Configure member group permissions for layout blocks and their elements

Layout blocks are page elements that are used to group other page elements on detail pages or on the dashboard. Layout blocks for the dashboard and detail pages have different sets of elements that they can include.

Availability of certain features on layout blocks or layout page elements is configured through the member group permissions. Thus, these page features are available only for portal members that were assigned to a portal member group for which these features are allowed.

Member group permissions for layout blocks

When you create or edit a layout block (a page with the icon for dashboard layout block or with the icon for the detail page layout block or with the icon for the detail page layout block), you can set up the following member group permissions:

  • Hide element - This setting hides the layout block from the parent page. It can be configured per member group. In the layout block page settings, on the General tab, in the Hide element setting, select one or several member groups, for which this layout block will be hidden. Alternatively, you can select the ~All~ check box to hide it for all member groups (without the necessity to select every member group's check box) or select the Hide element check box to have all member groups selected at once.
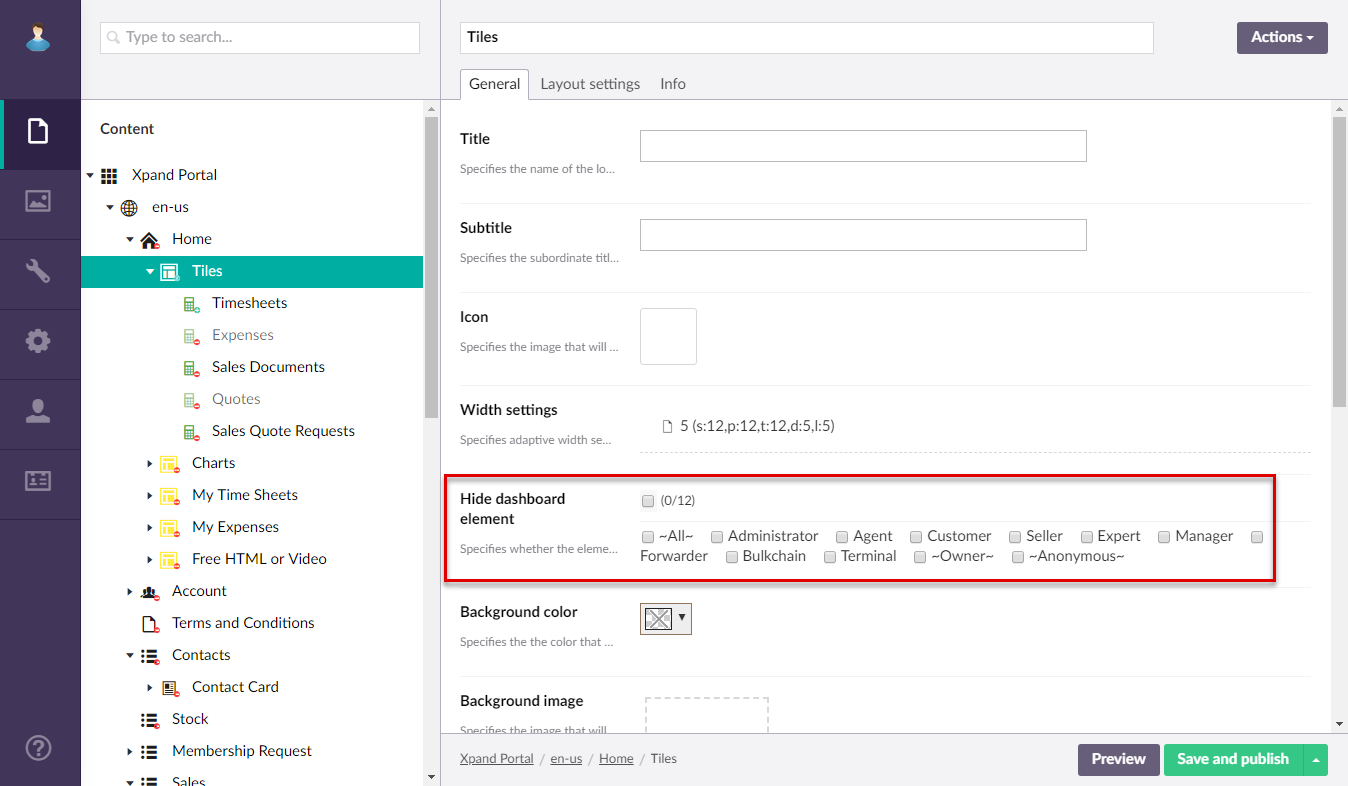
Whenever you make changes in page settings, ensure that you select Save and publish to save the changes and publish them on the front end. Optionally, if you were editing the page, you can select Save and preview to preview how the page will look like on the front end.

Member group permissions for dashboard layout block elements

When you create or edit a cue tile dashboard layout block element, which is used to provide a visual representation of aggregated data for an entity, you can set up the following member group permissions:

  • Hide element - This setting hides the layout block element from the dashboard page. It can be configured per member group. In the cue tile settings, on the General tab, in the Hide element setting, select one or several member groups, for which this cue tile will be hidden. Alternatively, you can select the ~All~ check box to hide it for all member groups (without the necessity to select every member group's check box) or select the Hide element check box to have all member groups selected at once.
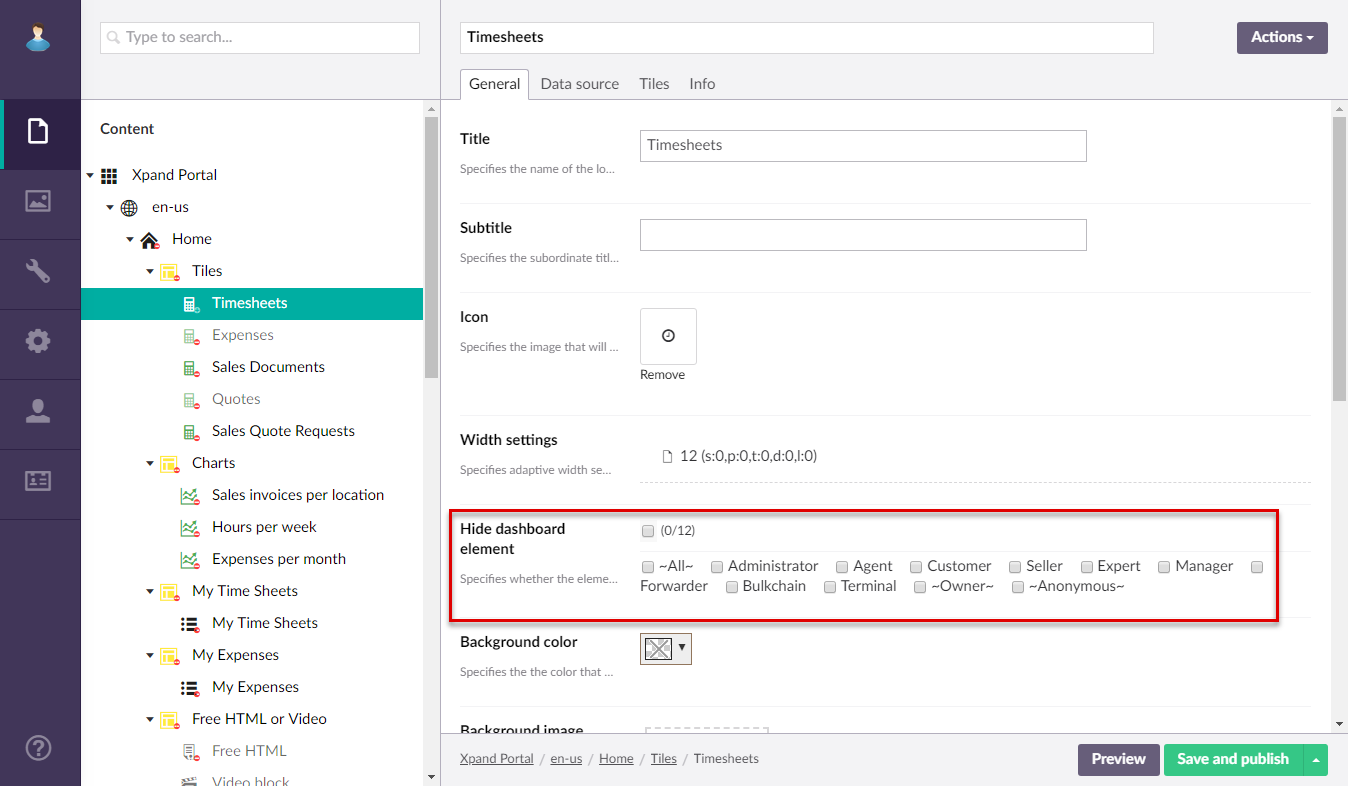
  Note

When you hide a layout block element, the empty place for this element is still occupied on the dashboard, and other elements are not moved to over this occupied place). If you want to free up this space or make your dashboard look tidy, you may want to delete the layout block element completely or change the position of the element on the dashboard so that it is not placed between other elements. This applies to all layout block elements that can be hidden. 

When you create or edit a gauge tile dashboard layout block element, which is used to measure and give a visual display of the amount, level, or contents of something, you can set up the following member group permissions:

  • Hide element - This setting hides the layout block element from the dashboard page. It can be configured per member group. In the gauge tile settings, on the General tab, in the Hide element setting, select one or several member groups, for which this gauge tile will be hidden. Alternatively, you can select the ~All~ check box to hide it for all member groups (without the necessity to select every member group's check box) or select the Hide element check box to have all member groups selected at once.

When you create or edit a grid dashboard layout block element, which is used to display a list of records, you can set up the same grid member group permissions as outside of the dashboard.

When you create or edit an HTML block dashboard layout block element, which is used to display simple content, you can set up the same simple content member group permissions as outside of the dashboard for simple content pages .

When you create or edit an image banner dashboard layout block element, which is used to add an image banner to the dashboard, you can set up the following member group permissions:

  • Hide element - This setting hides the layout block element from the dashboard page. It can be configured per member group. In the image banner settings, on the General tab, in the Hide element setting, select one or several member groups, for which this image banner will be hidden. Alternatively, you can select the ~All~ check box to hide it for all member groups (without the necessity to select every member group's check box) or select the Hide element check box to have all member groups selected at once.

When you create or edit a series chart dashboard layout block element, which is used to provide a visual representation of data in the form of a chart, you can set up the following member group permissions:

  • Hide element - This setting hides the layout block element from the dashboard page. It can be configured per member group. In the series chart settings, on the General tab, in the Hide element setting, select one or several member groups, for which this series chart will be hidden. Alternatively, you can select the ~All~ check box to hide it for all member groups (without the necessity to select every member group's check box) or select the Hide element check box to have all member groups selected at once.

  • Enable date range editing - This setting enables editing the date range for which data is displayed on the chart. To configure this setting per member group, in the series chart settings, on the Chart dates tab, in the Enable date range editing setting, select one or several member groups, for which this series chart will be hidden. Alternatively, you can select the ~All~ check box to hide it for all member groups (without the necessity to select every member group's check box) or select the Enable date range editing check box to have all member groups selected at once.

When you create or edit a video block dashboard layout block element, which is used to display a Youtube video on the dashboard, you can set up the following member group permissions:

  • Hide element - This setting hides the layout block element from the dashboard page. It can be configured per member group. In the video block settings, on the General tab, in the Hide element setting, select one or several member groups, for which this video block will be hidden. Alternatively, you can select the ~All~ check box to hide it for all member groups (without the necessity to select every member group's check box) or select the Hide element check box to have all member groups selected at once.

Member group permissions for detail page layout block elements

When you create or edit a cue tile detail page layout block element, which is used to provide a visual representation of aggregated data for an entity, you can set up the following member group permissions:

  • Hide element - This setting hides the layout block element from the detail page. It can be configured per member group. In the cue tile settings, on the General tab, in the Hide element setting, select one or several member groups, for which this cue tile will be hidden. Alternatively, you can select the ~All~ check box to hide it for all member groups (without the necessity to select every member group's check box) or select the Hide element check box to have all member groups selected at once.

  Note

When you hide a layout block element, the empty place for this element is still occupied on the dashboard, and other elements are not moved to over this occupied place). If you want to free up this space or make your dashboard look tidy, you may want to delete the layout block element completely or change the position of the element on the dashboard so that it is not placed between other elements. This applies to all layout block elements that can be hidden.

When you create or edit a field set detail page layout block element, which is used to display a group of fields from the related grid page, you can set up the following member group permissions:

  • Hide element - This setting hides the layout block element from the detail page. It can be configured per member group. In the field set settings, on the General tab, in the Hide element setting, select one or several member groups, for which this field set will be hidden. Alternatively, you can select the ~All~ check box to hide it for all member groups (without the necessity to select every member group's check box) or select the Hide element check box to have all member groups selected at once.

  • Field editability in an existing record - This setting specifies whether it will be possible to edit the value of a field on the detail page when an existing record is being edited. To configure editability per member group, in the field set settings, on the Fields tab, under Fields, select a field, and then, under Editable on edit page, select one or several member groups, for which this field will be editable on page edit. Alternatively, you can select the ~All~ check box to make it editable for all member groups (without the necessity to select every member group's check box) or select the Editable on edit page check box to have all member groups selected at once.

  • Field editability in a new record - This setting specifies whether it will be allowed to edit the field when a new record is created with this field (and edited on the detail page). To configure this setting per member group, in the field set settings, on the Fields tab, under Fields, select a field, and then, under Editable on create page check box to allow editing this field in new records for all member groups (without the necessity to select every member group's check box) or select the Editable on create page check box to have all member groups selected at once.

When you create or edit a gauge tile detail page layout block element, which is used to measure and give a visual display of the amount, level, or contents of something, you can set up the following member group permissions:

  • Hide element - This setting hides the layout block element from the detail page. It can be configured per member group. In the gauge tile settings, on the General tab, in the Hide element setting, select one or several member groups, for which this gauge tile will be hidden. Alternatively, you can select the ~All~ check box to hide it for all member groups (without the necessity to select every member group's check box) or select the Hide element check box to have all member groups selected at once.

When you create or edit a grid detail layout block element, which is used to display a list of records, you can set up the same grid member group permissions as outside of the dashboard.

When you create or edit a series chart detail layout block element, which is used to provide a visual representation of data in the form of a chart, you can set up the following member group permissions:

  • Hide element - This setting hides the layout block element from the dashboard page. It can be configured per member group. In the series chart settings, on the General tab, in the Hide element setting, select one or several member groups, for which this series chart will be hidden. Alternatively, you can select the ~All~ check box to hide it for all member groups (without the necessity to select every member group's check box) or select the Hide element check box to have all member groups selected at once.

  • Enable date range editing - This setting enables editing the date range for which data is displayed on the chart. To configure this setting per member group, in the series chart settings, on the Chart dates tab, in the Enable date range editing setting, select one or several member groups, for which this series chart will be hidden. Alternatively, you can select the ~All~ check box to hide it for all member groups (without the necessity to select every member group's check box) or select the Enable date range editing check box to have all member groups selected at once.

When you create or edit a wizard field block detail page layout block element, which is used to add fields to a detail page, you can set up the following member group permissions:

  • Hide element - This setting hides the layout block element from the detail page. It can be configured per member group. In the wizard block settings, on the General tab, in the Hide element setting, select one or several member groups, for which this wizard block will be hidden. Alternatively, you can select the ~All~ check box to hide it for all member groups (without the necessity to select every member group's check box) or select the Hide element check box to have all member groups selected at once.

  • Field editability in an existing record - This setting specifies whether it will be possible to edit the value of a field on the detail page when an existing record is being edited. To configure editability per member group, in the field set settings, on the Fields tab, under Fields, select a field, and then, under Editable on edit page, select one or several member groups, for which this field will be editable on page edit. Alternatively, you can select the ~All~ check box to make it editable for all member groups (without the necessity to select every member group's check box) or select the Editable on edit page check box to have all member groups selected at once.

  • Field editability in a new record - This setting specifies whether it will be allowed to edit the field when a new record is created with this field (and edited on the detail page). To configure this setting per member group, in the field set settings, on the Fields tab, under Fields, select a field, and then, under Editable on create page check box to allow editing this field in new records for all member groups (without the necessity to select every member group's check box) or select the Editable on create page check box to have all member groups selected at once.

Whenever you make changes in page settings, ensure that you select Save and publish to save the changes and publish them on the front end. Optionally, if you were editing the page, you can select Save and preview to preview how the page will look like on the front end.