SMTP settings
Simple Mail Transfer Protocol (SMTP) settings are your outgoing email server settings. This particular protocol only works for outgoing messages and is used with various portal features that send emails from the portal, such as sending records by email, password recovery, and email notifications about changes on records a member is subscribed to.
|
For OAuth 2.0 authentication, before configuring the SMTP settings in the portal backoffice, you need to configure the identity provider that you're going to use on the corresponding provider's site. |
To configure SMTP settings in the portal backoffice
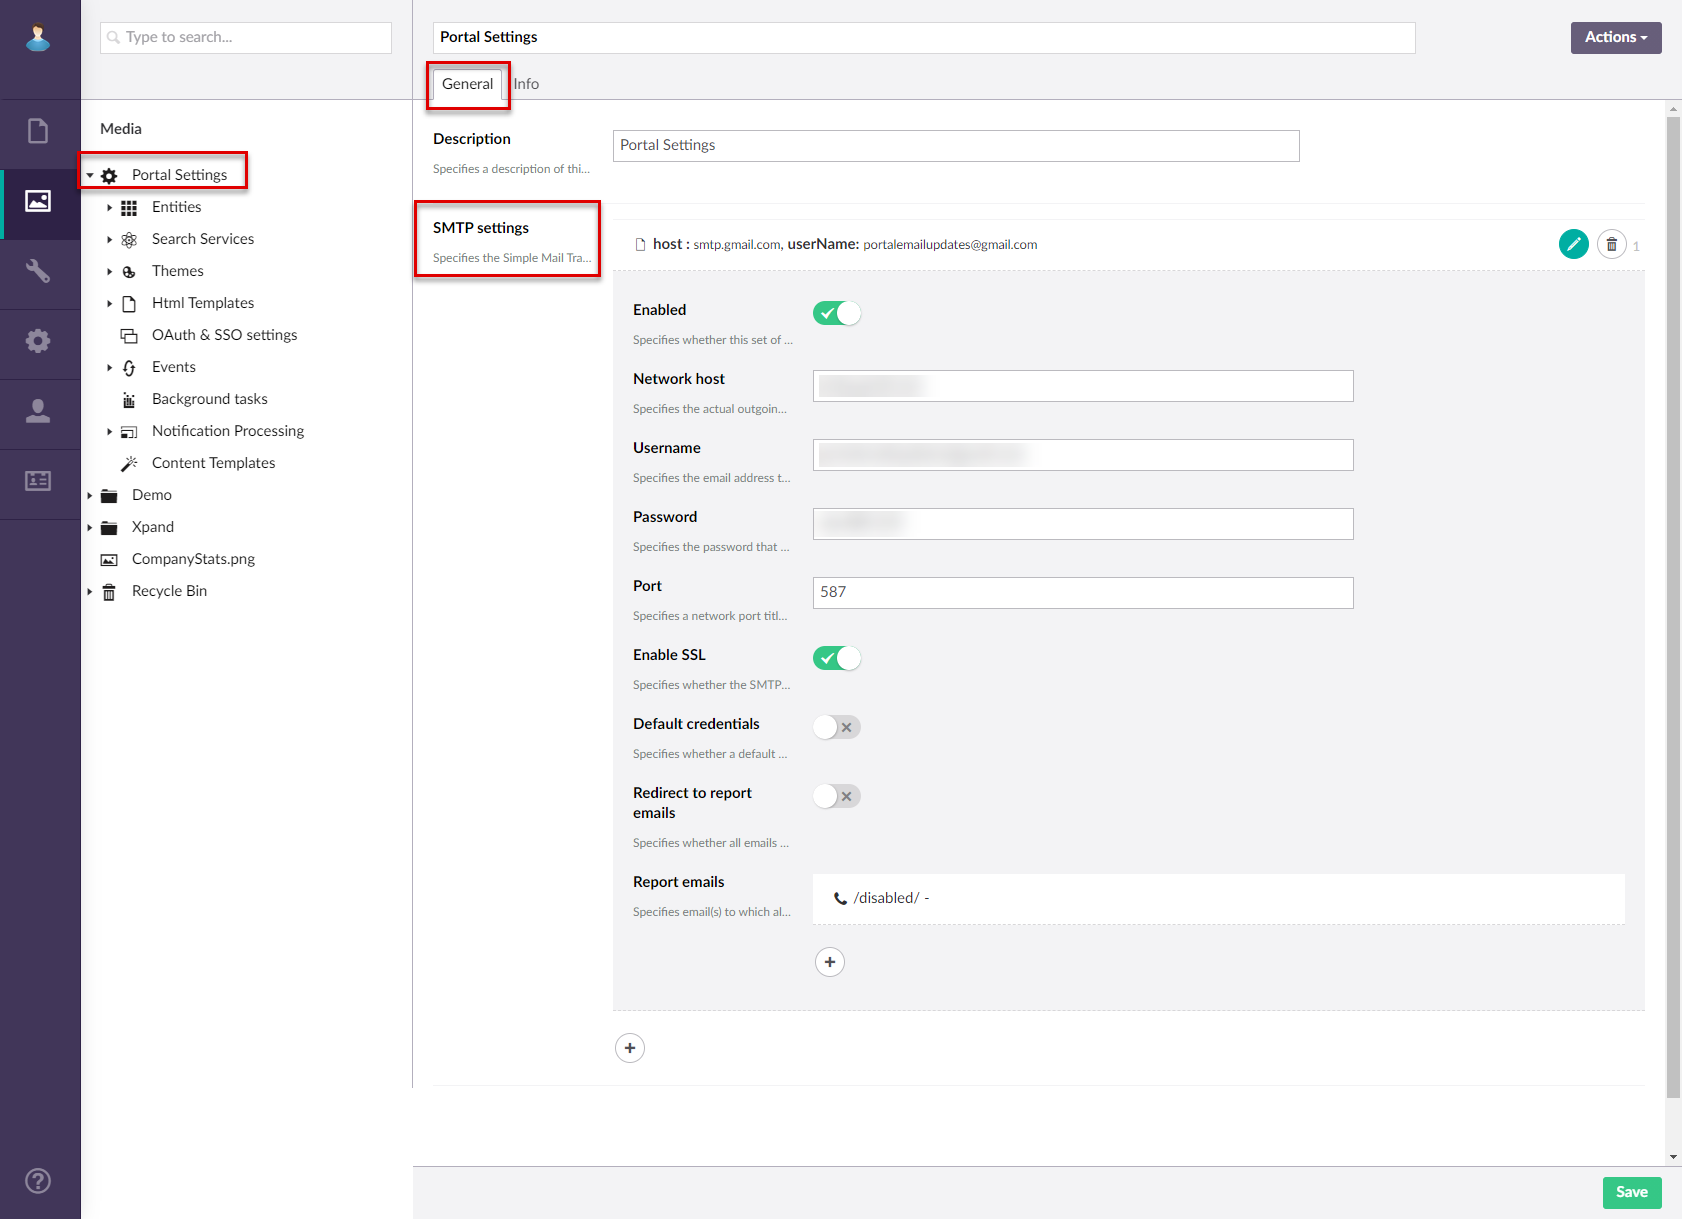
- In the backoffice, go to Media > Site settings.
- On the General tab, under SMTP settings, select Add content to create a new set of settings, or edit existing settings.
- Select the authentication method:
- Legacy password-based authentication
- OAuth 2.0 authentication (recommended)
- Fill in the fields as described below.
- If you selected Legacy password-based authentication:
- Enabled - Specifies whether this set of SMTP settings will be enabled. If you have multiple SMTP setting sets enabled, the first set of settings will be used.
- Email category - Specifies the category of emails that this SMTP setting set will be used for.
The first found enabled SMTP setting set for each email category will be used. We recommend configuring a separate set of settings for each category. If the portal cannot find separate settings for the Notifications or Administration category, the General category will be used.- Administration: For administration emails only.
- General: For all portal emails except administration- and notification-related emails.
- Notifications: For email notifications only.
- Network host - Specifies the actual outgoing email server hostname that is an individual one for each provider. For example, smtp-mail.outlook.com; smtp.gmail.com.
- Authorization email - Specifies the email address that is used for authorization with this identity provider.
- Send-from email - Specifies the email address that will be used to send emails from.
- Password - Specifies the password of the email address specifies in the Username setting.
- Port - Specifies the port through which emails will be sent. Port 587 is recommended for secure connection.
- Enable SSL - Specifies whether the SMTP connection will be secured with SSL.
- Default credentials - Specifies whether the default credentials (username and password) will be used instead of the credentials specifies in this settings set.
- Redirect to report email - Specifies whether all emails sent by the portal will be redirected to the email(s) specified in the Report emails setting. Redirecting emails is useful for testing purposes.
- Report emails - Specifies email(s) to which all emails sent by the portal will be redirected if the Redirect to report emails setting is enabled. You can set up multiple report emails.
- Email – Specifies the email to which all emails sent by the portal will be redirected if the Redirect to report emails setting is enabled.
- Enabled – Specifies whether this report is enabled. Use this switch to temporarily disable a report email without having to remove the settings.
- If you selected OAuth 2.0 authentication
- Enabled - Specifies whether this set of SMTP settings will be enabled. If you have multiple SMTP setting sets enabled, the first set of settings will be used.
- Email category - Specifies the category of emails that this SMTP setting set will be used for.
The first found enabled SMTP setting set for each email category will be used. We recommend configuring a separate set of settings for each category. If the portal cannot find separate settings for the Notifications or Administration category, the General category will be used.- Administration: For administration emails only.
- General: For all portal emails except administration- and notification-related emails.
- Notifications: For email notifications only.
- Identity provider - Specifies the service that provides OAuth 2.0 authentication services. Select Google or Microsoft Entra ID. A custom identity provider can be added as part of customization.
- Network host - Specifies the actual outgoing email server hostname that is an individual one for each provider. For example, smtp-mail.outlook.com; smtp.gmail.com.
- For Microsoft Entra ID: enter smtp.office365.com
- Token issue method - Specifies the method that defines the flow of issuing a token by the identity provider:
- Authorization code - For issuing a token, an authorization code is used. If this method is used, you will need to obtain the refresh token in the Refresh token setting using the Authorize action next to it.
- Client credentials - The client credentials are used to issue a token.
- Password - A password is used to issue a token. If this method is used, in the Password setting, you will need to specify the password of the account that was used for configuring the corresponding identity provider.
- For Microsoft Entra ID: use the Authorization code (preferred) or Password method.
- For Google: only the Authorization code method is supported
- Authorization email - Specifies the email address that is used for authorization with this identity provider.
- Send-from email - Specifies the email address that will be used to send emails from.
- Password - Specifies the password of the email address specifies in the Username setting. With OAuth 2.0 authentication, this setting is filled in only when the Token issue method setting is set to Password.
- Port - Specifies the port through which emails will be sent. Port 587 is recommended for secure connection.
- For Microsoft Entra ID: enter 465 (for SSL) or 587 (for STARTTLS, which is preferred for Microsoft Exchange)
- For Google: enter 465 (for SSL, preferred for Google) or 587 (for STARTTLS)
- Default credentials - Specifies whether the default credentials (username and password) will be used instead of the credentials specifies in this settings set.
- Redirect to report email - Specifies whether all emails sent by the portal will be redirected to the email(s) specified in the Report emails setting. Redirecting emails is useful for testing purposes.
- Report emails - Specifies email(s) to which all emails sent by the portal will be redirected if the Redirect to report emails setting is enabled. You can set up multiple report emails.
- Email – Specifies the email to which all emails sent by the portal will be redirected if the Redirect to report emails setting is enabled.
- Enabled – Specifies whether this report is enabled. Use this switch to temporarily disable a report email without having to remove the settings.
- Client ID - Specifies the client ID that was obtained for this portal application on the identity provider site.
- Client secret - Specifies the client secret that was obtained for this portal application on the identity provider site.
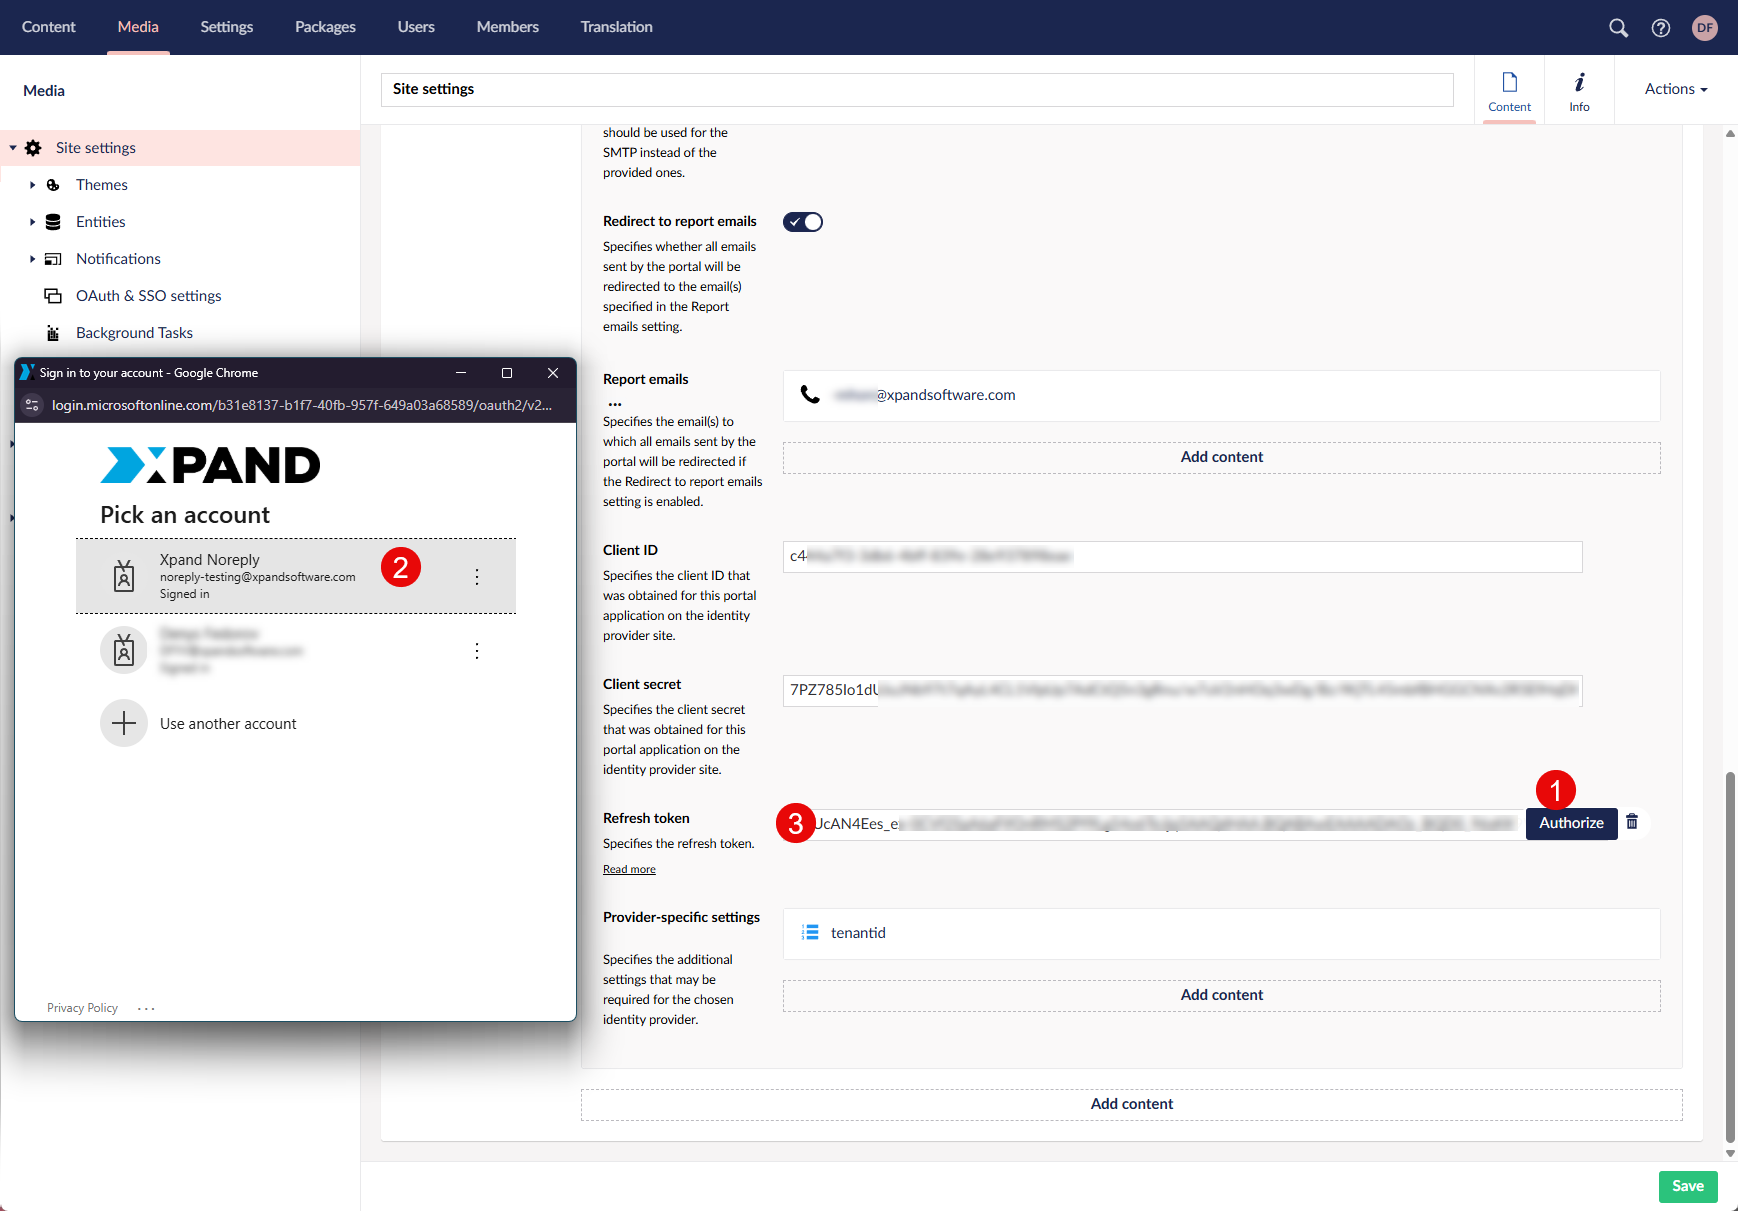
- Refresh token - Specifies the refresh token. Refresh tokens are issued to the client by the authorization server and are used to obtain a new access token when the current access token becomes invalid or expires, or to obtain additional access tokens with identical or narrower scope (access tokens may have a shorter lifetime and fewer permissions than authorized by the resource owner).
This setting is used when the Token issue method setting is set to Authorization code. To get a refresh token from the identity provider, after you have set up the Client ID, Client secret and (in case of Microsoft Entra ID), the Tenant ID settings, select the Authorize action and authorize a Microsoft/Google account with the corresponding identity provider. The account must have the appropriate permissions to send emails. Once you sign in, follow the instructions on screen and, if asked, grant permissions that the identity provider requests. As a result, the refresh token is issued by the identity provider and automatically filled in this setting.
 Note
NoteThe refresh token must be re-authorized every time you enter a new client secret (for example, because the previous client secret has expired and needs to be updated).
- Provider-specific settings - Specifies the additional settings that may be required for the chosen identity provider.
- Setting name - Specifies the name of the setting for which the value must be specified in the Value setting.
- Value - Specifies the value for the selected setting.
- Comment - Specifies a description of the external service. You can use this field to add a note about the setting if necessary.
Note
In provider-specific settings, you need to configure the following:
For the Microsoft Entra ID identity provider:
- Tenant ID (required)
- Scope (optional) - defines the permissions (what can be accessed)
- OAuth prompt type (optional) - Specifies what will be shown during authorization. Supported values:
- login – A sign-in window is shown during authorization where the user needs to enter account credentials.
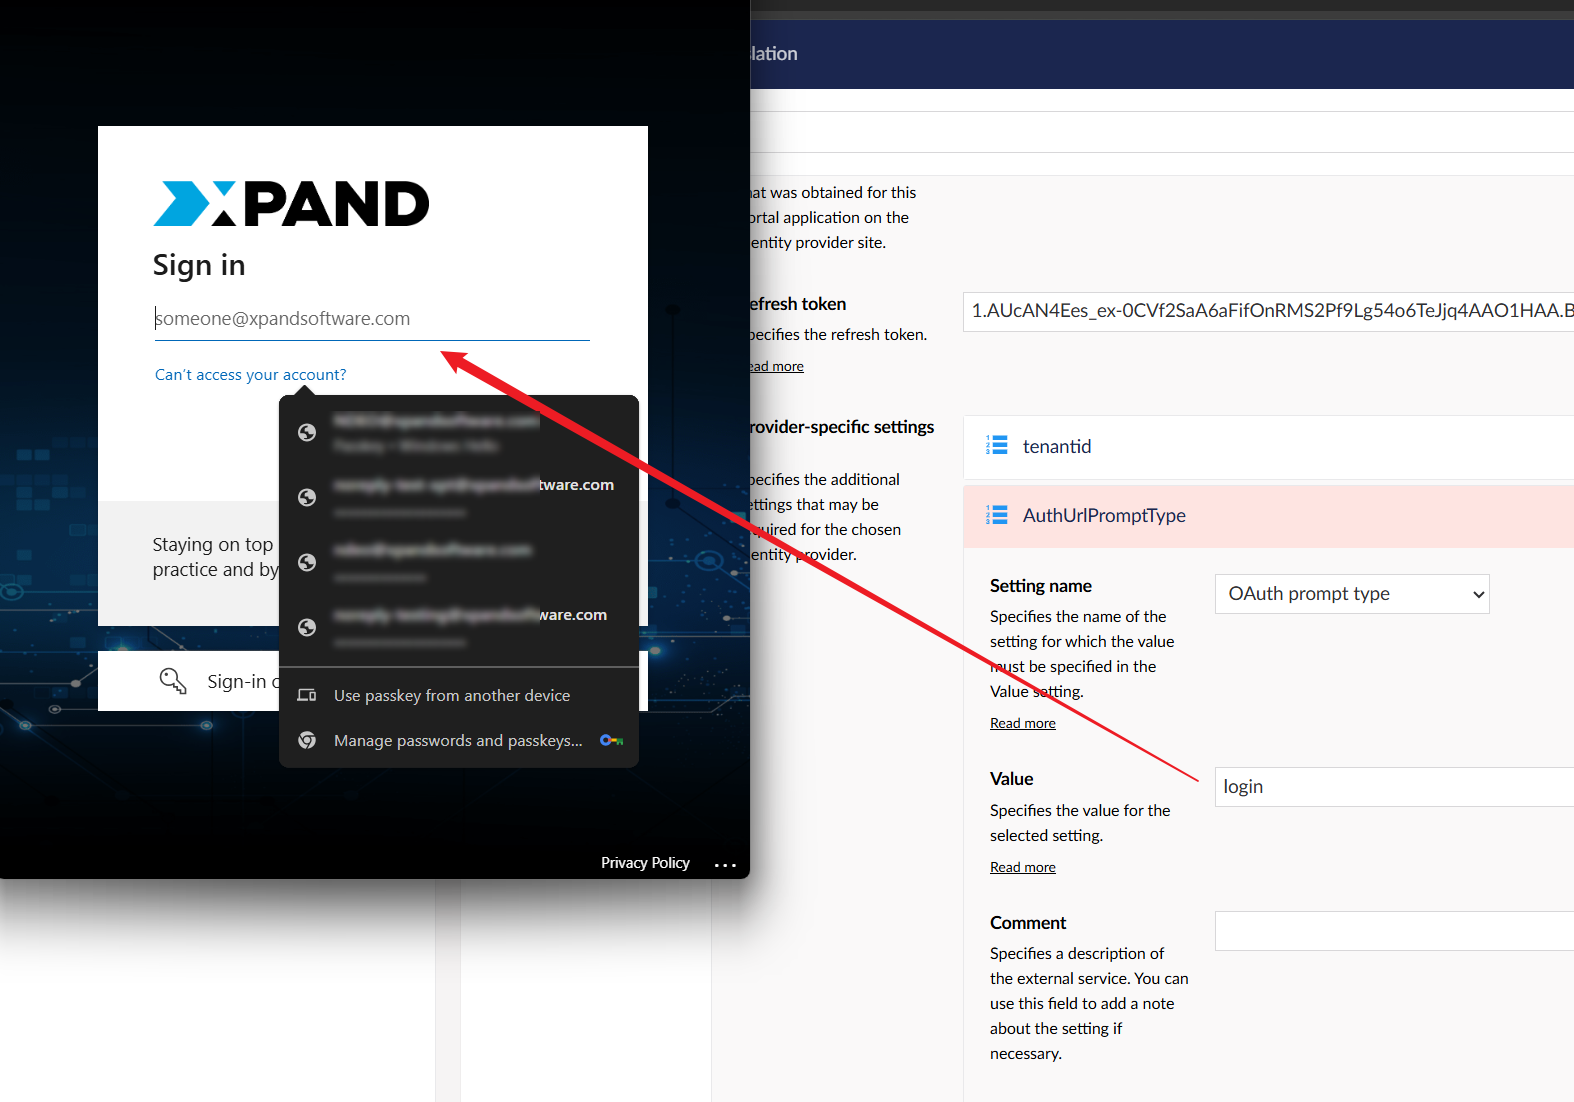
- select_account - An account selection window is shown during authorization where the user selects an account to sign in with. This type is used by default if the OAuth prompt type setting is not configured.
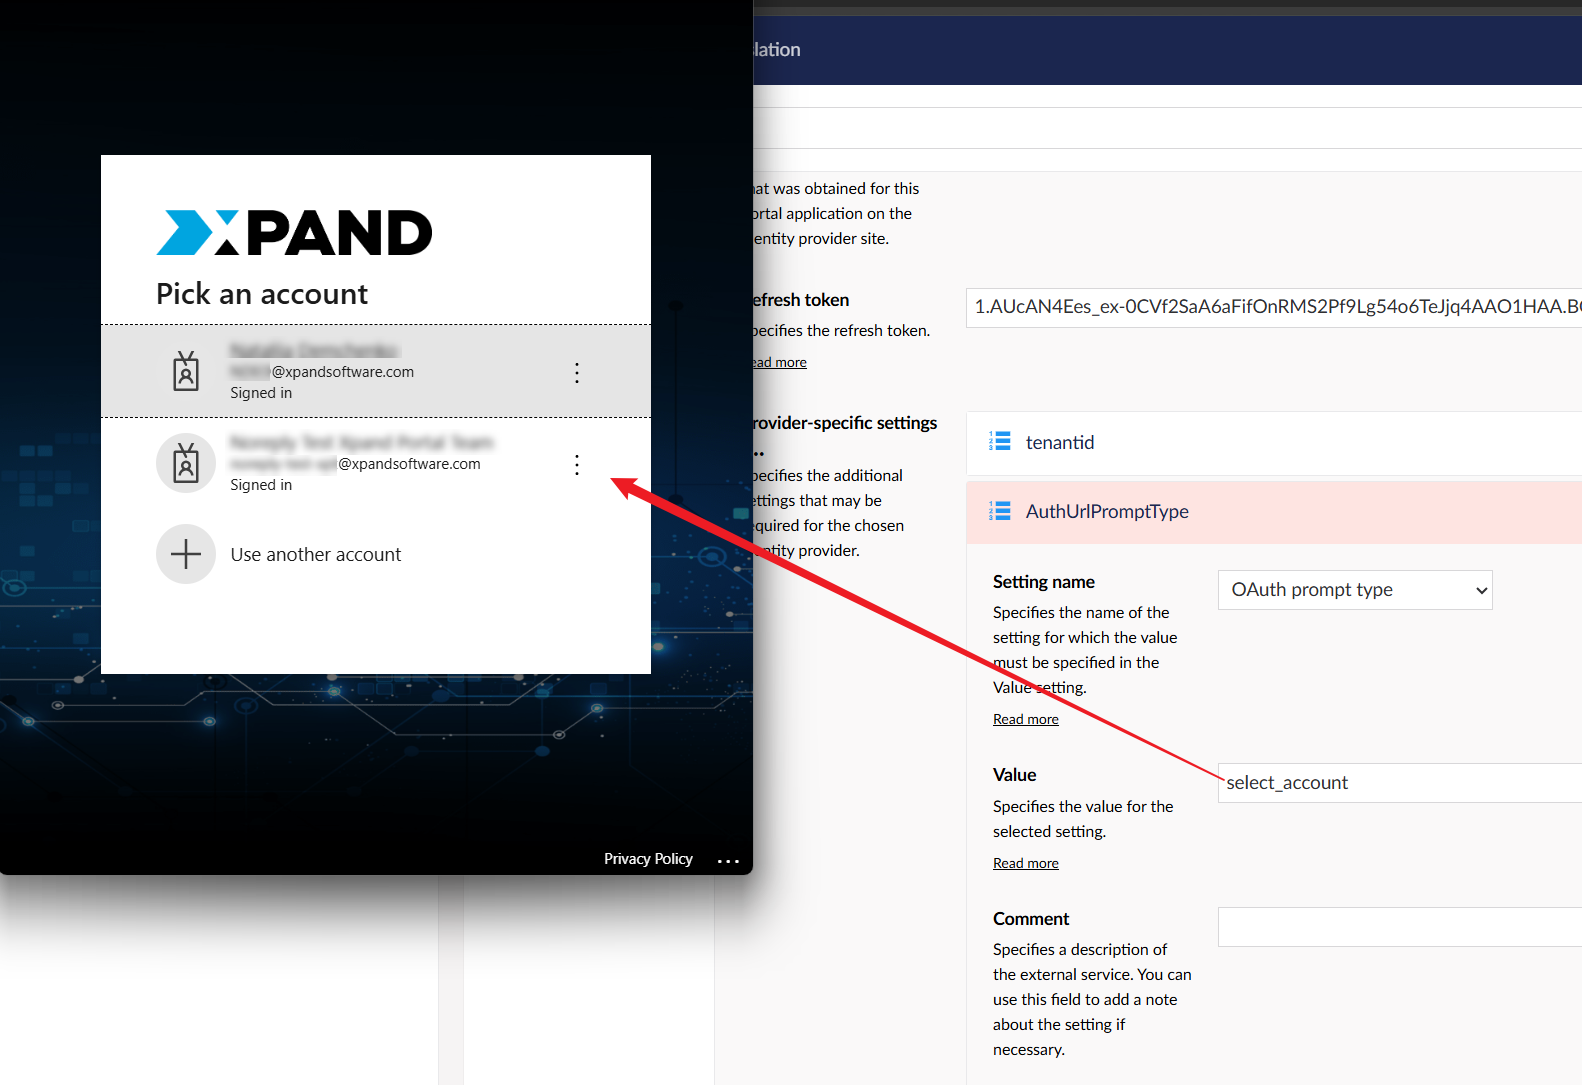
- consent - A request window is shown during authorization where the user needs to grant permissions to the app.
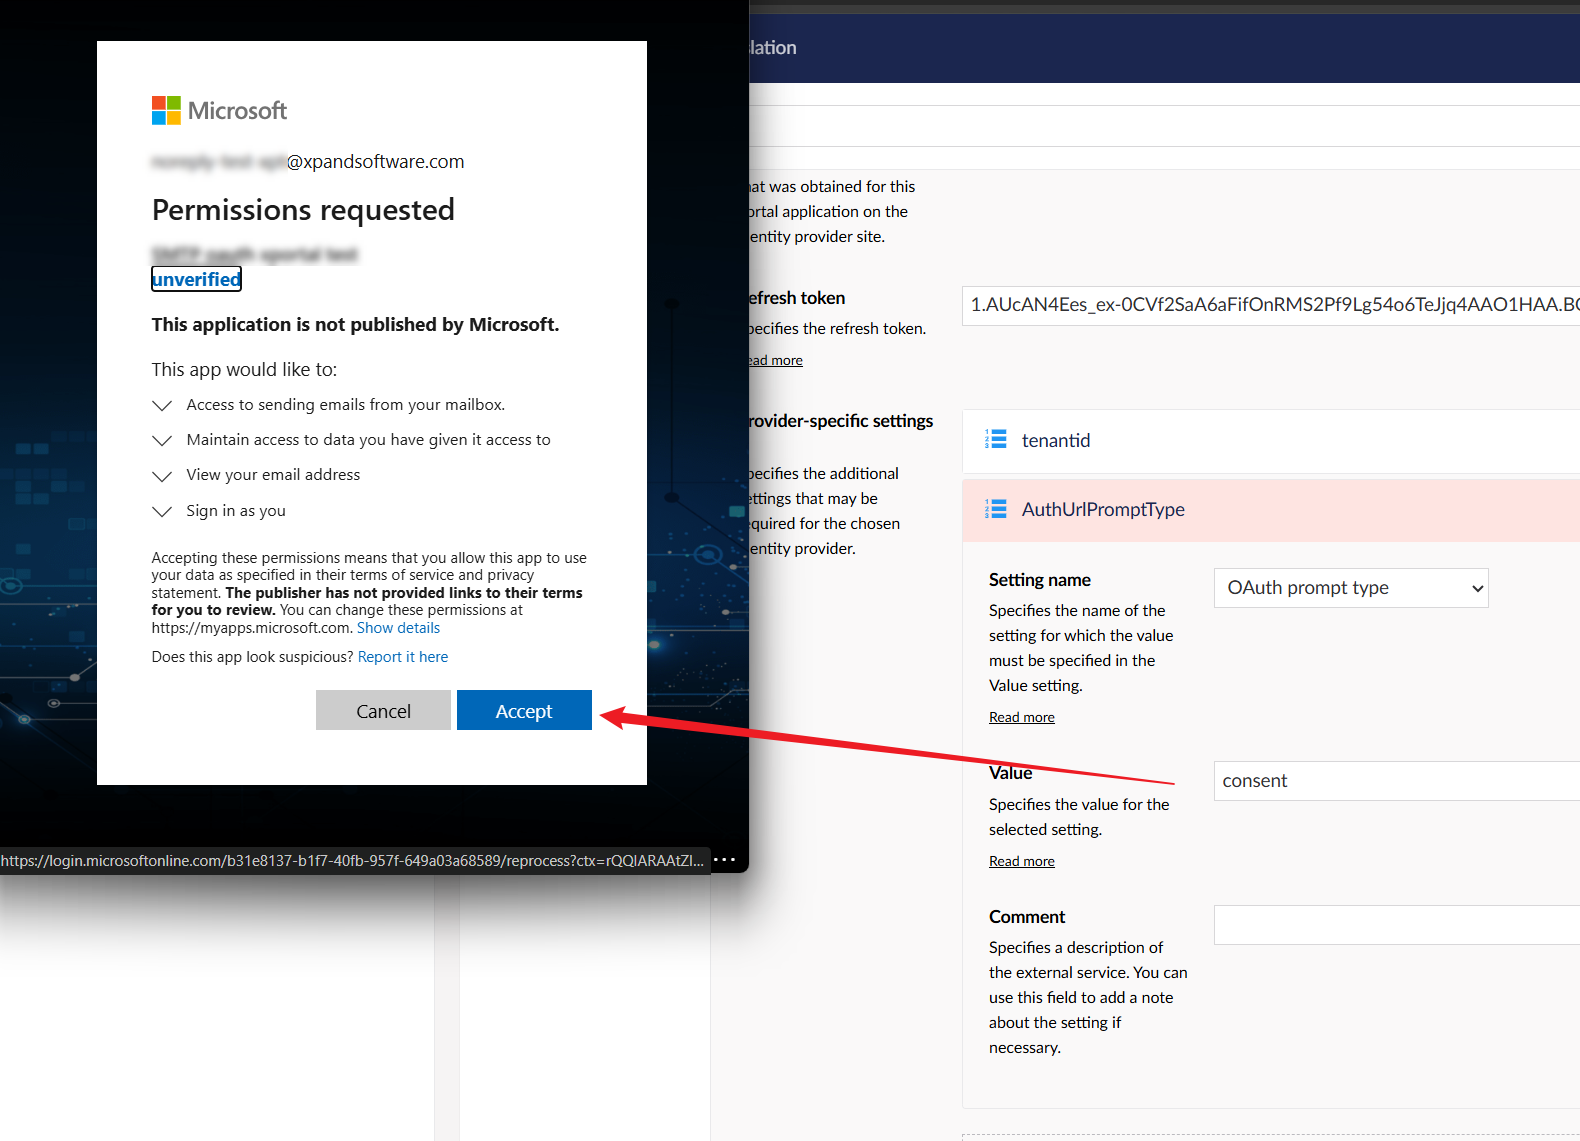
Note that the standard none OAuth prompt type type is not used in Xpand Portal.
- login – A sign-in window is shown during authorization where the user needs to enter account credentials.
For the Google provider:
- Scope (optional)
- OAuth prompt type (optional) - Specifies what will be shown during authorization. Supported values:
- login – A sign-in window is shown during authorization where the user needs to enter account credentials.
- select_account - An account selection window is shown during authorization where the user selects an account to sign in with. This type is used by default if the OAuth prompt type setting is not configured.
- consent - A request window is shown during authorization where the user needs to grant permissions to the app.
Note that the standard none OAuth prompt type type is not used in Xpand Portal.
Also, for some identity providers, you may need to configure Access token URL template (not necessary for Microsoft Entra ID or Google). This URL template may include variables, such as the variable for tenant ID. For example:
https://login.microsoftonline.com/{tenantId}/oauth2/v2.0/token
- If you selected Legacy password-based authentication:
- Optionally, create an alternative set of of SMTP settings. Only one set of SMTP settings can be enabled at a time; if you have multiple SMTP setting sets enabled, the first set of settings will be used. However, you can have separate settings for each email category.
- In the backoffice, select Settings > More > Reload Application for changes in the SMTP settings to take effect.
Set up identity providers for SMTP
Before configuring OAuth 2.0 authentication in the SMTP settings of the portal backoffice, you must set up an identity provider that you are going to use for your SMTP authentication on their site. For OAuth 2.0 authentication SMTP configuration on the portal side, you will need certain values, such as the client ID, client secret, and tenant ID that you can obtain while configuring the identity providers, therefore, make sure you save them.
Configure Microsoft Entra ID for SMTP
To configure Microsoft Entra ID for SMTP authentication:
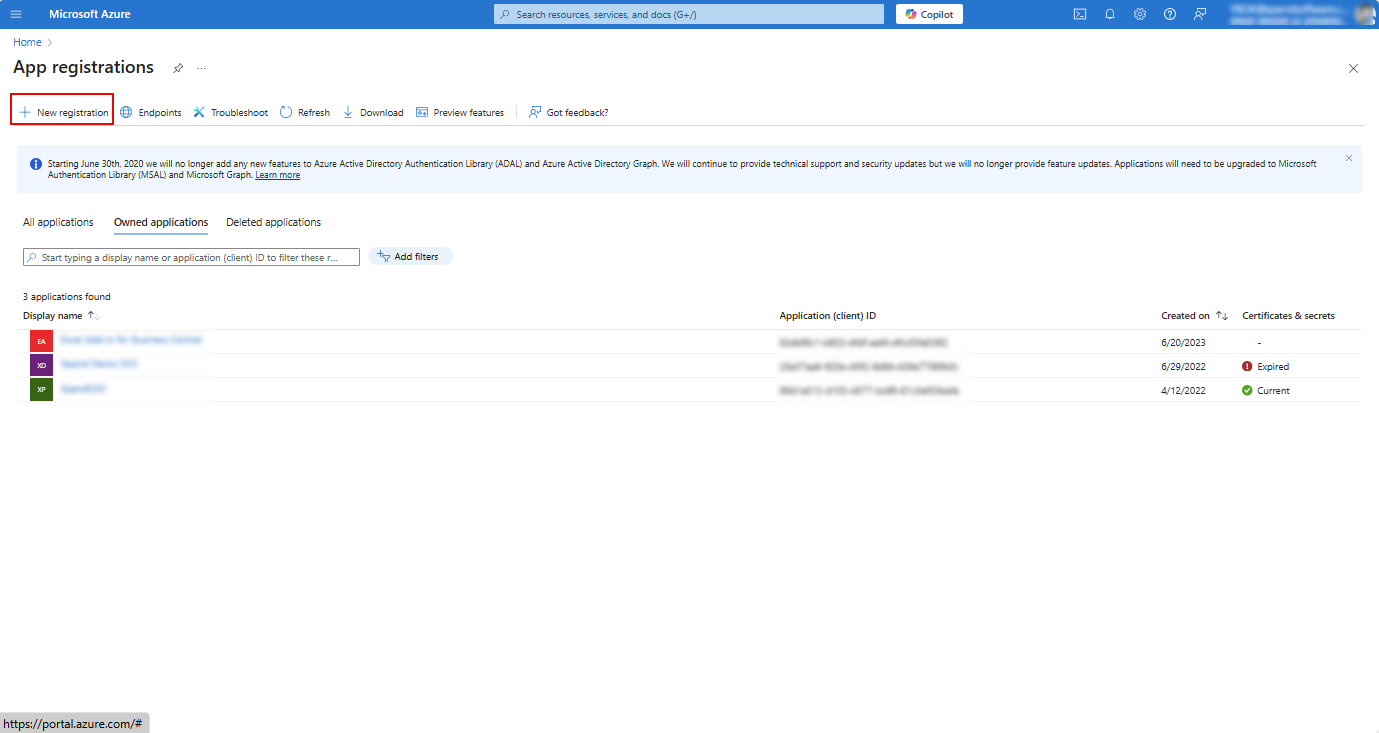
- Go to App registrations in the Azure portal. If needed, sign in with a Microsoft account that has administrator permissions.
Note
If you already have a registered app for your portal (which was created and configured, for example, for the SSO functionality), you don't need to create another app registration. In this case, skip the next step, and then expand the existing app configuration with additional setting that are required for SMTP authentication.
- Create a new app registration:
- Select New registration, then enter an application name.
 Note
NoteOnly Microsoft accounts with administrator permissions can create new app registrations.
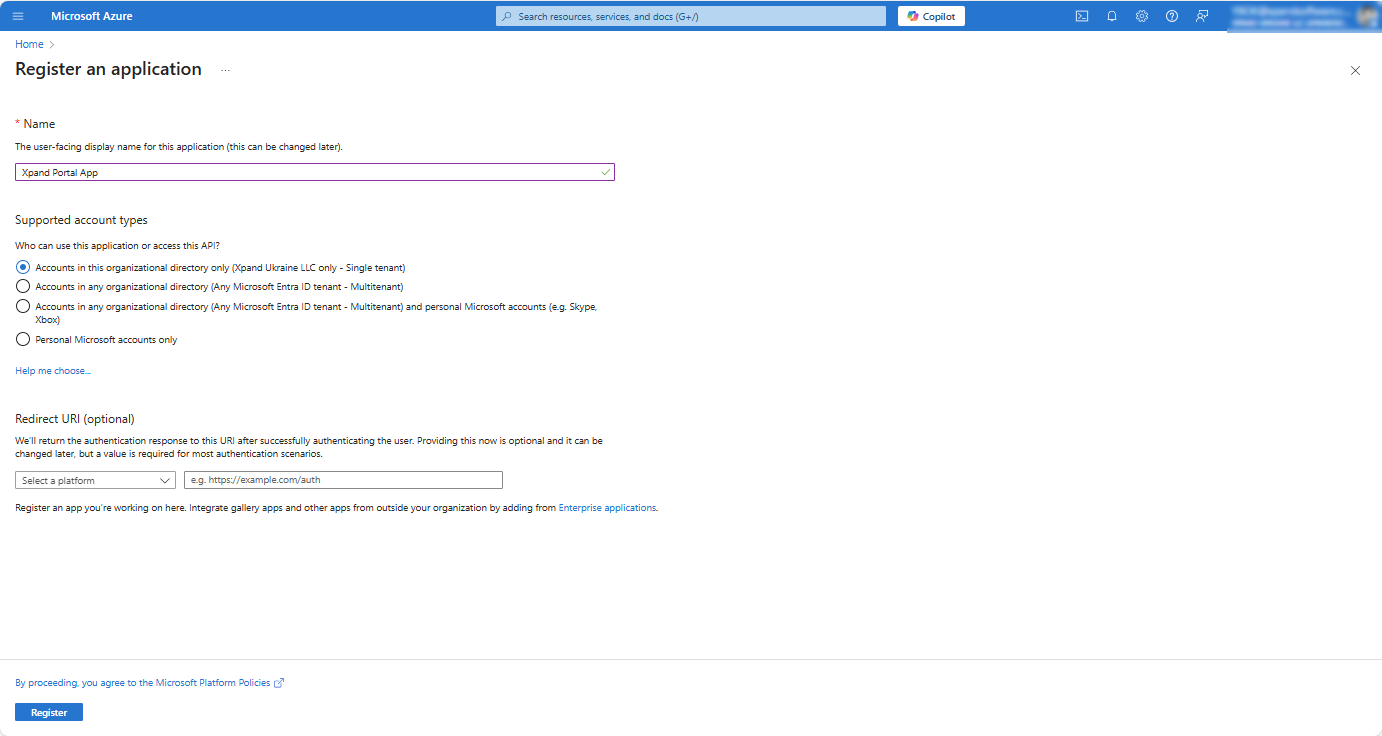
- In the Register an application window, enter the name of the application (leave the Redirect URI section empty for now), and then select Register.
- Select New registration, then enter an application name.
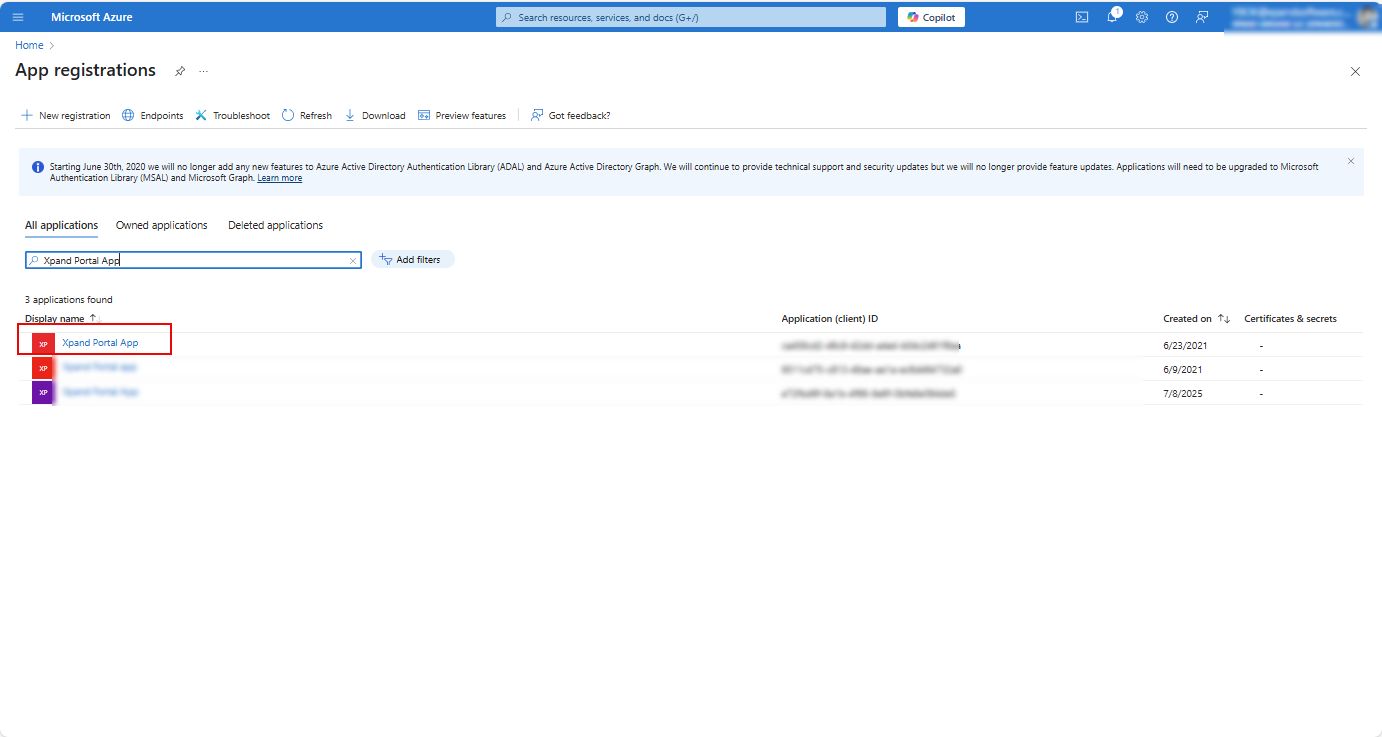
- In the App registrations window, open the registered app by selecting its name in the app list.
- Add a client secret. If your portal app has already been registered before with a client secret added, you can skip this step (in this case, contact your administrator to get the client secret value because you will need it later when configuring SMTP in the Xpand Portal backoffice).
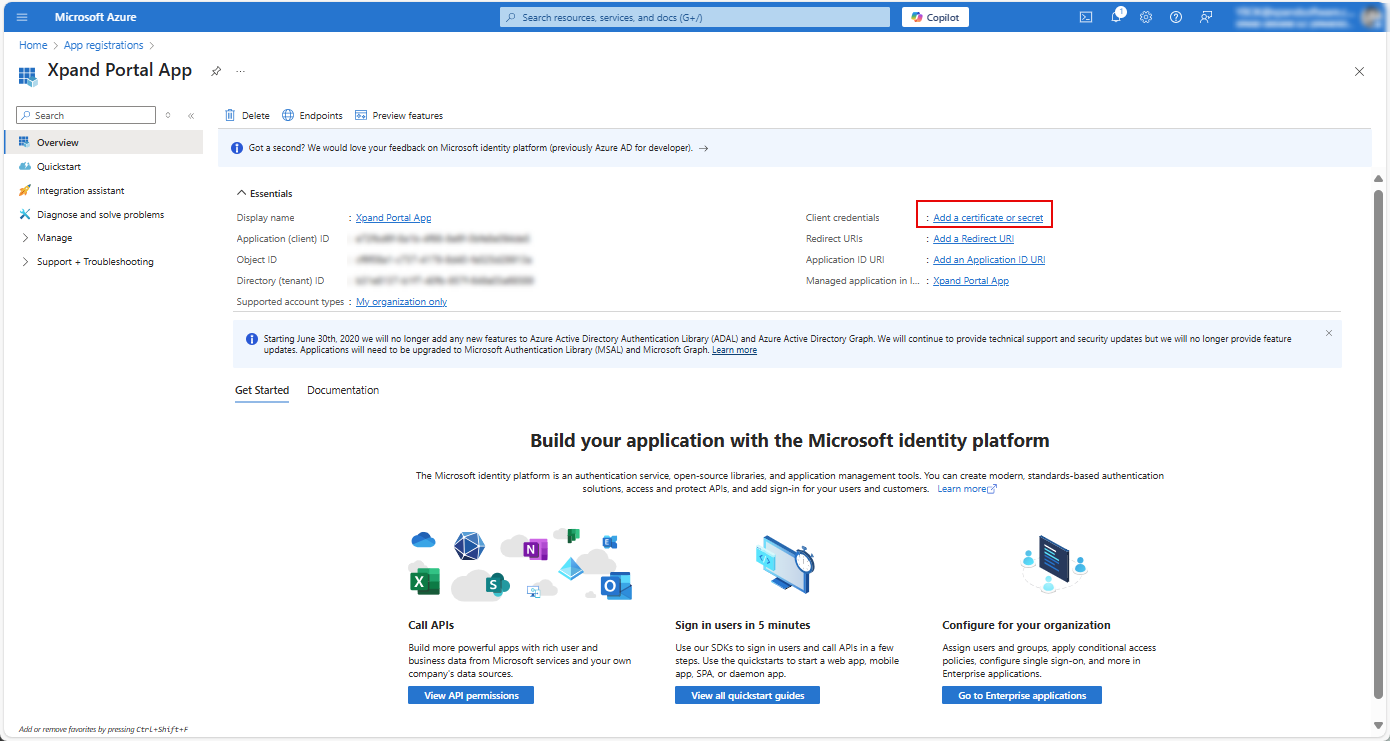
- In the Overview section, select Add a certificate or secret next to Client credentials.
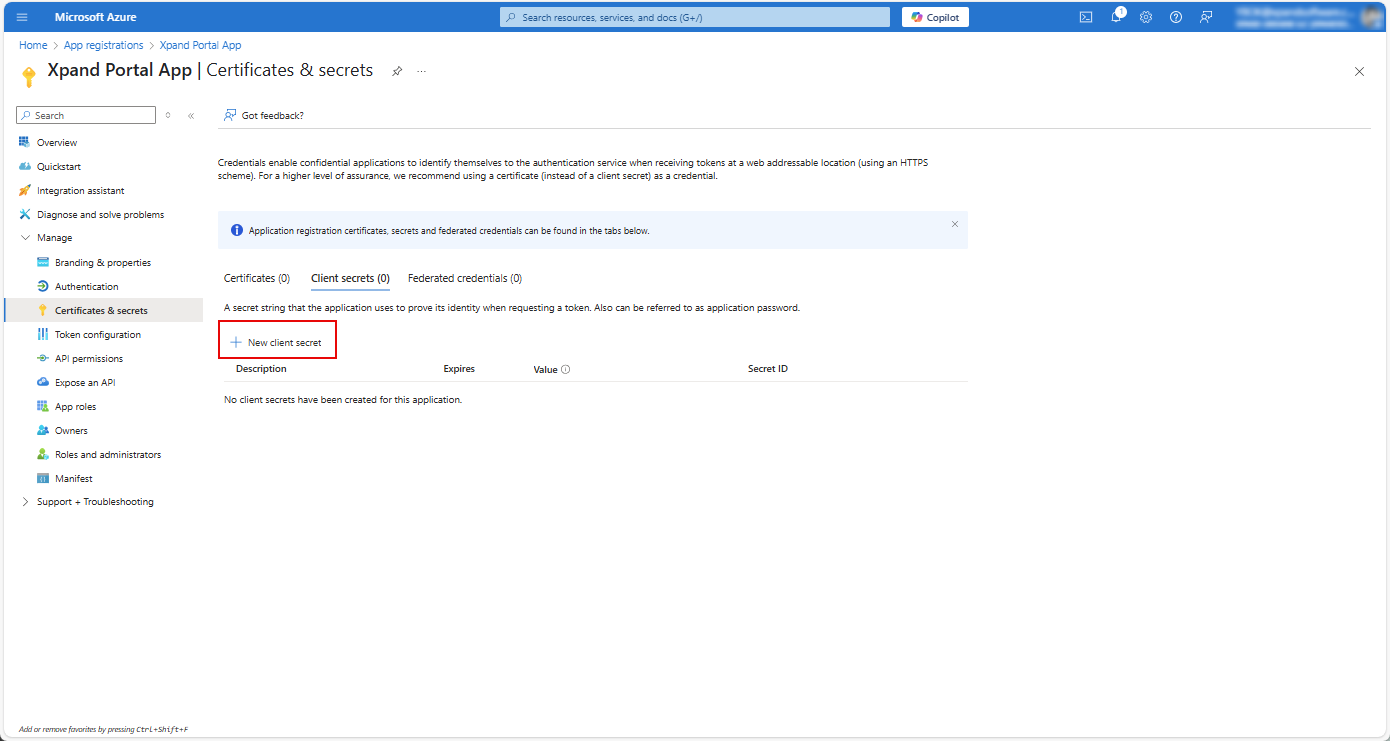
- In the Certificates & secrets window that opens, under Client secrets, select New client secret.
- In the Add a client secret window, fill in the required fields, and then select Add.
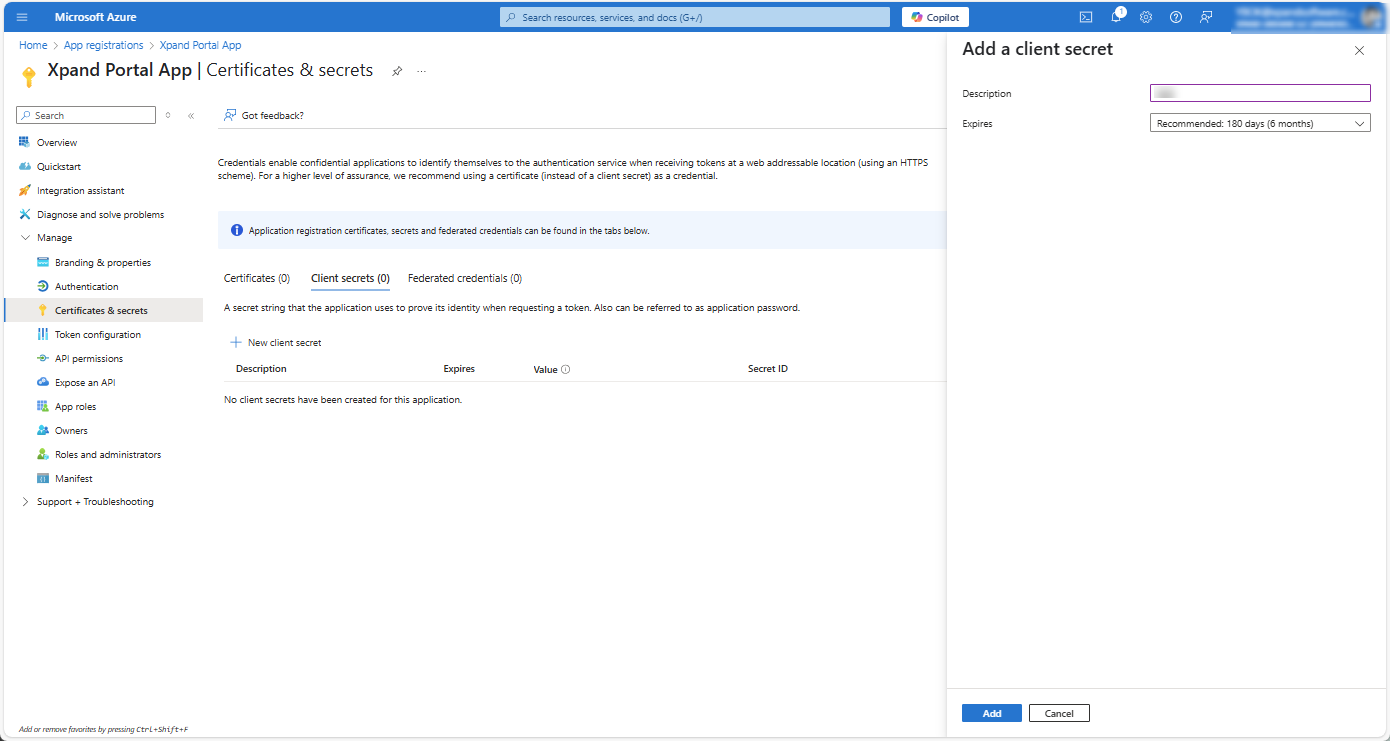
- Copy the client secret from the Value field as you will need it for further configuration of the SSO settings on Xpand Portal.

 Important
- Make sure to copy the client secret from the Value field as you will not be able to access it in future.
- Note the client secret expiration date in the Expires column—you will need to create a new client secret after that date, otherwise, the portal will not be able to send emails.
- In the Overview section, select Add a certificate or secret next to Client credentials.
- In the navigation pane on the left, select Overview and copy the client ID from the Application (Client) ID field as well as tenant ID from the Directory (tenant) ID field as you will need them for further configuration of the SMTP settings in the Xpand Portal backoffice.

- Select Add a Redirect URI next to Redirect URIs.

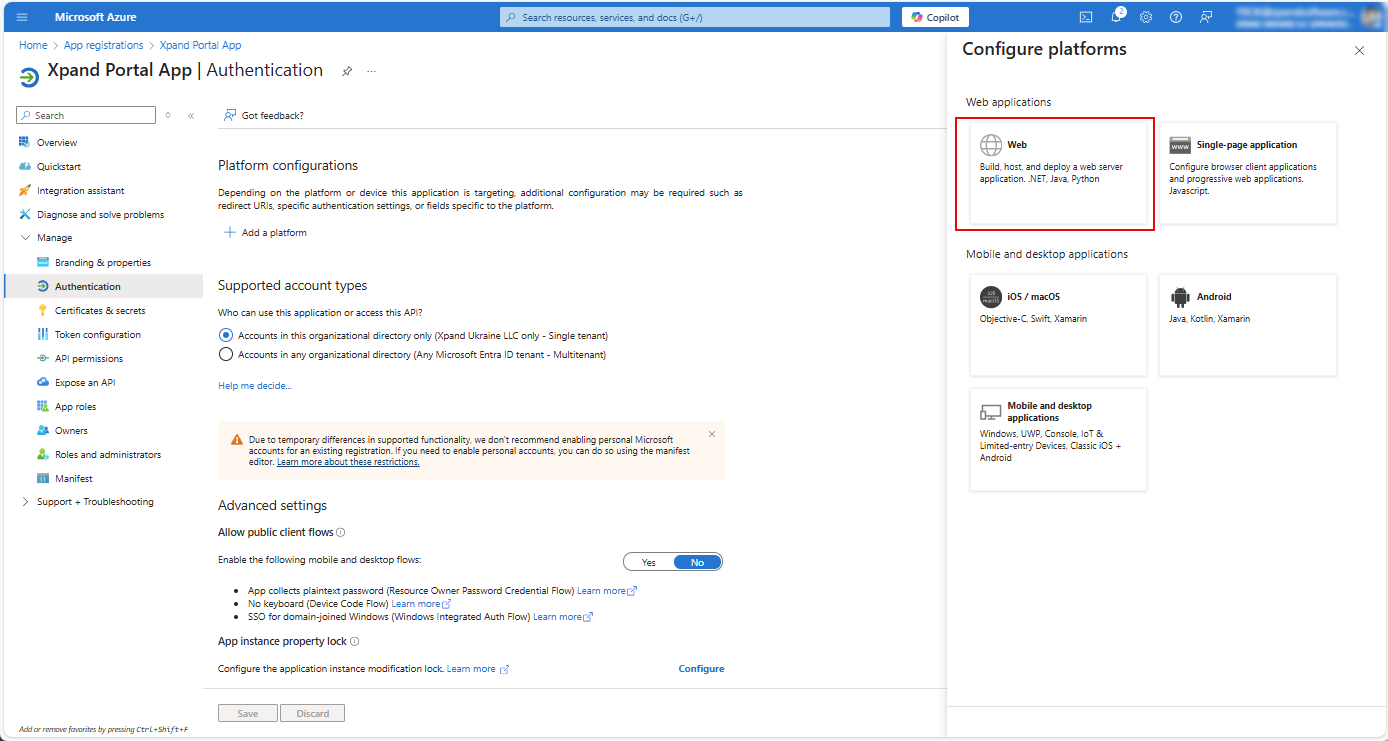
- In the Authentication window that opens, under Platform configurations, select Add a platform.
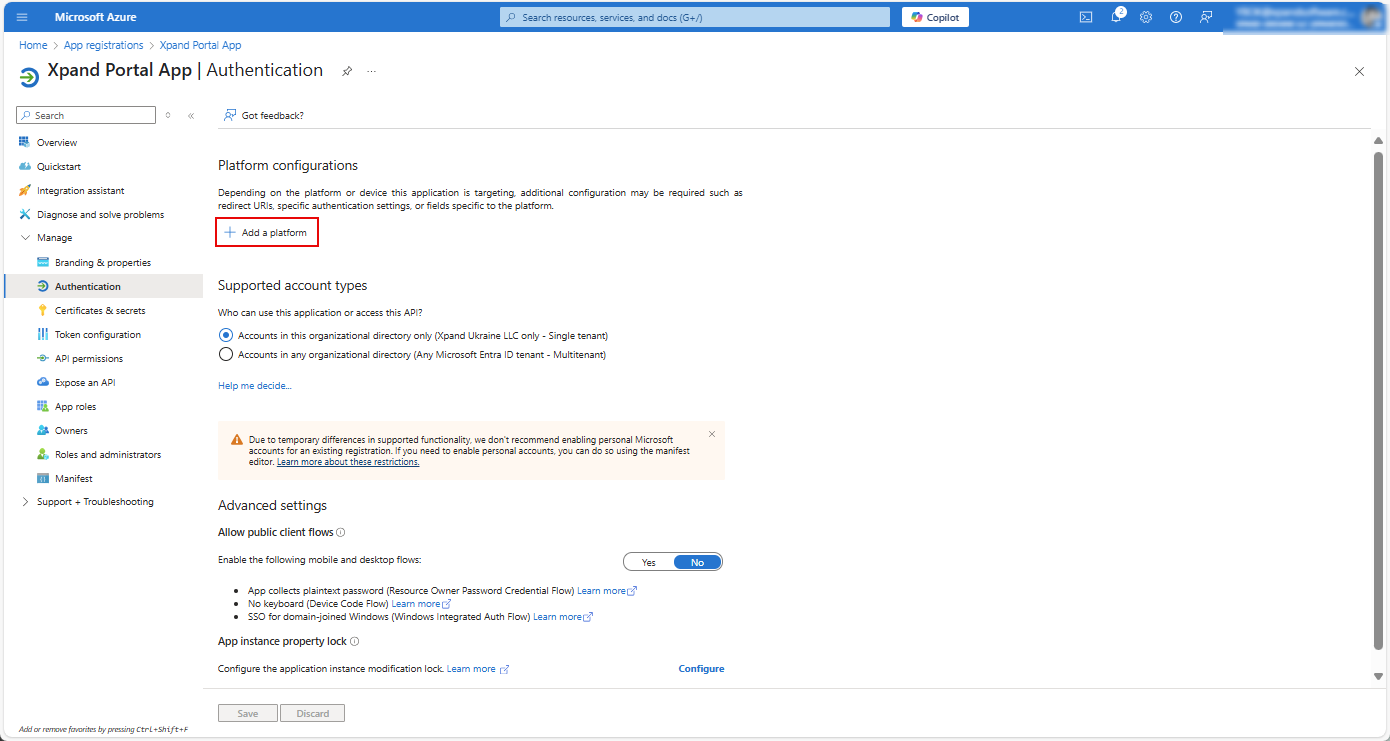
- In the Configure platforms window that appears, select Web.
- In the Configure Web window, fill in the Redirect URIs field with a URI that matches your portal's authorization endpoint, and then select Configure.
https://[yourportaldomain]/security/Oauth/2.0/Oauth/HandleRedirectOAuth
where [yourportaldomain] is the domain where your Xpand Portal solution is deployed.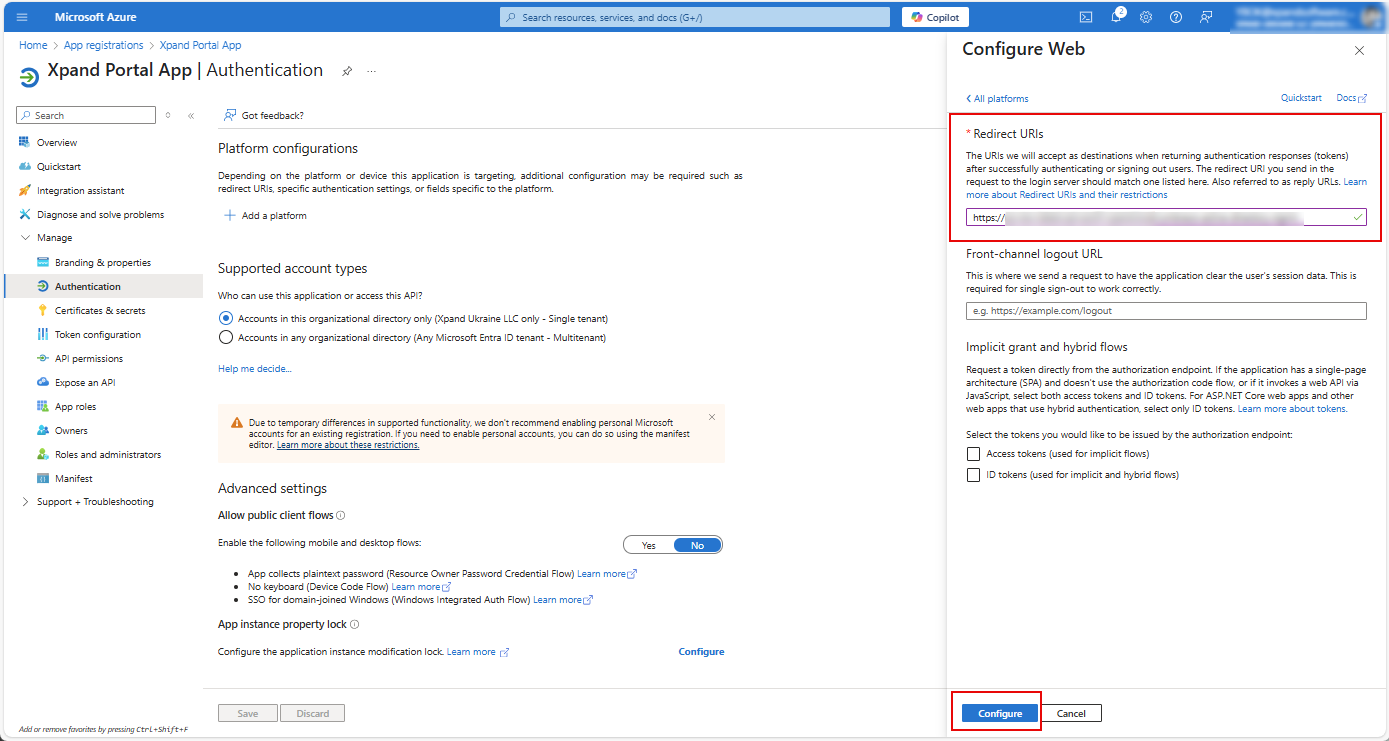
- Select Save to save the changes.
- On the API Permissions page, add the required Microsoft Graph and Office 365 Exchange permissions (these permissions are used to obtain the correct token):
- To add Microsoft Graph permissions:
- On the API Permissions page, on the Microsoft APIs tab, select Microsoft Graph.
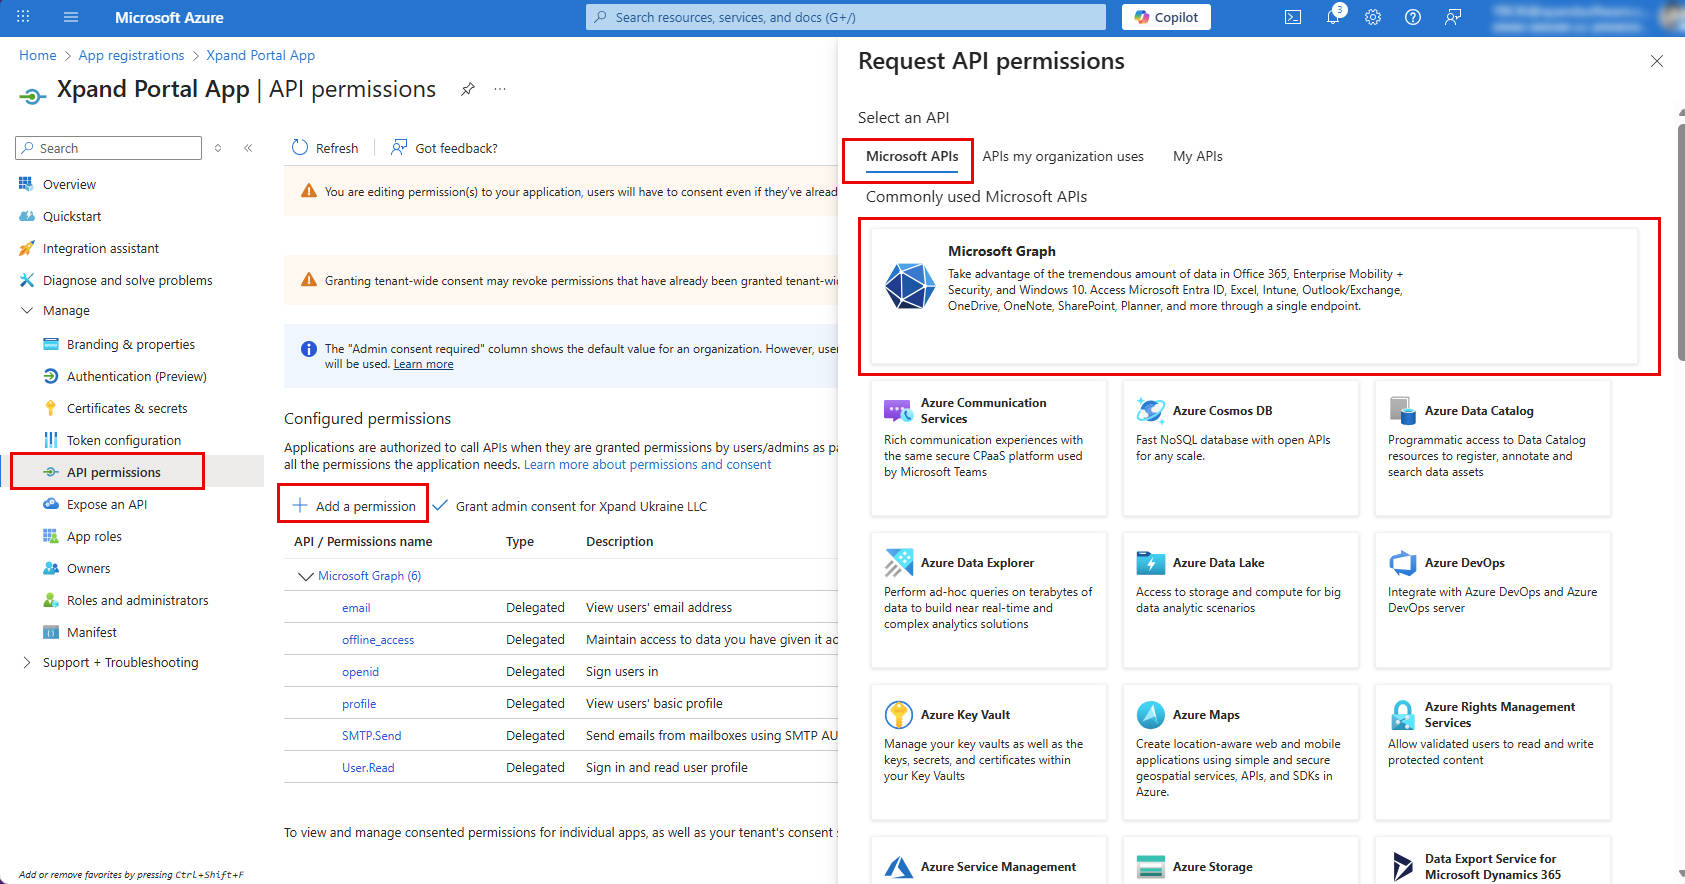
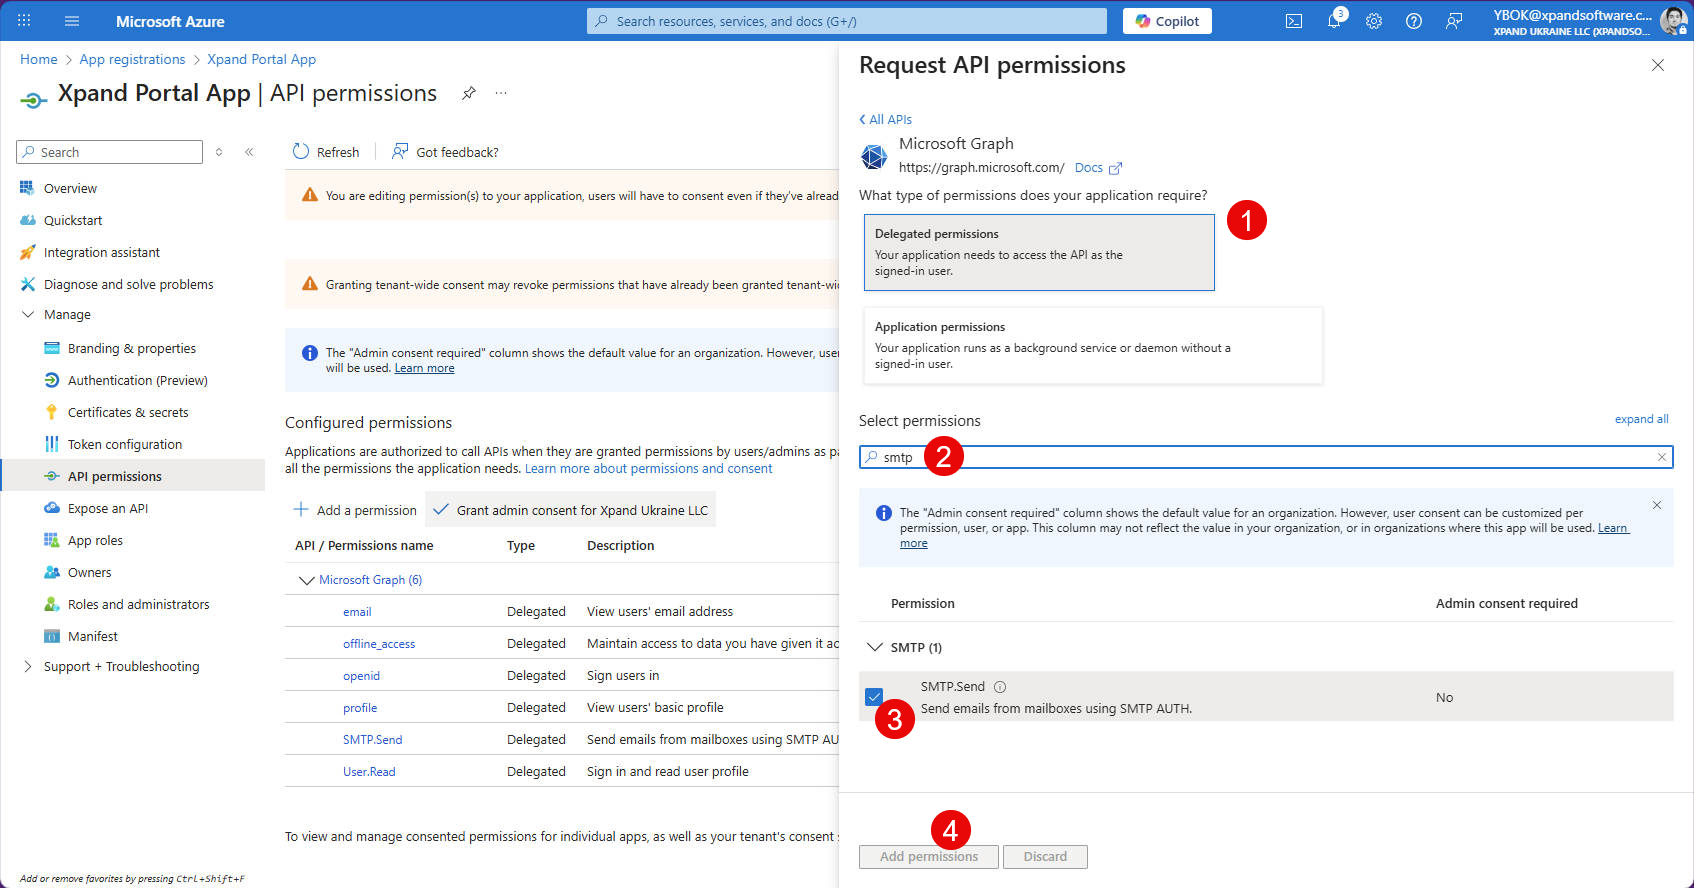
- Select Delegated permissions.
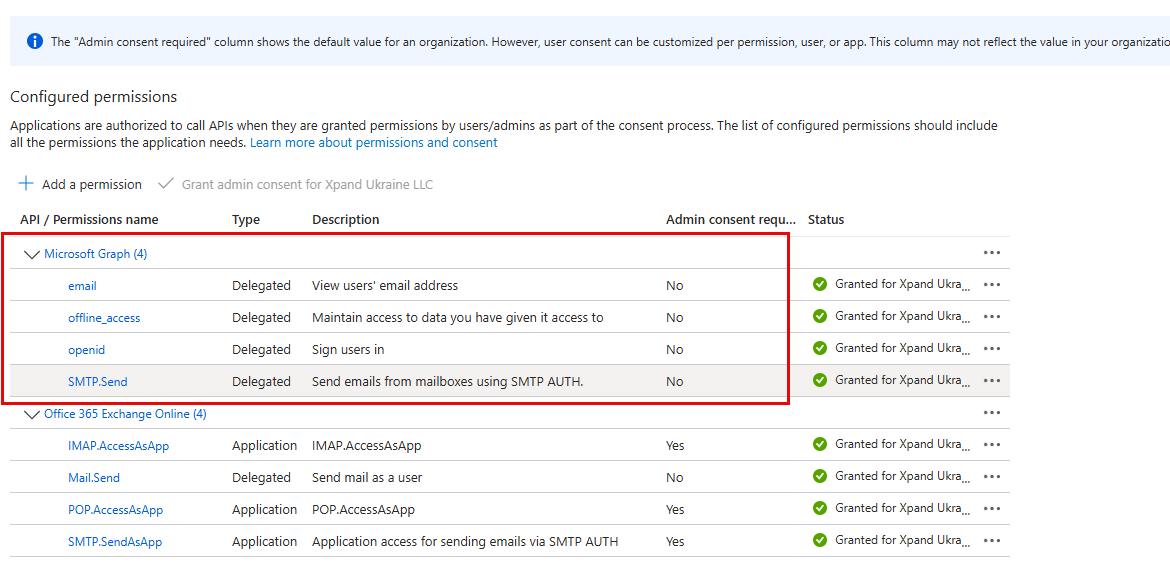
- Search for a permission by its name. You need to add the following Microsoft Graph permissions:
- email (delegated)
- offline_access (delegated)
- openid (delegated)
- SMTP.Send (delegated)
- Select a permission, and then select Add permissions. Added Office 365 Exchange Online permissions look as follows:
- On the API Permissions page, on the Microsoft APIs tab, select Microsoft Graph.
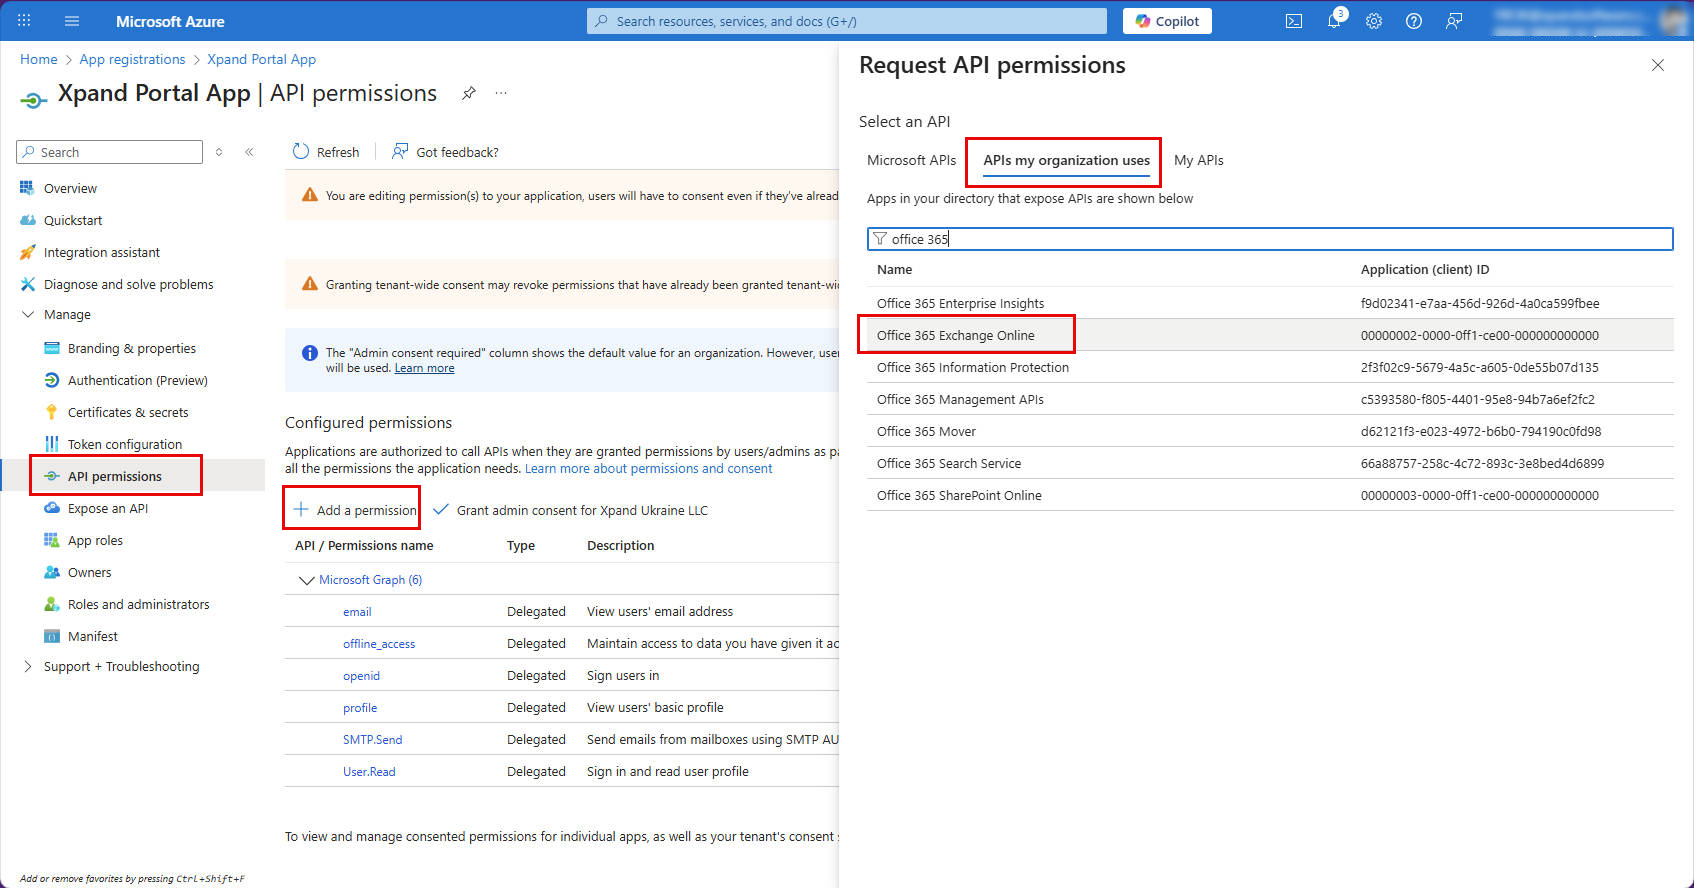
- To add Office 365 Exchange Online permissions:
- On the API Permissions page, on the APIs my organization uses tab, search for, and then select Office 365 Exchange Online.
- Select Delegated permissions or Application permissions depending on the type you're adding.
- Search for a permission by its name. You need to add the following Office 365 Exchange Online permissions:
- IMAP.AccessAsApp (application)
- Mail.Send (delegated)
- POP.AccessAsApp (application)
- SMTP.SendAsApp (application)
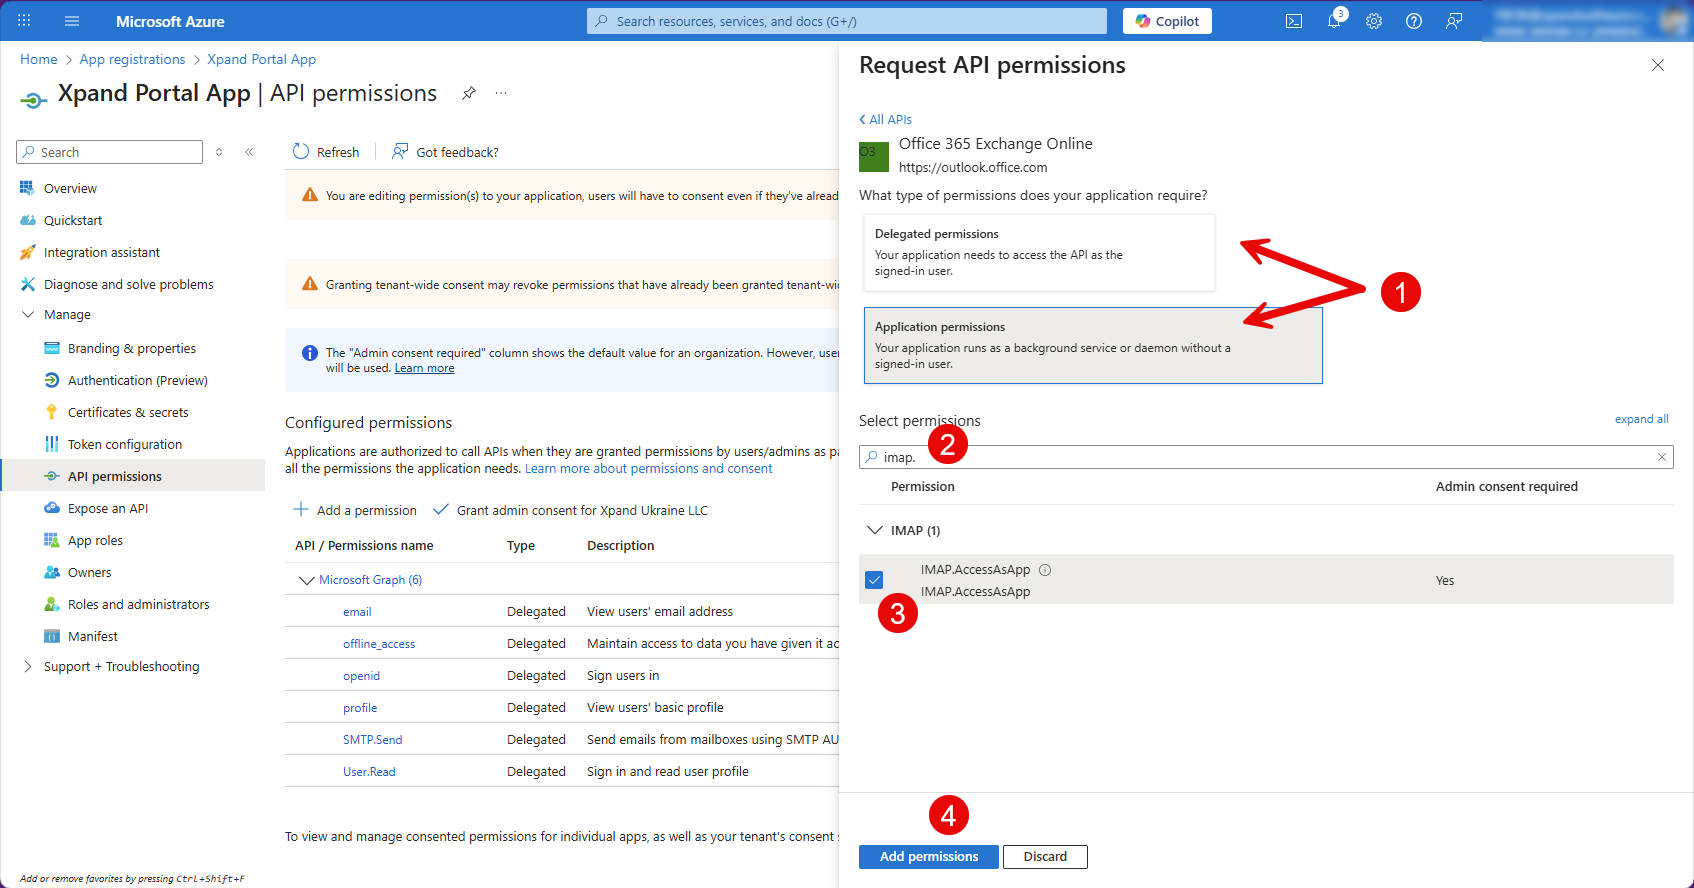
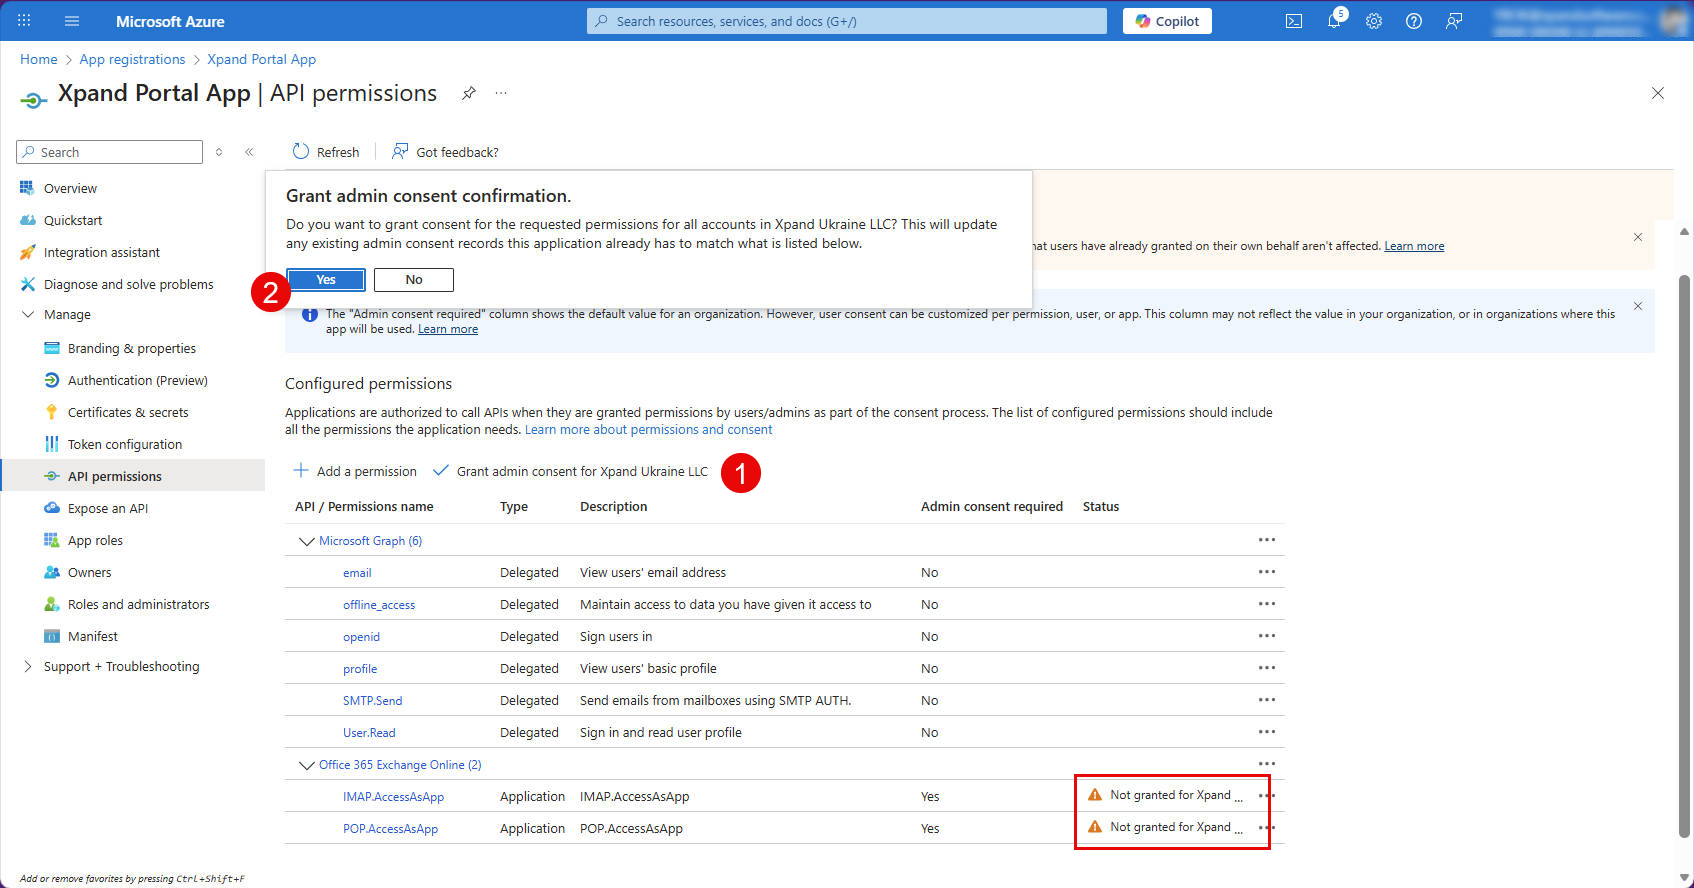
- Select a permission, and then select Add permissions. Added Office 365 Exchange Online permissions look as follows:
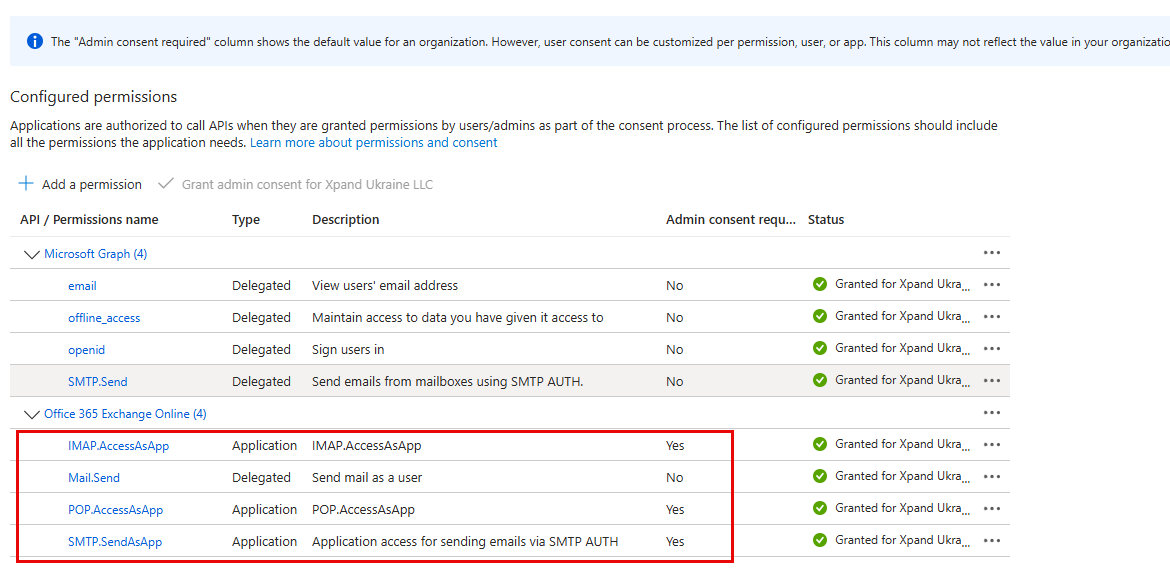
- Some of the Office 365 Exchange Online permissions require administrator consent (their status will be Not granted for [your_organization] where [your_organization] is the name of your organization. To grant administrator consent, select the action Grant admin consent for [your_organization] action, and then select Yes on the confirmation message that appears.
- On the API Permissions page, on the APIs my organization uses tab, search for, and then select Office 365 Exchange Online.
- To add Microsoft Graph permissions:
- Now you can return to the portal SMTP settings (described above) and set up SMTP authentication using the client ID, client secret, and tenant ID that you obtained in the Microsoft Azure portal. When configuring SMTP in the Xpand Portal backoffice:
- In Media > Site settings SMTP settings: Choose OAuth 2.0 authentication
- Network host: enter smtp.office365.com
- Port: enter 465 (for SSL) or 587 (for STARTTLS, which is preferred for Microsoft Exchange)
- Username: Enter the username of the Microsoft Entra ID account that will be used for sending emails.
- Email: Enter the email of the Microsoft Entra ID account that will be used for sending emails.
- Client ID: enter the client ID that was copied from the Application (Client) ID field in Azure Portal, on the app Overview page.
- Client secret: enter the secret that was copied from the Value field in Azure Portal, on the Certificates & secrets page, on the Client secrets tab.
- Token issue method: choose Authorization code (recommended) or Password
- If you chose Authorization code the token issue method: In the Refresh token setting, select the Authorize action. Once you sign in, follow the instructions on screen and, if asked, grant permissions that the identity provider requests. As a result, the refresh token is issued by the identity provider and automatically filled in this setting. The password in this case is not used.
Note
The refresh token must be re-authorized every time you enter a new client secret (for example, because the previous client secret has expired and needs to be updated).
- If you chose Password the token issue method: in the Password setting, enter the password from the Microsoft Entra ID account (the refresh token in this case is obtain automatically).
- If you chose Authorization code the token issue method: In the Refresh token setting, select the Authorize action. Once you sign in, follow the instructions on screen and, if asked, grant permissions that the identity provider requests. As a result, the refresh token is issued by the identity provider and automatically filled in this setting. The password in this case is not used.
- In Provider-specific settings:
- Tenant ID: enter the tenant ID that was copied from the Directory (tenant) ID field in Azure Portal, on the app Overview page.
- Fill in other SMTP settings as described above in this article, and save the changes.
- In the backoffice, select Settings > More > Reload Application for changes in the SMTP settings to take effect.
After this, Microsoft Entra ID is fully configured as an SMTP provider and ready to send emails.
Configure Google for SMTP
To configure Google for SMTP authentication:
- Go to Google Cloud Platform and sign in with your Google account or create a new one.
Note
If you already have a registered app for your portal (which was created and configured, for example, for the SSO functionality), you don't need to create another app registration. In this case, skip the next step, and then expand the existing app configuration with additional setting that are required for SMTP authentication.
- Create a project. If you already have a project, you can skip this step.
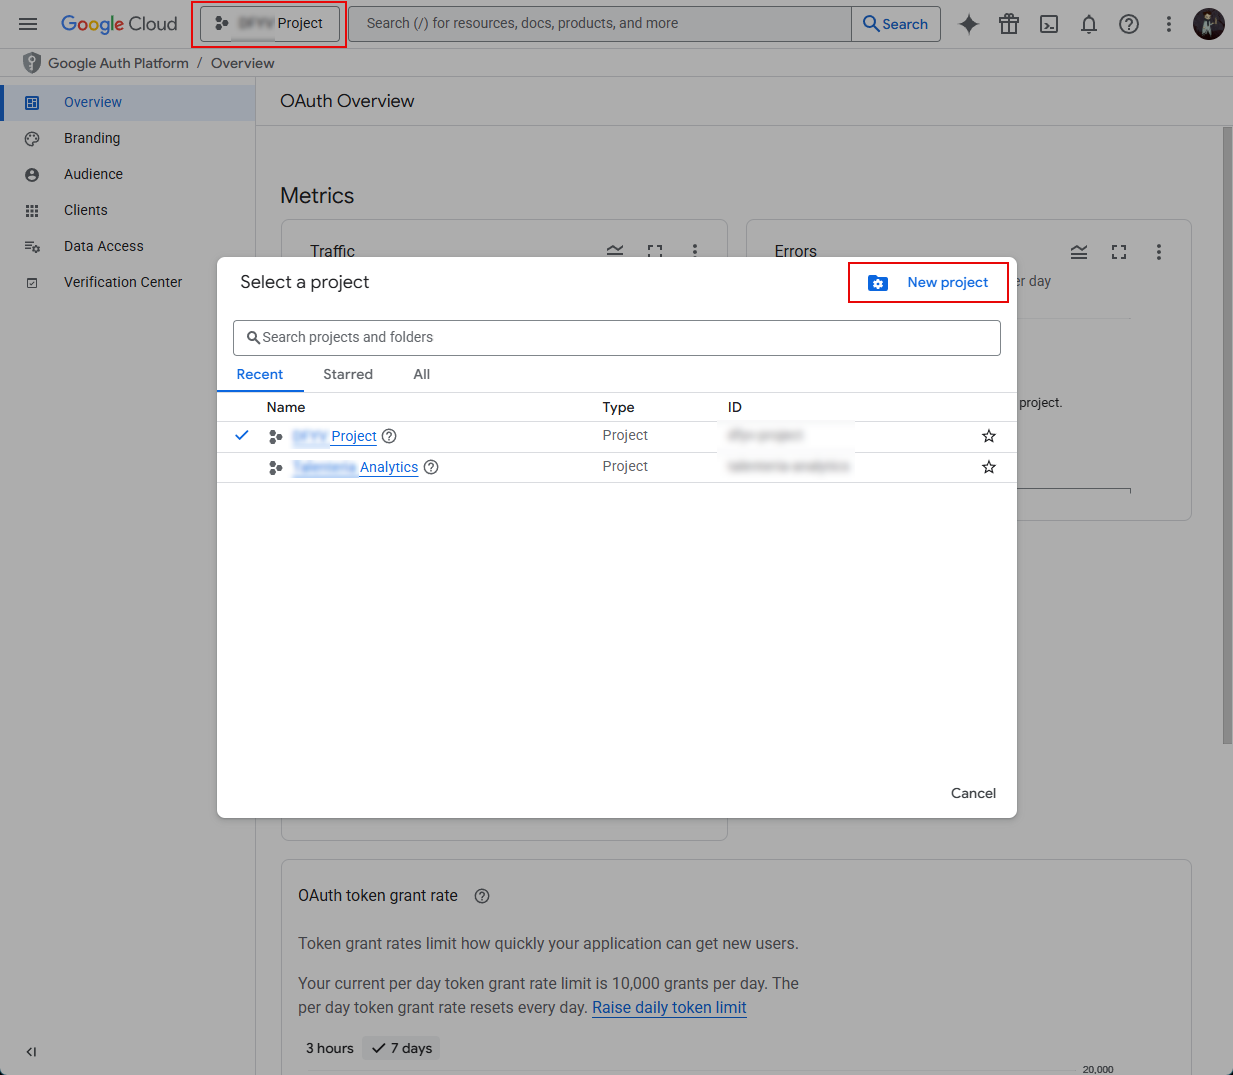
- On the header, select the Select a project action.
- In the Select a project window that opens, select New project.
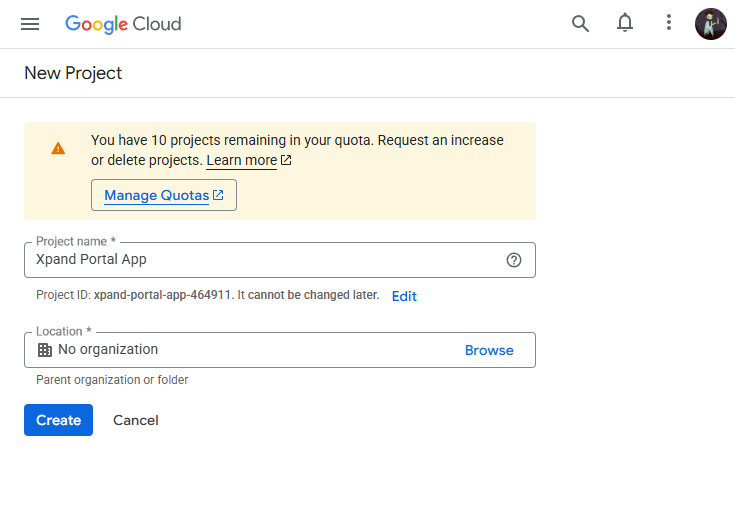
- In the New Project window, add the name of your app and select Create.
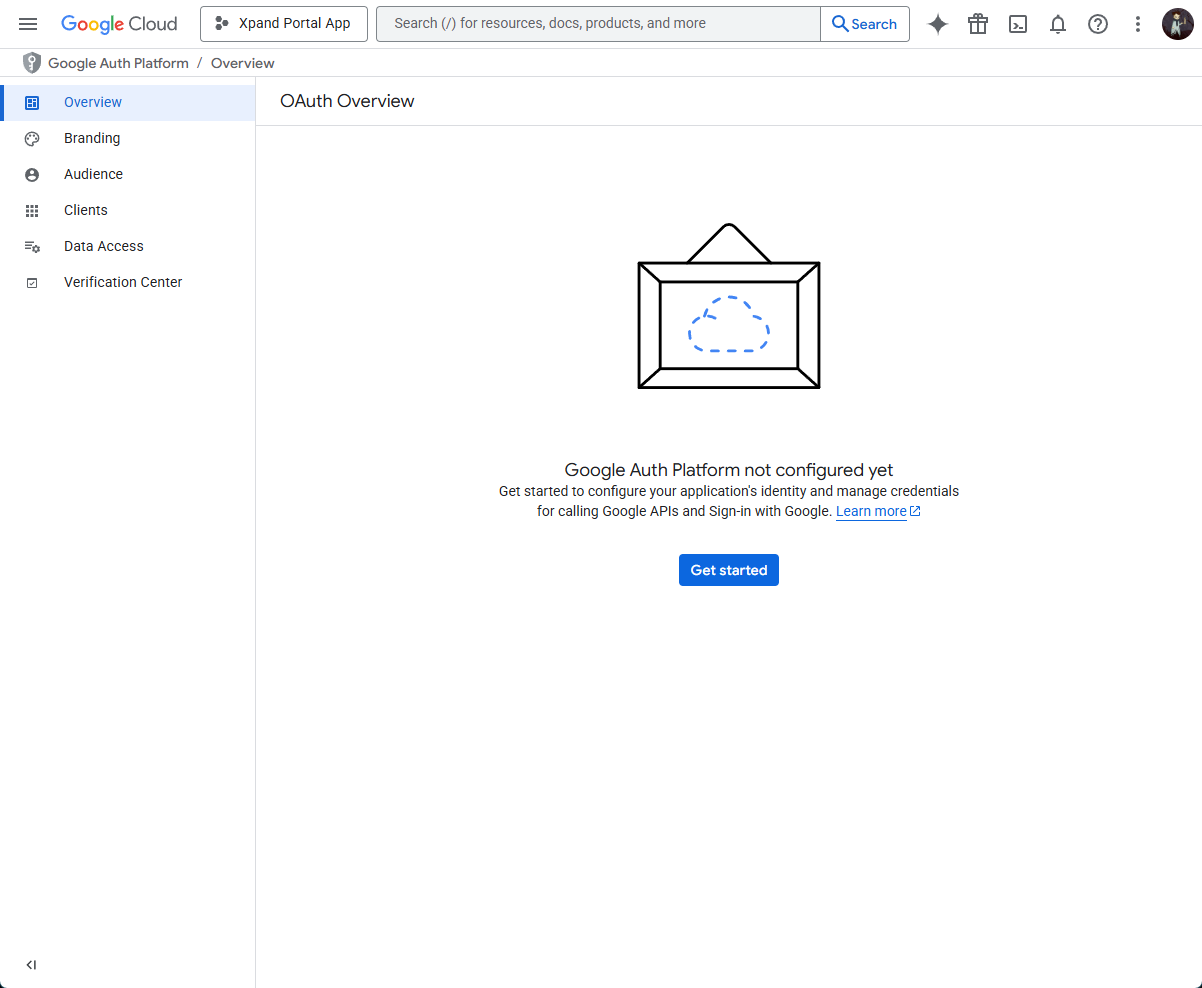
- On the OAuth Overview page, select Get started and fill in the required fields.
- On the Branding page, enter the app name and user support email. This information is shown on the consent screen.
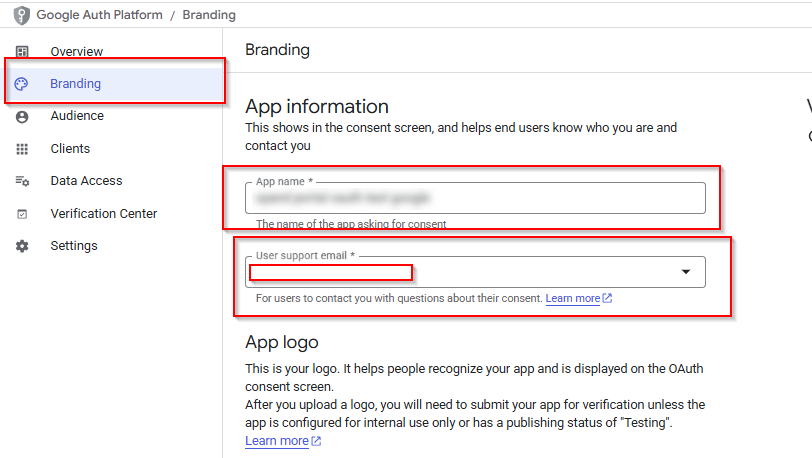
- On the Branding page, enter the app name and user support email. This information is shown on the consent screen.
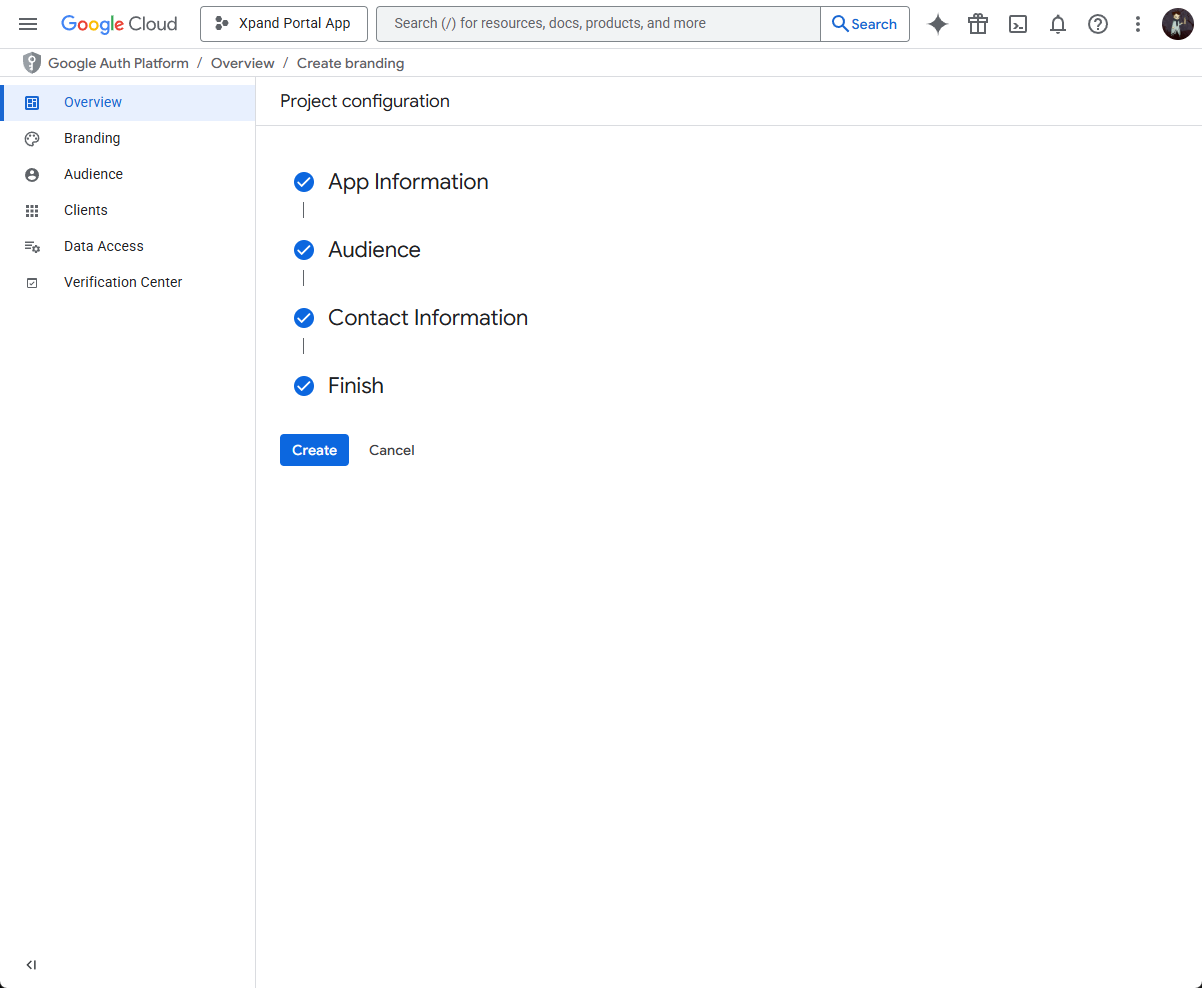
- Select Create to finish the project creation.
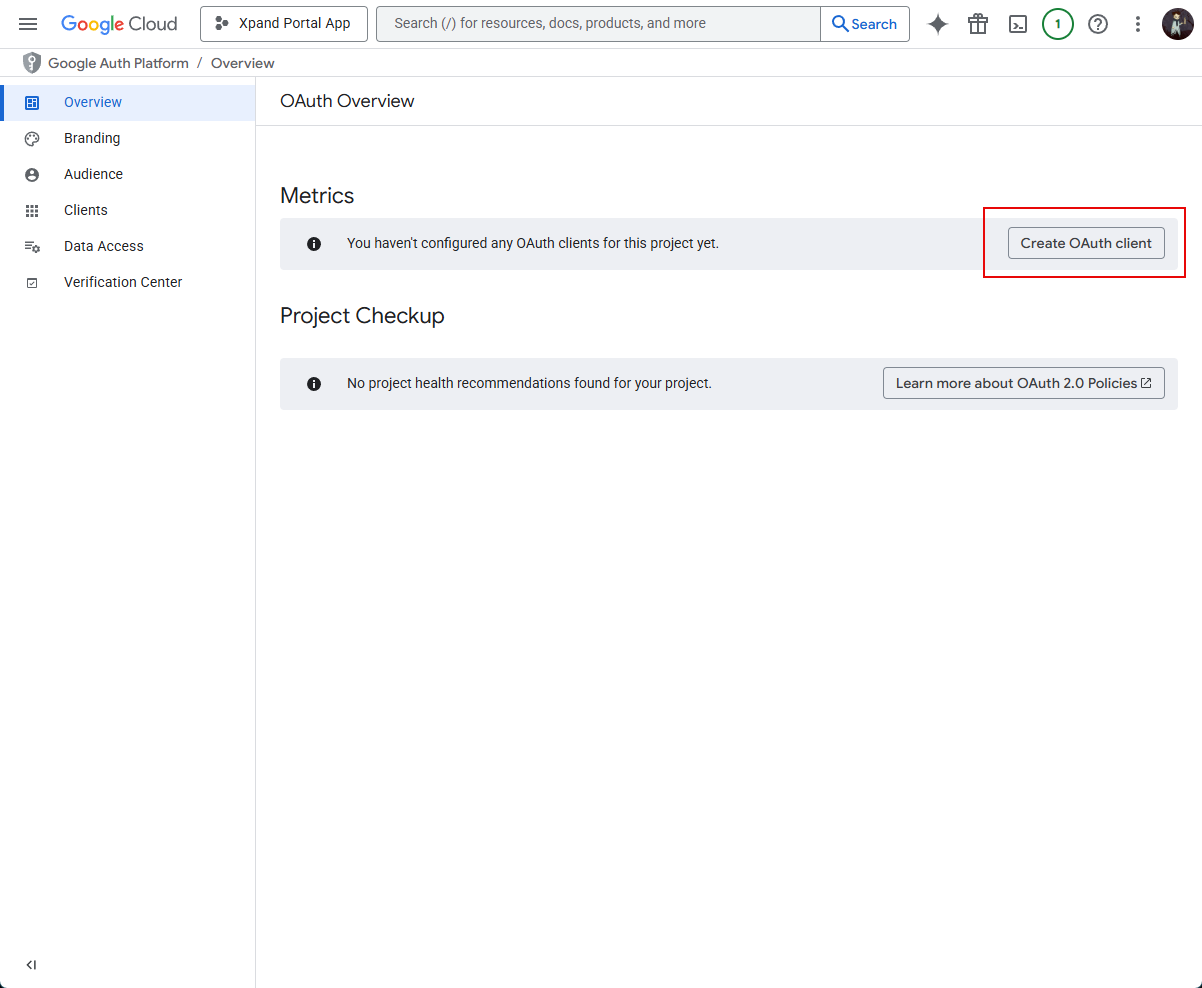
- On the OAuth Overview page, select Create OAuth client.
 Note
NoteIf you already had an OAuth client configured for your portal, you can skip its creation and proceed to the step where you need to add a redirect URI for SMTP.
- In the window that opens, on the navigation pane on the left, select OAuth consent screen.
- In the Create OAuth client ID window, in the drop-down menu, select Web application.
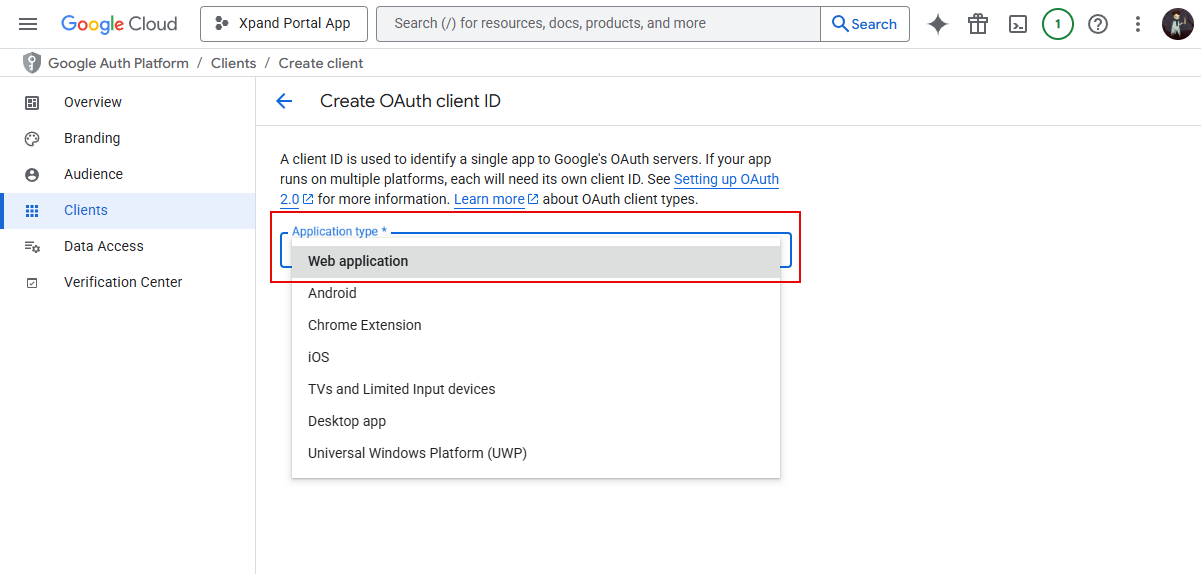
- In the Create OAuth client ID window that opens, enter the client name.
- Under Authorised redirect URIs, select Add URI and a URI for SMTP, and then select Create:
https://[yourportaldomain]/security/Oauth/2.0/Oauth/HandleRedirectOAuth
where [yourportaldomain] is the domain where your Xpand Portal solution is deployed.
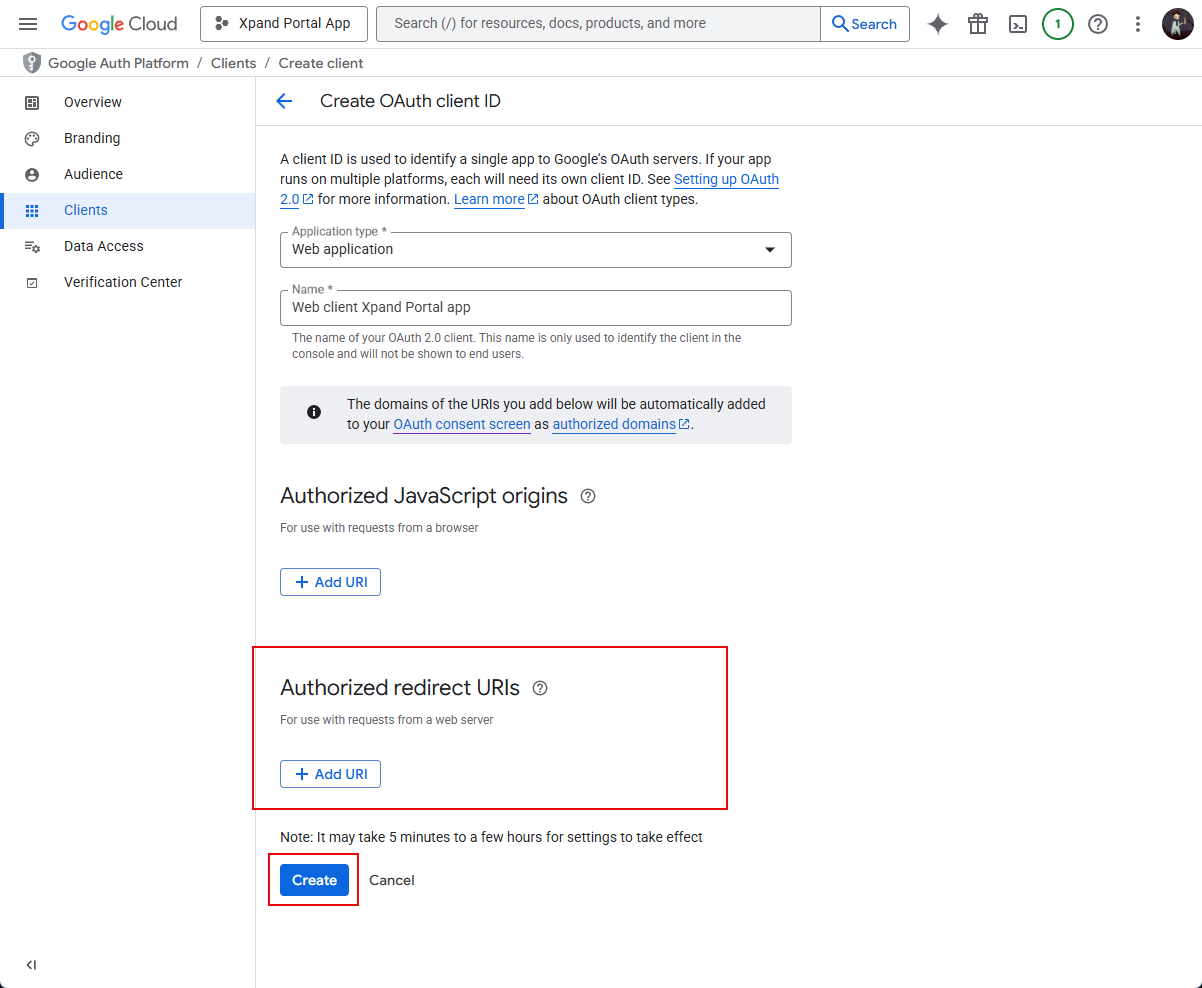
NoteGoogle Cloud only allows redirect URIs with public top level domain (such as .com or .org). To be able to use Google as an SMTP provider, your portal domain must meet this requirement.
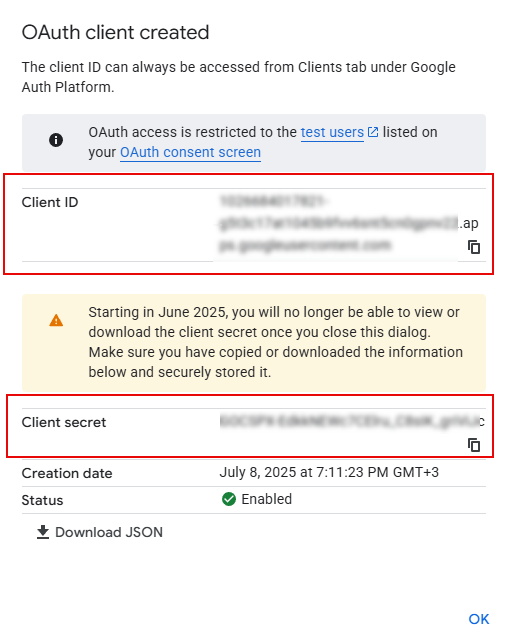
- From the OAuth client created message that appears, copy the client ID from the Client ID field, and the client secret—from the Client secret field, as you will need them for further configuration of the SSO settings on Xpand Portal, and then select OK. If you used a project configured earlier, contact your administrator to get the client ID and client secret values.
- Now you can return to the portal SMTP settings (described above) and set up SMTP authentication using the client ID and client secret that you obtained in the Google Cloud Platform. When configuring SMTP in the Xpand Portal backoffice:
- In Media > Site settings SMTP settings: choose OAuth 2.0 authentication
- Network host: enter smtp.gmail.com
- Port: enter 465 (for SSL which is preferred for Google) or 587 (for STARTTLS)
- Username: enter the username of the Google account that will be used for sending emails.
- Email: enter the email of the Google account that will be used for sending emails.
- Client ID: enter the client ID that was copied from the Client ID field in the Google Cloud Platform.
- Client secret: enter the secret that was copied from the Client secret field in the Google Cloud Platform.
- Token issue method: choose Authorization code (Google supports only this method)
- In the Refresh token setting, select the Authorize action. Once you sign in (make sure you choose the correct Google account—the one that was used when configuring the Google identity provider), follow the instructions on screen and, if asked, grant permissions that the identity provider requests. As a result, the refresh token is issued by the identity provider and automatically filled in this setting.
Note
The refresh token must be re-authorized every time you enter a new client secret (for example, because the previous client secret has expired and needs to be updated).
- Fill in other SMTP settings as described above in this article, and save the changes.
- In the backoffice, select Settings > More > Reload Application for changes in the SMTP settings to take effect.
After this, Google is fully configured as an SMTP provider and ready to send emails using Google OAuth2 with XOAUTH2 authentication.