Creating entities
A portal entity is a table that stores data that can be displayed on pages in the front end. Data can be retrieved from an external data source in case the portal is integrated with an external system or created directly on the portal. Thus, portal entities can be either imported from an external system (to retrieve data from that system) or created manually directly on the portal (to show data created on the portal). Additionally, you can create new fields in the imported entities.
You may need to create new entities and fields manually to create and store data that will not be imported from or exported to an external database, and is intended for internal use by members of Xpand Portal.
Examples of cases when portal entities can be created manually:
- To create and store specific records, independent of an external database, such as a price list or contact list used only by members of Xpand Portal.
- To mark records with portal-specific statuses that assist the members in their processing of entity records.
- Create specific lookup entities that can be used as options in other fields.
To create a new entity
- In the backoffice, go to Media.
- Go to Site settings > Entities.
- Select the
 icon next to Entities, and then select Entity.
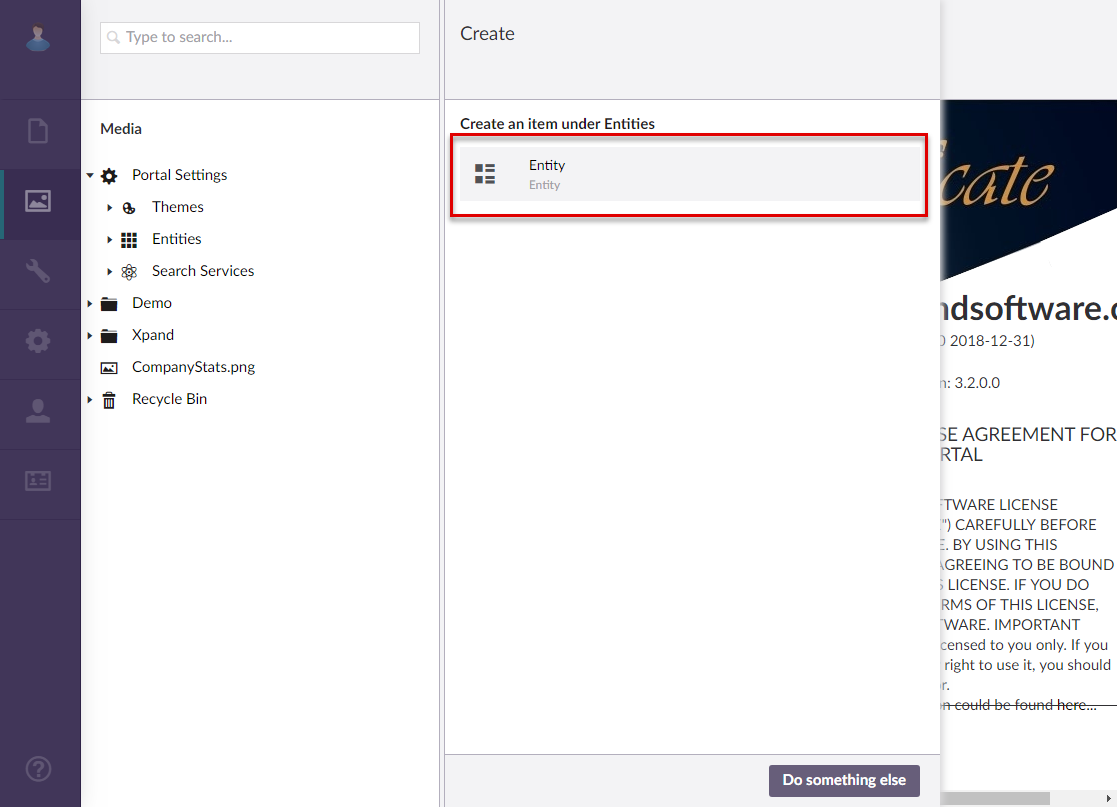
- Enter a name of the entity in the field located at the top of the page. This name will appear in the list of the portal entities.
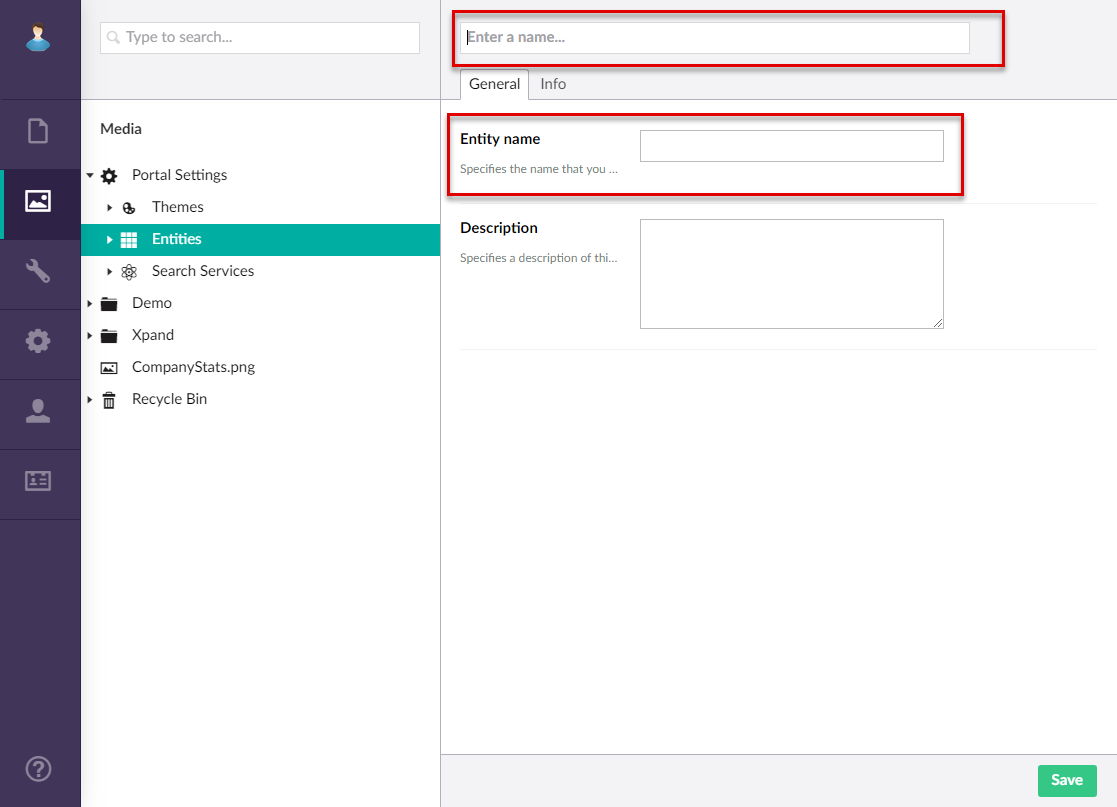
- On the Content tab, configure the settings as described below:
- Entity name - Specifies the name of the entity that you will see in the entity selection for a grid, field set, chart, or cue tile.
- Description - Specifies a description of the entity if needed.
- Specifies the registered server events, which can work with all or specific selected entities. - Specifies the registered server events, which can work with all or specific selected entities.
- Module assignment & protection - Specifies settings that allow you to assign this content element (localization, page, etc.) to an internal module as well as to protect this element from certain operations (copying, changing, deletion). Select the Configure button to configure module assignment & protection or the Change button to edit existing configuration if it has already been configured.
- Select Save.
- In the backoffice, select Settings > More > Reload Application.
 Important
You must reload the application whenever you make changes in the Media section of the backoffice. Otherwise, your changes may not take effect.
The created entity is now visible in the list of portal entities. Now you need to create fields for your new entity.
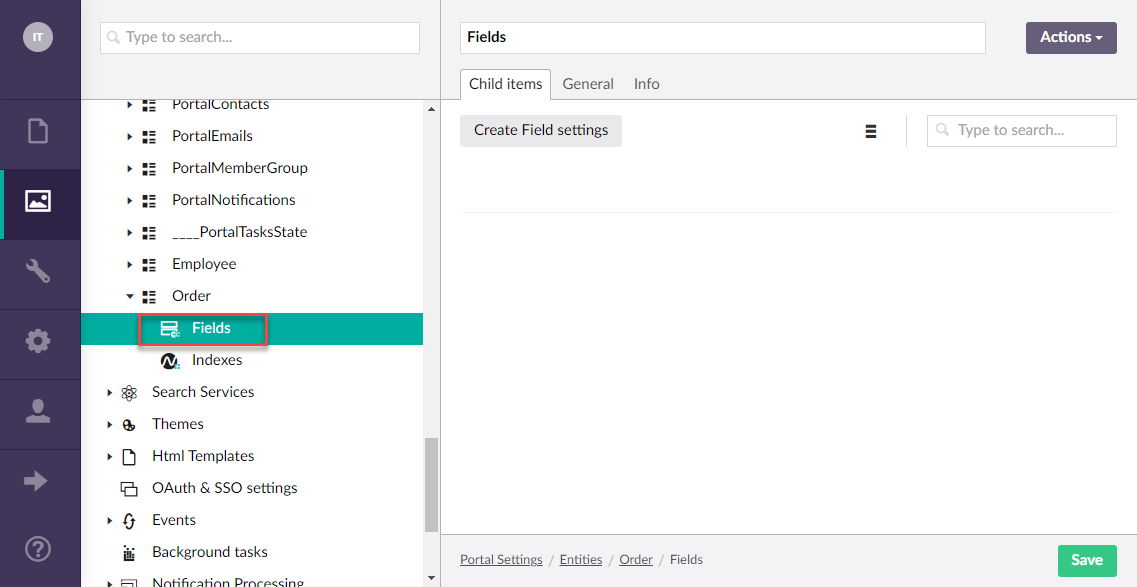
To create entity fields
- In the backoffice, under Entities, select the
 icon, next to the node with the entity that you want to create the fields for.
 - From the list that opens, select Fields.
 Note
NoteIf the Fields node is missing (for example, if it was deleted or was not created automatically), you can create it by following these steps:
- Select and hold (or right-click) the relevant entity.
- Select Create.
- In the Create window that opens, select Fields.
- In the window that opens, fill in the required fields, and then select Save.
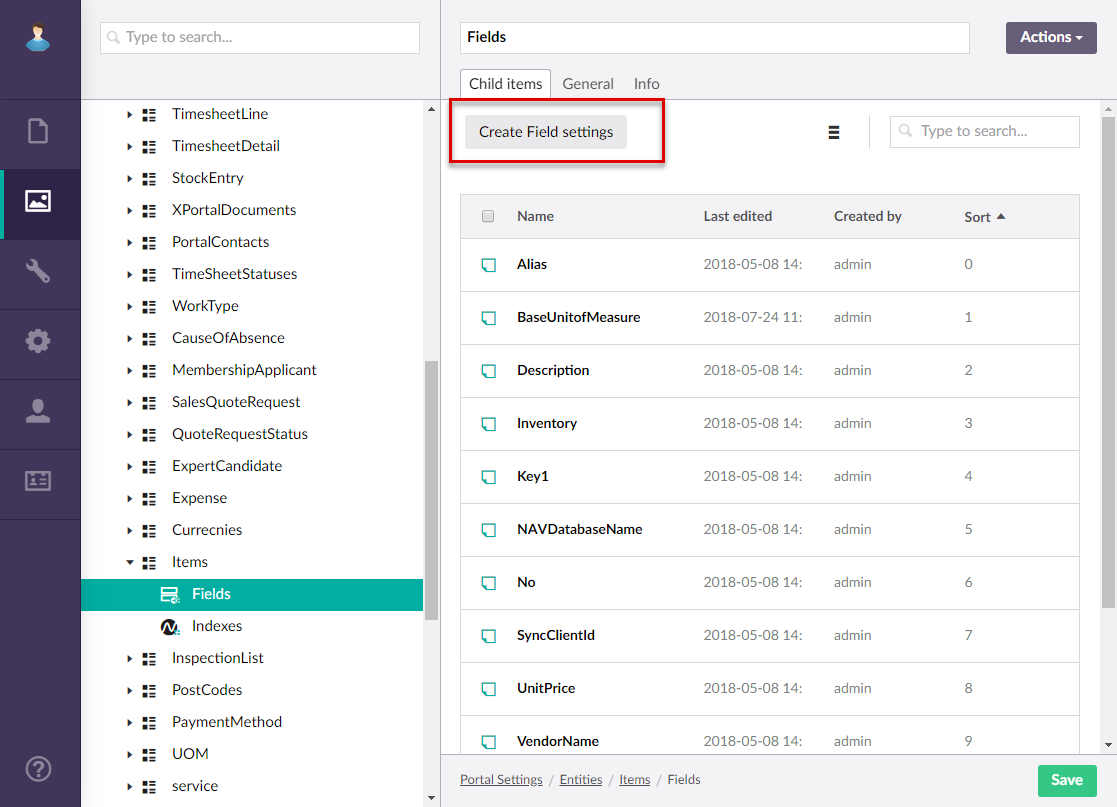
- On the Child items tab, select Create field settings to add fields to the field set.
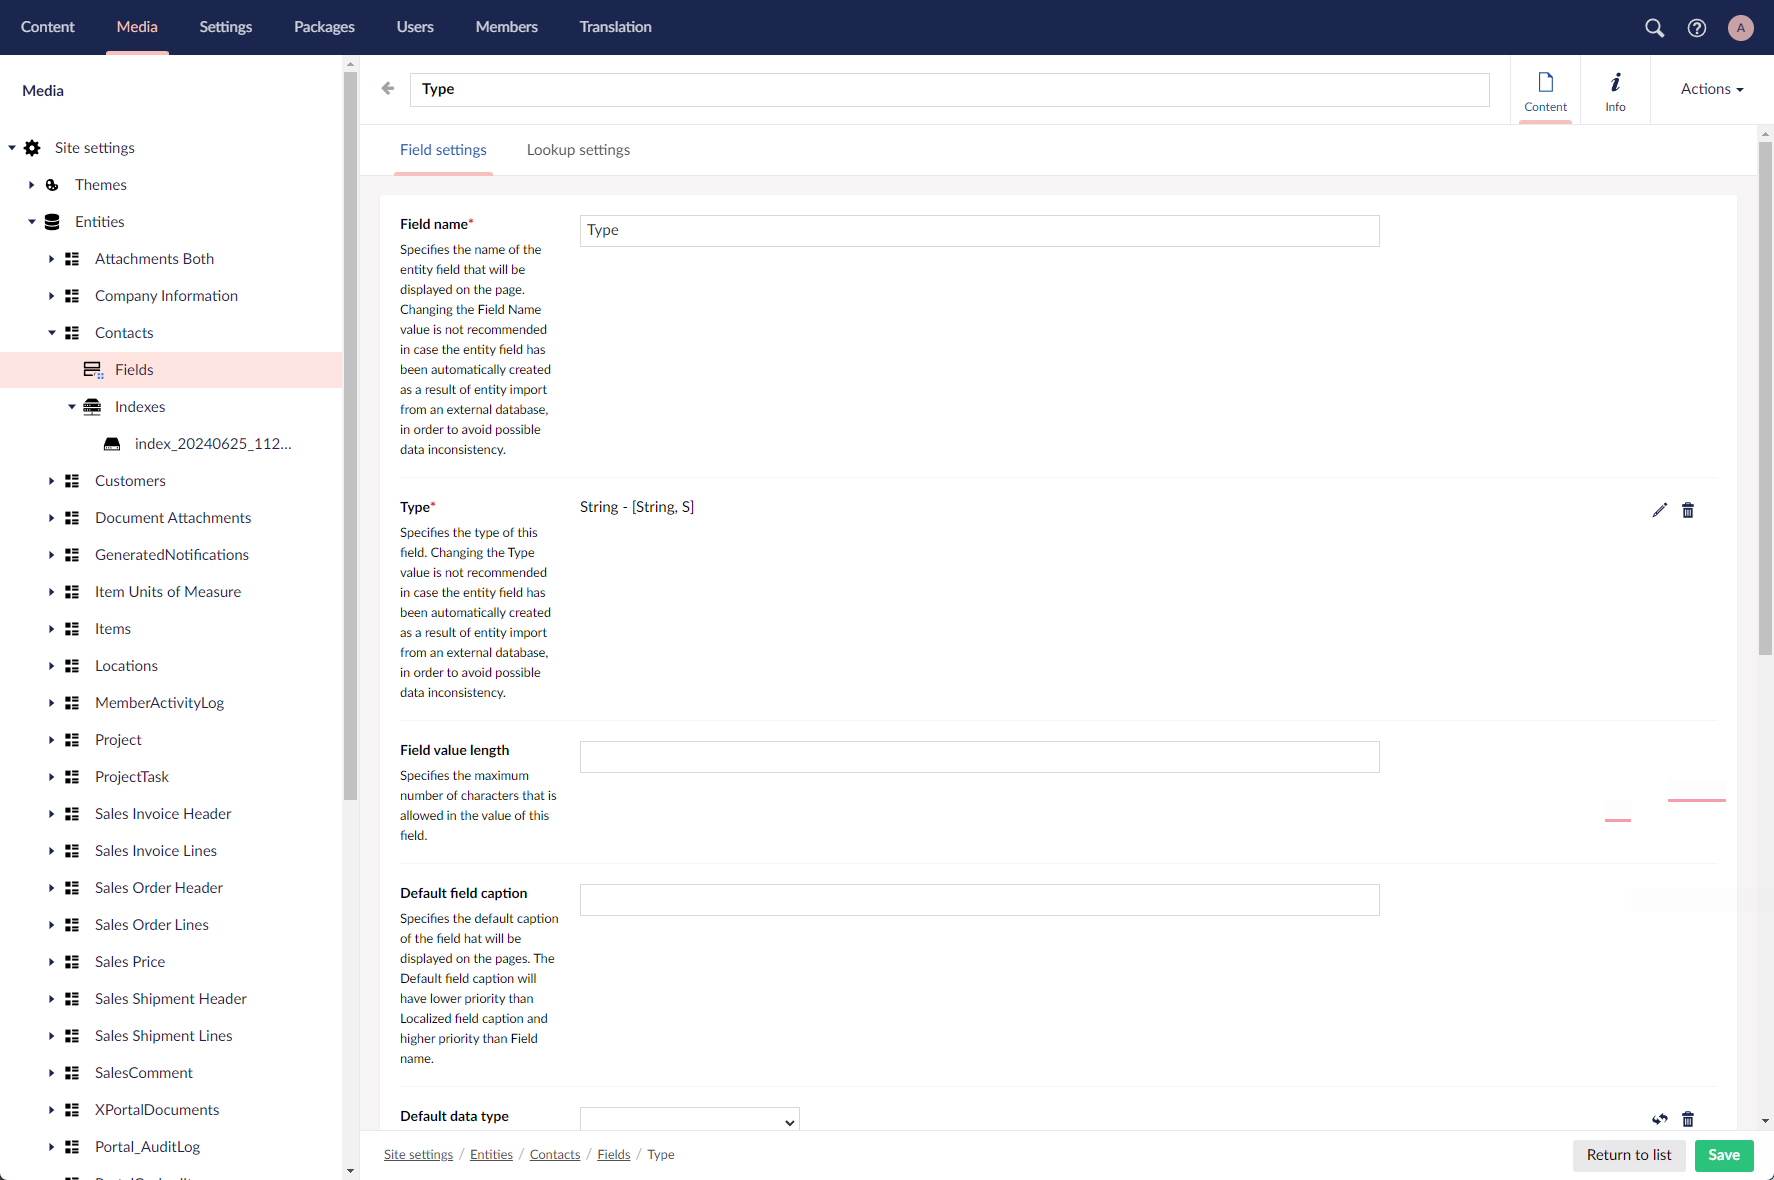
- On the Field Settings tab, configure the settings as described below:
- Field Name – Specifies the name of the field that will be used to identify it within this portal entity.
- Type – Specifies the type of the field that defines what kind of data the field can contain. It is not recommended that this type is modified for fields automatically created as a result of entity import, because data synchronization may not work properly.
- Field value length - Specifies the maximum number of characters that will be allowed in the value of this field.
- Default field caption – Specifies the label that will be displayed by default for this field in the front end for portal members. This caption can be changed if necessary in the field settings when creating or editing a portal page.
- Default data type – Specifies the type of data that the field contains. This data type is used in case the field is editable for portal members. This data type can be changed if necessary in the field settings when creating or editing a portal page.
- Comment – Specifies a comment about the field that can be used for information purposes.
- Value validation – Specifies a validation or multiple validations that will be applied to the field value on the grid page or detail card. When the field isn't editable, validations will not be applied. Value validation can also be set up for fields directly in the grid or detail page settings. Select the
 icon and select the type of validation:
- Required - Specifies a validation that verifies whether the field after having been edited contains value.
- Enabled - Specifies whether this validation is turned on. If the validation is disabled, it will not be run when entering a field value.
- Validation message - Specifies the text of an error message that will be displayed if the validation criteria are not fulfilled.
- Field length - Specifies validation that verifies whether the length of the field after having been edited is within the specified length range.
- Enabled - Specifies whether this validation is turned on. If the validation is disabled, it will not be run when entering a field value.
- Validation message - Specifies the text of an error message that will be displayed if the validation criteria are not fulfilled.
- Minimum length - Specifies a numeric value that will be used as the minimum field length value when validating the field.
- Maximum length - Specifies a numeric value that will be used as the maximum field length value when validating the field.
- Regular expression - Specifies a validation that verifies whether the field value after having been edited meets the format defined by a regular expression.
- Enabled - Specifies whether this validation is turned on. If the validation is disabled, it will not be run when entering a field value.
- Validation message - Specifies the text of an error message that will be displayed if the validation criteria are not fulfilled.
- Regular expression - Specifies a regular expression that defines the format that the field value must meet to pass the validation. Refer to this site for help on creating a regular expression. Several examples:
Explanation: Only letters from A to Z letters are valid; case sensitive. Value: [A-Z]
Explanation: The following characters are not allowed: <>\/$. Value: [^<>\/\$]+
- Email - Specifies validation that verifies whether the field value that is email after having been edited meets the predefined criteria of email.
- Enabled - Specifies whether this validation is turned on. If the validation is disabled, it will not be run when entering a field value.
- Validation message - Specifies the text of an error message that will be displayed if the validation criteria are not fulfilled.
- Custom validation - Specifies a client- and/or server-side validation that verifies whether the field value after having been edited fulfills the criteria that are defined in a custom or predefined script/code.
- Enabled - Specifies whether this validation is turned on. If the validation is disabled, it will not be run when entering a field value.
- Validation message - Specifies the text of an error message that will be displayed if the validation criteria are not fulfilled.
- Client-side validation - Specifies JavaScript code that defines validation criteria that must be fulfilled on the client side after the field value is changed. Select the icon next to the setting to select one of pre-defined or custom-made validations. If you use both client- and server-side validation, they must validate the same. After you select a predefined custom validation, the required settings will be filled in automatically. If you need additional custom validation that would suit your needs, contact the portal development team.
- Server-side validation - Specifies the title of a function in a custom piece of code that defines validation criteria that must be fulfilled on the server side after the field value is changed. Select the icon next to the setting to select one of pre-defined or custom-made validations. Server-side validation may be useful when multiple users are trying to change the same field value. If you use both client- and server-side validation, they must validate the same. After you select a predefined custom validation, the required settings will be filled in automatically. If you need additional custom validation that would suit your needs, contact the portal development team.
- File size/type - Specifies a validation that verifies whether the size of an uploaded file doesn't exceed the maximum allowed size and/or that the file type belongs to the allowed file types.
- Enabled - Specifies whether this validation is turned on. If the validation is disabled, it will not be run when entering a field value.
- Validation message - Specifies the text of an error message that will be displayed if the validation criteria are not fulfilled.
- Maximum file size - Specifies the maximum allowed file size in KB to fulfil the validation criteria.
- File type(s) validation message - Specifies the text of an error message that will be displayed if the allowed file type(s) validation criteria are not fulfilled.
- File type(s) - Specifies the list of allowed file type(s) to fulfil the validation criteria. Allowed file types must be listed as file extensions and, if more than one, separated by a comma without spaces. Example: .docx,.xlsx,.png
- No. of selected options - Specifies a validation that verifies whether the number of selected options in an extended field with the multiselection or multiple picker data type is within the allowed range of selectable options.
- Enabled - Specifies whether this validation is turned on. If the validation is disabled, it will not be run when entering a field value.
- Validation message - Specifies the text of an error message that will be displayed if the validation criteria are not fulfilled.
- Min. no. of selected options - Specifies the minimum number of options that can be selected in the field to fulfil the criteria.
- Max. no. of selected options - Specifies the maximum number of options that can be selected in the field to fulfil the criteria.
- Google reCAPTCHA - Specifies validation that verifies whether the Google reCAPTCHA test has been passed successfully.
- Enabled - Specifies whether this validation is turned on. If the validation is disabled, it will not be run when entering a field value.
- Validation message - Specifies the text of an error message that will be displayed if the validation criteria are not fulfilled.
- Validation message title - Specifies the title that will be displayed on the validation message.
- Google reCAPTCHA version - Specifies the version of the Google reCAPTCHA that is used for this validation. Select the version for which the site key and secret key were obtained during the reCAPTCHA account registration and which are specified in the site localization additional settings.
- Required - Specifies a validation that verifies whether the field after having been edited contains value.
- Module assignment & protection - Specifies settings that allow you to assign this content element (localization, page, etc.) to an internal module as well as to protect this element from certain operations (copying, changing, deletion). Select the Configure button to configure module assignment & protection or the Change button to edit existing configuration if it has already been configured.
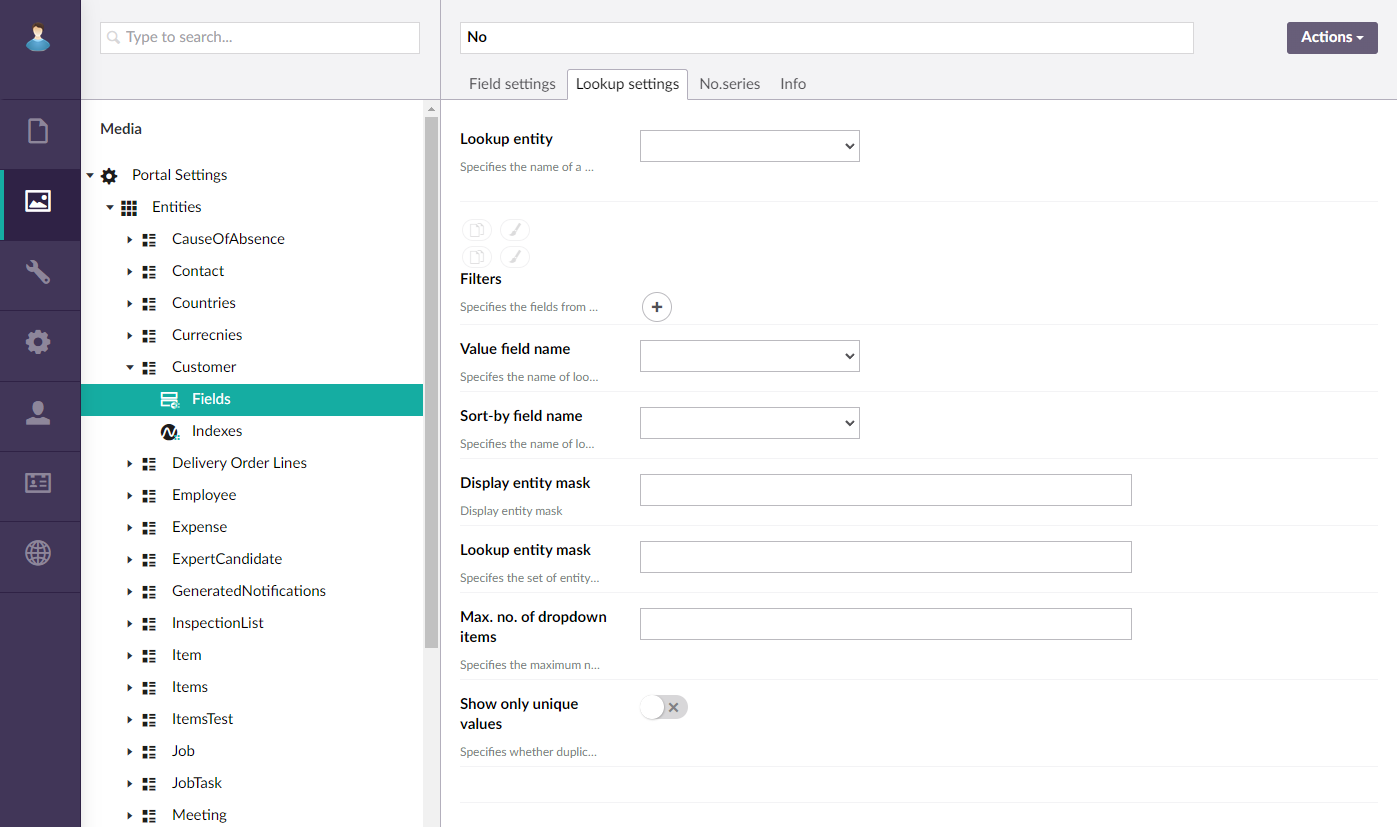
- On the Lookup settings tab, configure the lookup settings (only if you are creating/editing a lookup field - a field, the value of which can be retrieved from a field in another entity through the drop-down list when a portal member edits the value of the lookup field):
- Lookup entity – Specifies the name of a portal entity that contains a field to which this field will look up.
- Filters – Specifies filters that will be applied when looking up the value to narrow down the results if necessary.Select Add content to add a filter, select a field from the lookup entity and specify filter conditions (such as the field value must be equal to a certain value). When specifying a filter condition, in the Value setting, you can choose one of the following:
- Address field – Specifies the name of a query string parameter (the part of a uniform resource locator (URL) which assigns values to specified parameters), which will be used as a condition for the field value in this filter.
- Constant value – Specifies a constant value that will be used as a filter condition during lookup. If the value of the specified field is equal (or more, or less, etc., depending on the operator) to this value, the filter condition will be met.
- Field – Specifies a field from the current entity (an entity, to which the field that you are configuring lookup settings for belongs to) the value from which will be used as a filter during lookup. This may be useful if you want to see value for the lookup entity that are related to the current entity.
- Date-time value – Specifies a date value that will be used as a filter condition during lookup. For example, the field value must be equal to the today's date or a date 3 months ago from the current date, etc.
- Value-from parent entity field – Specifies a field from a parent entity on the portal, the value from which will be used as a filter during lookup.
- Value-from member field name – Specifies a field from the portal member settings, the value from which will be used as a filter during lookup.
- Value from entity - Specifies the entity and the field from this entity, the value from which will be retrieved in this field.
- Value field name – Specifies the name of a field from the lookup entity the values of which will be selectable in the lookup field that you are configuring.
- Sort-by field name – Specifies the name of a field from the lookup entity the values of which will be used to sort the values in the drop-down list in the lookup field that you are configuring.
- Direction - Specifies the direction that will be applied to the sorting.
- Display entity mask - Specifies the template (mask) that defines how the field's value will look like in the field. You can combine variables in double square brackets (fields from this entity) with text constants. E.g.: Country: [[countryname]] Code: [[code]] E.g.: fieldname}" title="#: data.{fieldname}#"> where {fieldname} should be replaced with the name of the fields, the value of which will be used.
- Lookup entity mask – Specifies the template (mask) that defines how field options will look like in the drop-down list with the member selects the AssistButton in the field. You can combine variables in double square brackets (fields from this entity) with text constants. E.g.: Country: [[countryname]] Code: [[code]] E.g.: fieldname}" title="#: data.{fieldname}#"> where {fieldname} should be replaced with the name of the fields, value of which will be used.
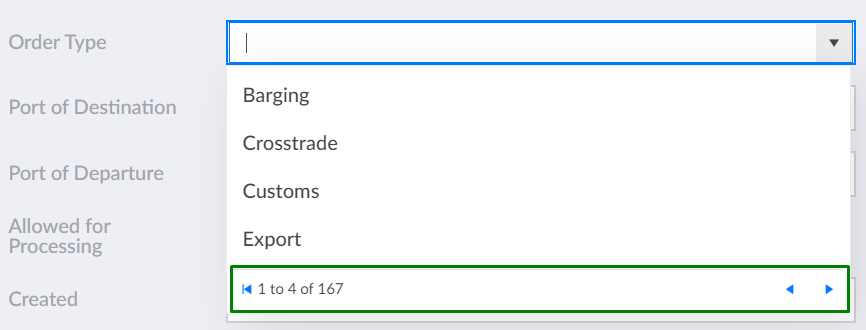
- Max. no. of options per dropdown page - Specifies the maximum number of options that will be displayed on a single page in a drop-down list of an option field. If the number of options exceeds this number, the member will be able to navigate through drop-down pages to see other options. This setting applies to fields with the Option or Multiselection data type.
- Show only unique values - Specifies whether duplicate values are allowed in the lookup.
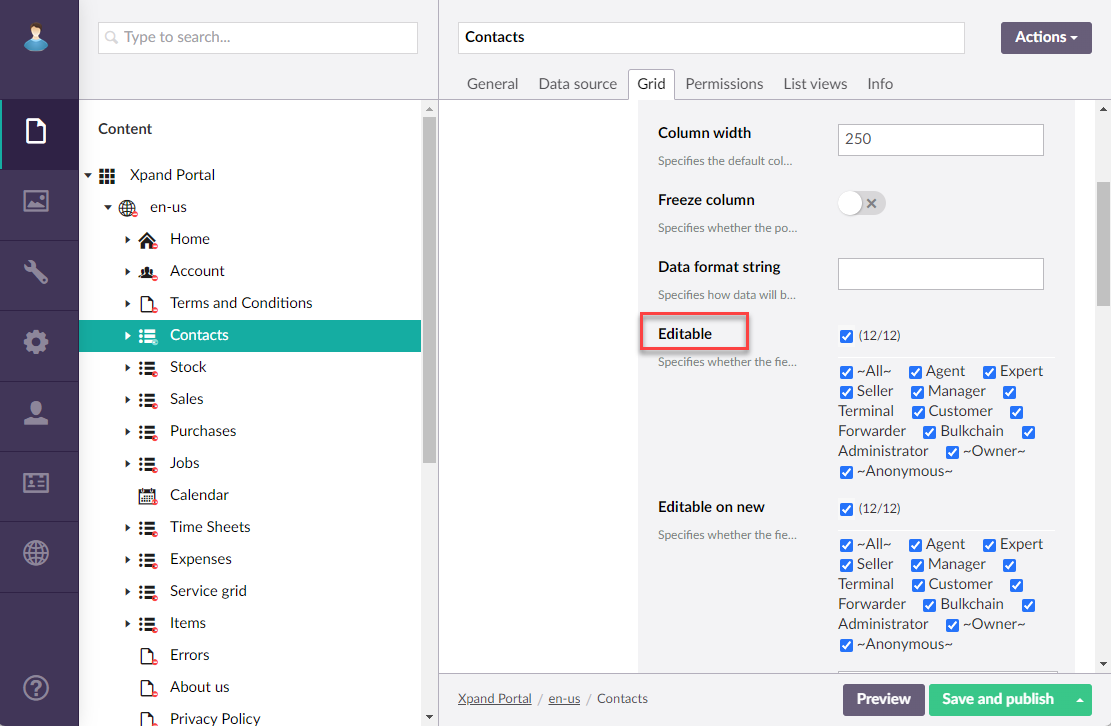
|
When creating a page, on the Fields tab, in the settings for a lookup field, ensure that the Editable (existing record) check box is selected. |
- Repeat steps 3 through 9 to create more entity fields.
- In the backoffice, select Media, and then, on the Portal License tab, select More > Clear cached data.
Important
You must clear cache whenever you make changes in the Media section of the backoffice. Otherwise, your changes may not take effect.