Single sign-on (SSO)
Single sign-on (SSO) settings are used to configure the ability to sign in to the portal front end and portal backoffice with social network accounts. For signing in to the front end using SSO, you must also add the corresponding buttons on the sign-in page for each SSO provider you set up here.
SSO providers are configured separately for back end and front end: if the CMS provider setting is enabled, this means that the SSO settings are for the back end; if this setting is disabled, then you are setting up SSO for the front end.
To configure SSO settings
- In the backoffice, go to Media > Site settings > OAuth & SSO settings.
- Select the SSO settings tab.
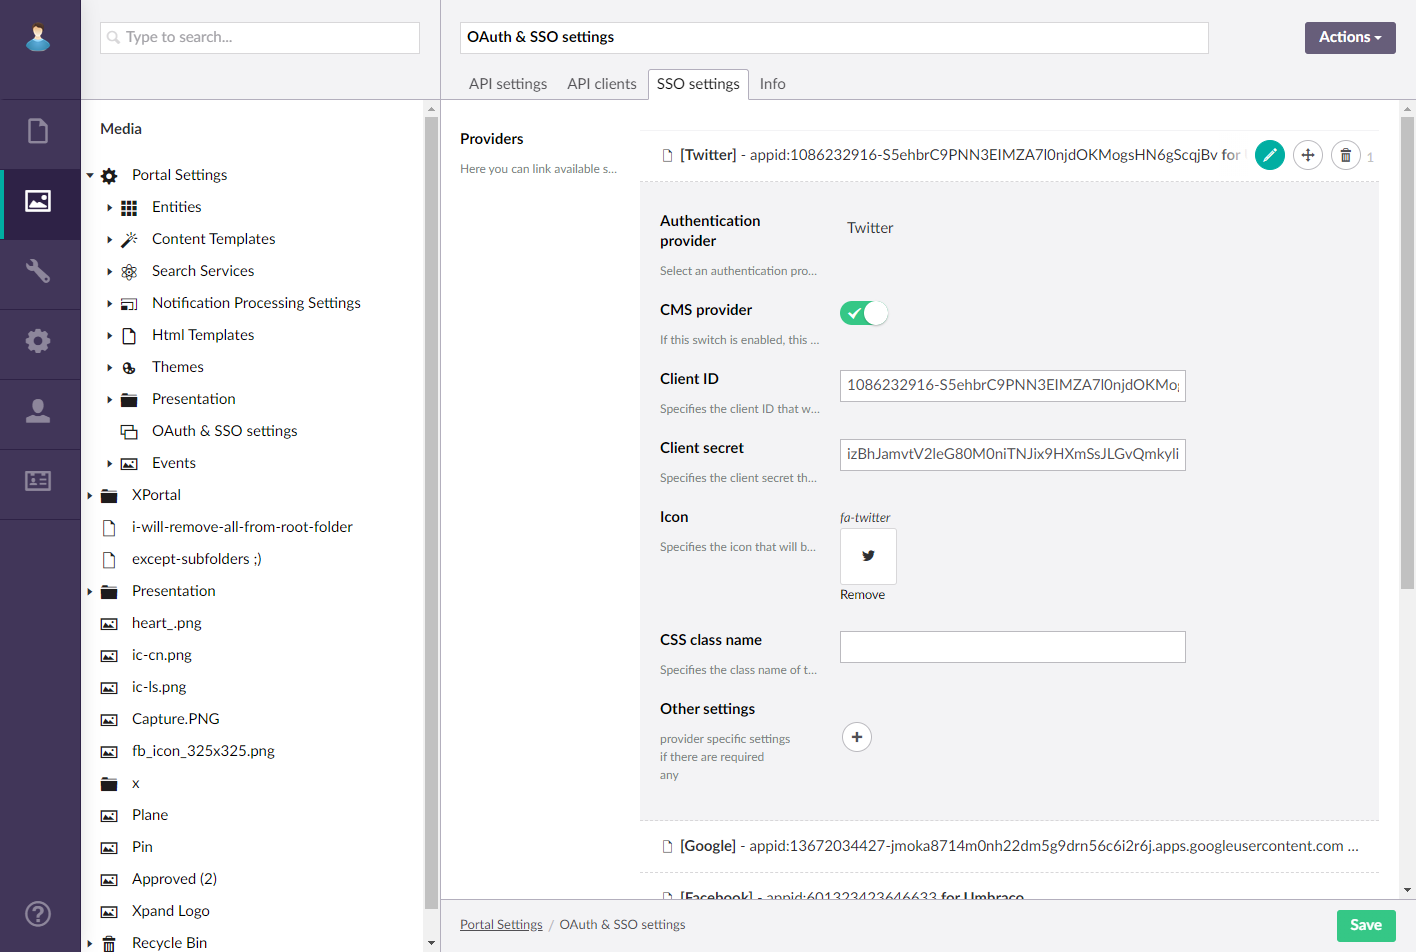
- Next to Providers, select Add content to add a new SSO provider or select an existing one to edit.
- Fill in the fields as described below:
- Authentication provider – Specifies the authentication provider for which these settings will apply. Select one of the supported authentication providers:
 Facebook
 Google
 Microsoft
- CMS provider- With this switch enables, the SSO provider settings will be applied to the portal backoffice. If this switch is disabled, the SSO provider settings will be applied to the portal front end (in this case, also ensure you configure SSO settings for this provider on the sign-in page).
- Client ID – Specifies the client ID that was registered for this SSO provider on the corresponding SSO provider site:
- Facebook: for this SSO provider, the Xpand Portal app must be registered on this site. For more information on how to set up the Facebook app, refer to this guide or follow the steps below. For information on how to lock down your Facebook app settings, refer to this guide.
- Google: for this SSO provider, the Xpand Portal app must be registered on this site. For more information on how to set up your Google app, refer to this guide or follow the steps below.
- Microsoft: for this SSO provider, the Xpand Portal app must be registered on this site. For more information on how to configure your App Service app to use Microsoft Account login, see this guide or follow the steps below.
- Client secret – Specifies the client secret that was registered for this SSO provider on the corresponding SSO provider site (see the Client ID setting above).
 Important
The portal hashes the Client secret setting value. This means that if you copy the SSO settings (for example, when you set up a provider for the front end, and want to set up SSO for the back end), you need to clear this setting value and then paste or type it again. Otherwise, the client secret will be considered incorrect and won't work properly.
- Icon – Specifies the image that will be used as the button to sign in with a social network that corresponds to this authentication provider. You can leave this setting empty to use the predefined icon. If this setting is also filled in on the login page, the setting on the login page will be used.
- CSS class name – Specifies the name of the CSS (Cascading Style Sheets), which can be used to apply styles to the sign-in link of this authentication provider. This setting is optional. If this setting is also filled in on the login page, the setting on the login page will be used.
- Other settings - Use this setting to specify additional provider settings, which might be required for your SSO provider.
- External service name - Specifies the name of an external service, for which value needs to be specified in the Value field. The availability of additional settings available for selection depends on the additional features implemented on the portal. Specific settings per provider:
- For the Microsoft provider, you need to set up here:
- Tenant ID - This value can be taken from the Directory (tenant) ID field in Microsoft Azure.
- Redirect URI for the front end: https://[your_portal_domain]/member-signin-microsoft where [your_portal_domain] is the domain of your portal.
- Redirect URI for the back end: https://[your_portal_domain]/umbraco-signin-microsoft where [your_portal_domain] is the domain of your portal.
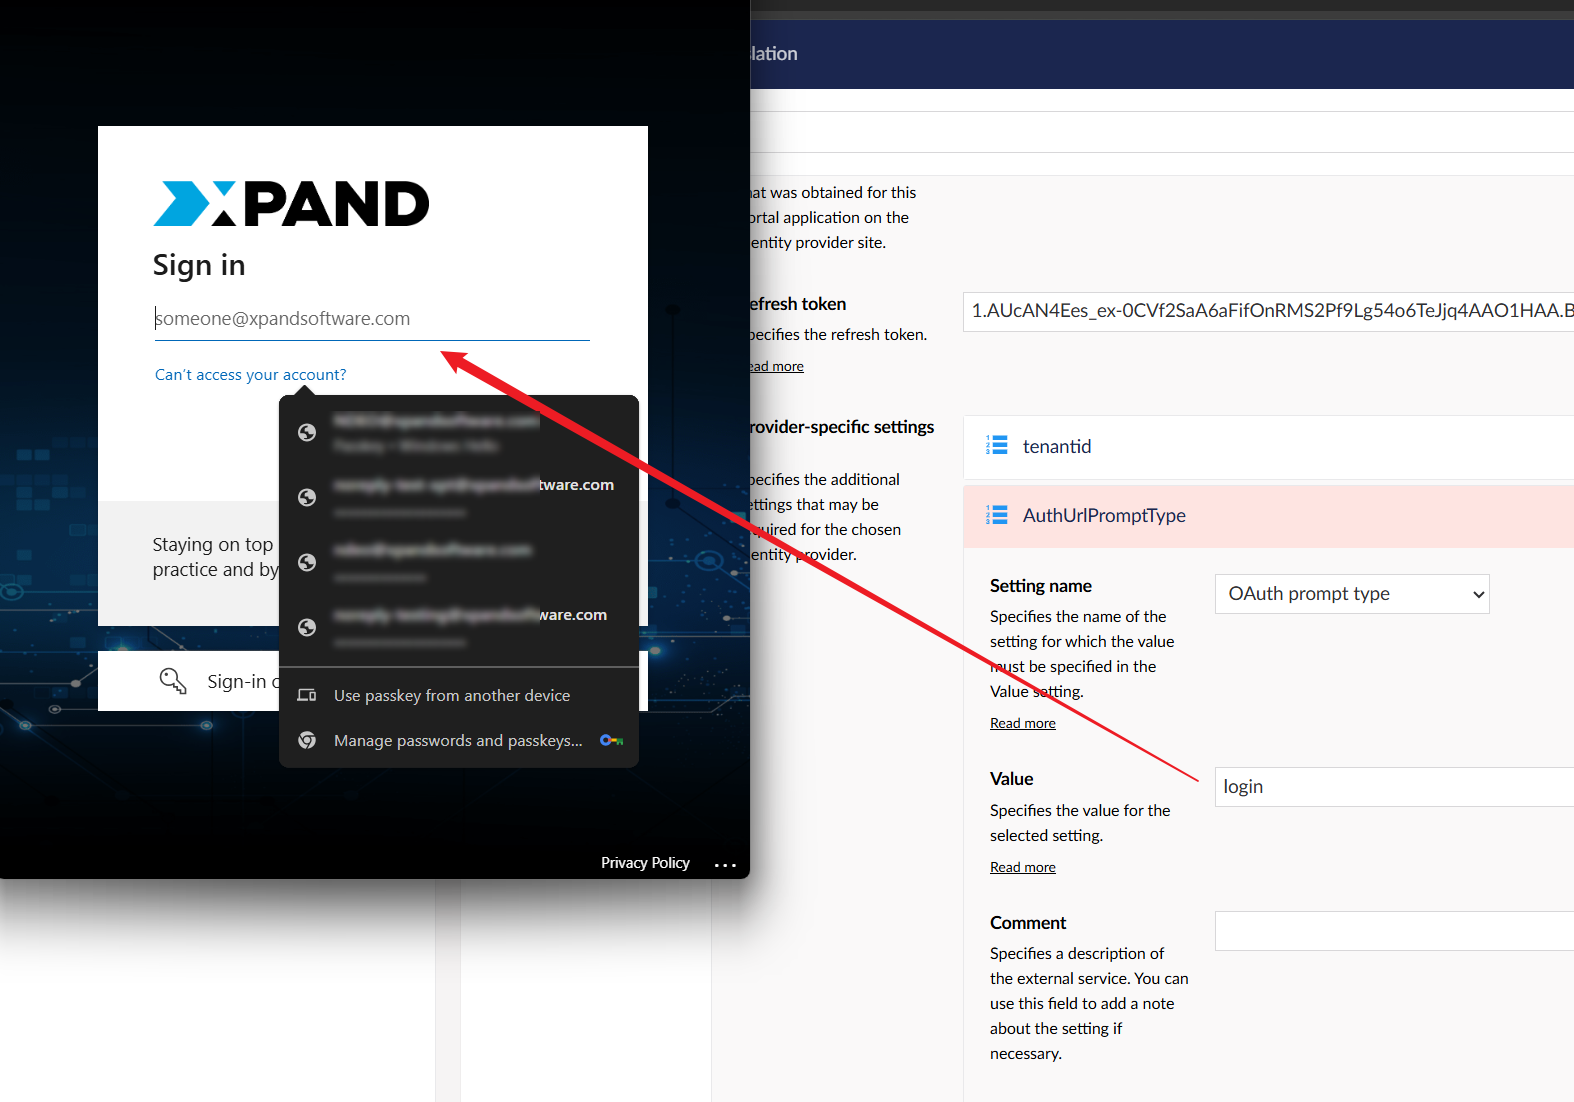
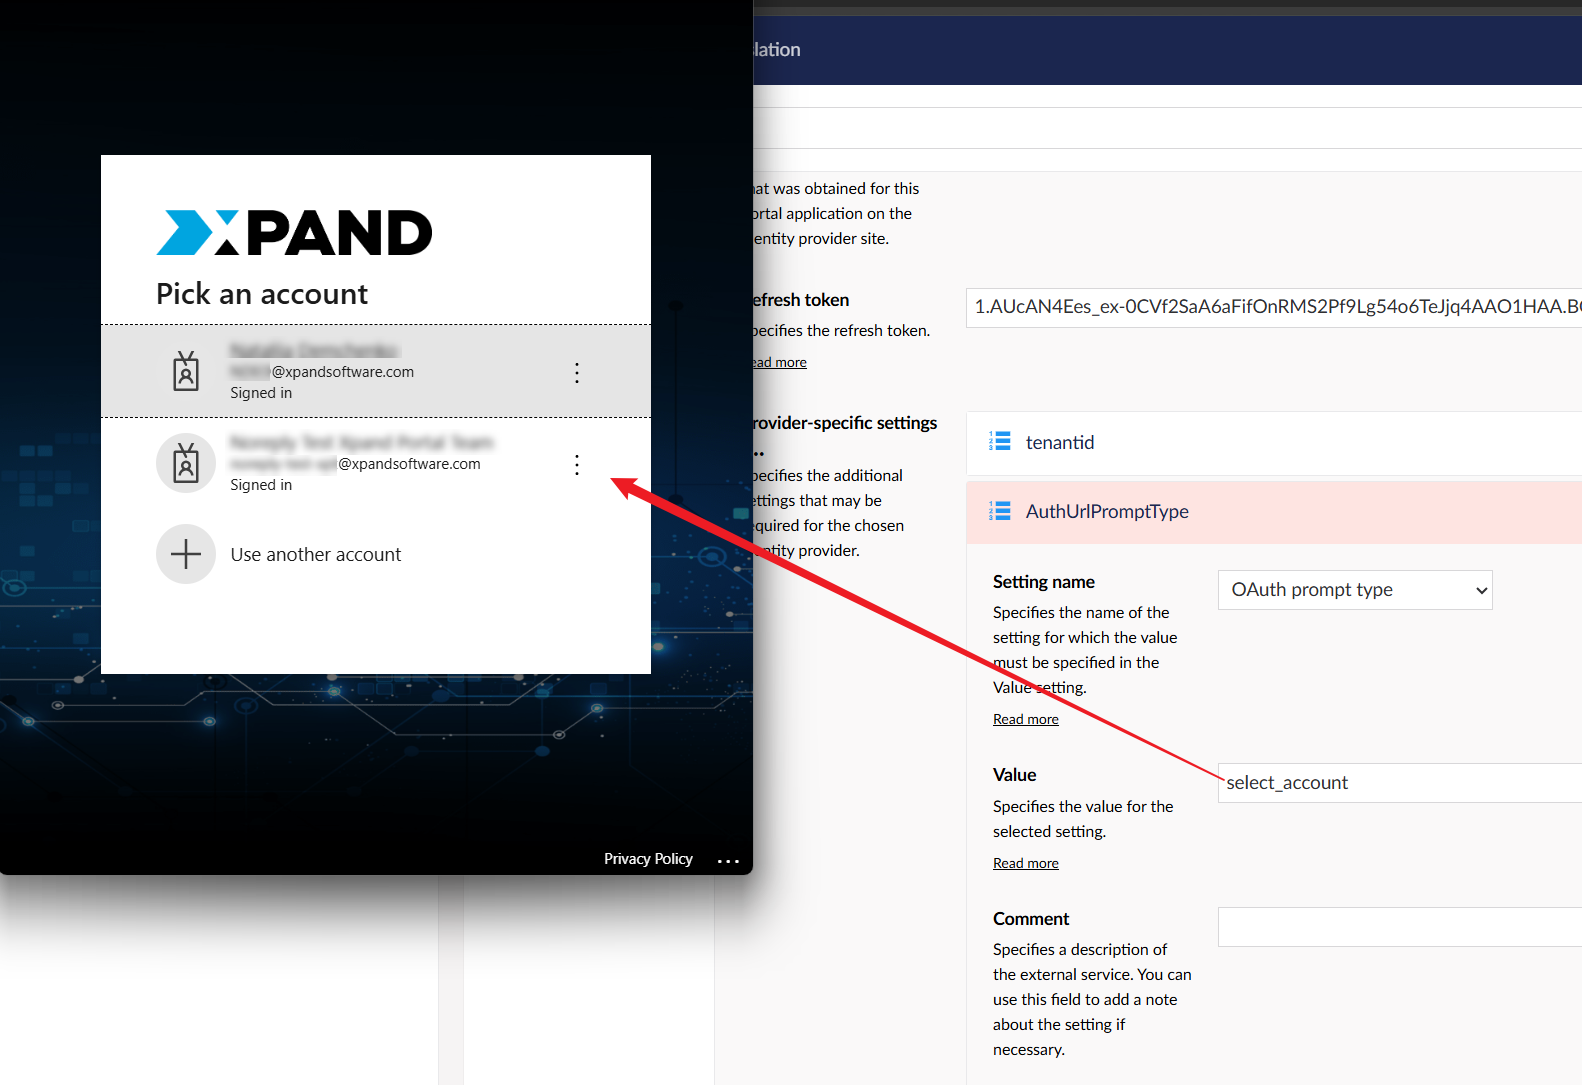
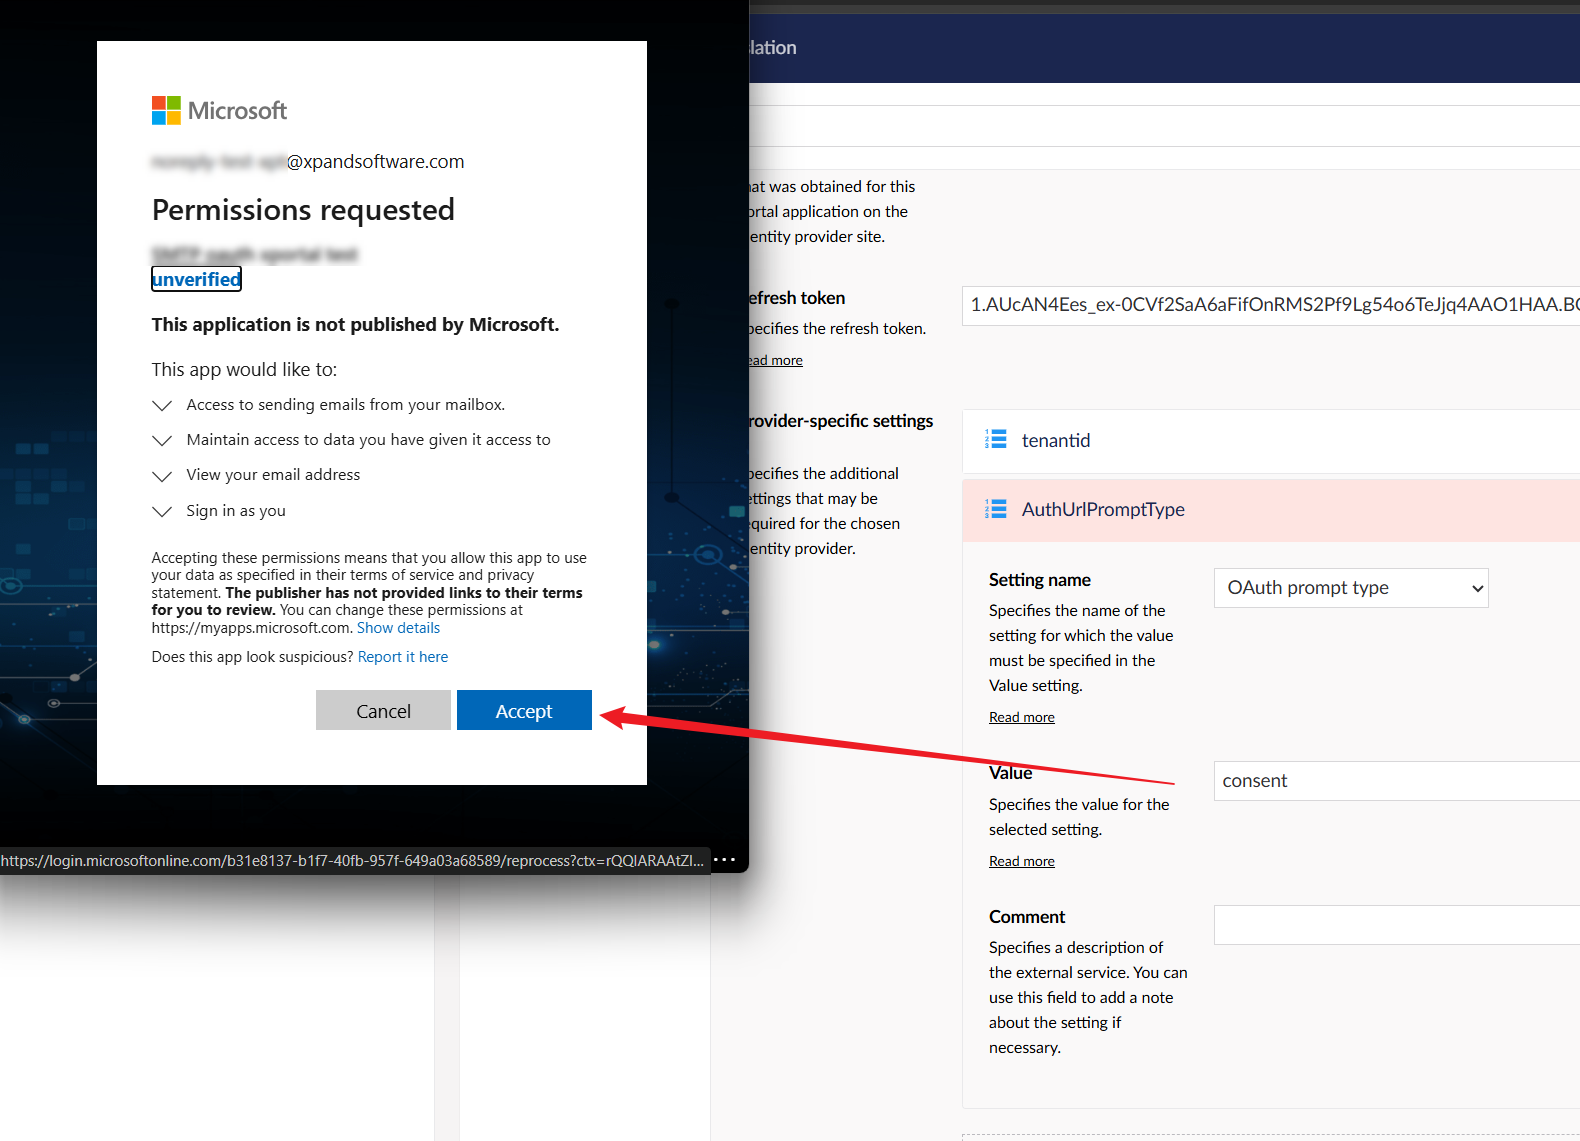
- OAuth prompt type (optional) - Specifies what will be shown during authorization. Supported values:
- login – A sign-in window is shown during authorization where the user needs to enter account credentials.
- select_account - An account selection window is shown during authorization where the user selects an account to sign in with. This type is used by default if the OAuth prompt type setting is not configured.
- consent - A request window is shown during authorization where the user needs to grant permissions to the app.
 Note
NoteThe standard none OAuth prompt type is not used in Xpand Portal.
- login – A sign-in window is shown during authorization where the user needs to enter account credentials.
- For the Google provider, you can set up here:
- OAuth prompt type (optional) - Specifies what will be shown during authorization. Supported values:
- login – A sign-in window is shown during authorization where the user needs to enter account credentials.
- select_account - An account selection window is shown during authorization where the user selects an account to sign in with. This type is used by default if the OAuth prompt type setting is not configured.
- consent - A request window is shown during authorization where the user needs to grant permissions to the app.
Note
The standard none OAuth prompt type is not used in Xpand Portal.
- OAuth prompt type (optional) - Specifies what will be shown during authorization. Supported values:
- For the Microsoft provider, you need to set up here:
- Value - Specifies the value of the selected service. You may need to enter, for example, the app ID, the app key, etc., depending on the additional setting type.
- Comment - Specifies a description of the external service. You can use this field to add a note about the setting if necessary.
- External service name - Specifies the name of an external service, for which value needs to be specified in the Value field. The availability of additional settings available for selection depends on the additional features implemented on the portal. Specific settings per provider:
- Authentication provider – Specifies the authentication provider for which these settings will apply. Select one of the supported authentication providers:
- Repeat steps 3 and 4 to add more providers. Ensure you add a pair of setting sets for each provider, one setting set for front end (the CMS provider switch is disabled) and one setting set for back end (the CMS provider switch is enabled)
- In the backoffice, select Settings > More > Reload Application.
Important
You must reload application whenever you make changes in the Media section of the backoffice. Otherwise, your changes may not take effect.
Configuring external settings for SSO
Before configuring SSO settings in the portal backoffice, you must set up external services that you are going to use for the SSO on your portal. For SSO configuration on the portal side, you will need certain values, such as the client ID, client secret, and tenant ID that you can obtain while configuring the external services, therefore, make sure you save them.
Configuring Facebook for SSO
To register and configure your app on Facebook for SSO, follow these steps:
- Go to https://developers.facebook.com/ and sign in using your Facebook account or create a new one.
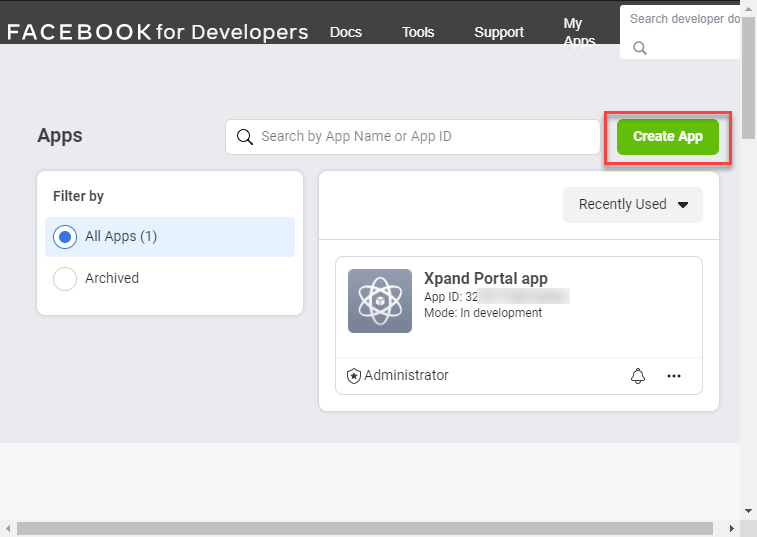
- Select My Apps. If you haven't registered yet, first select Get started and register with your Facebook account.

- In the window that opens, select Create App.
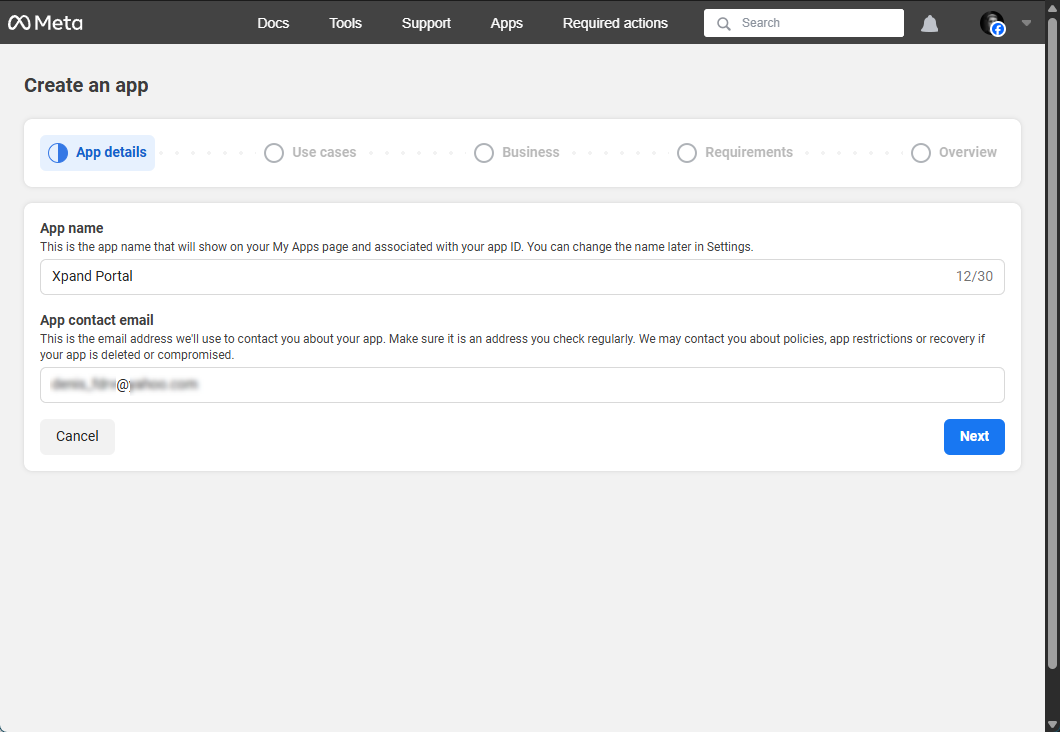
- In App details, specify the app name and app contact email, and then select Next.
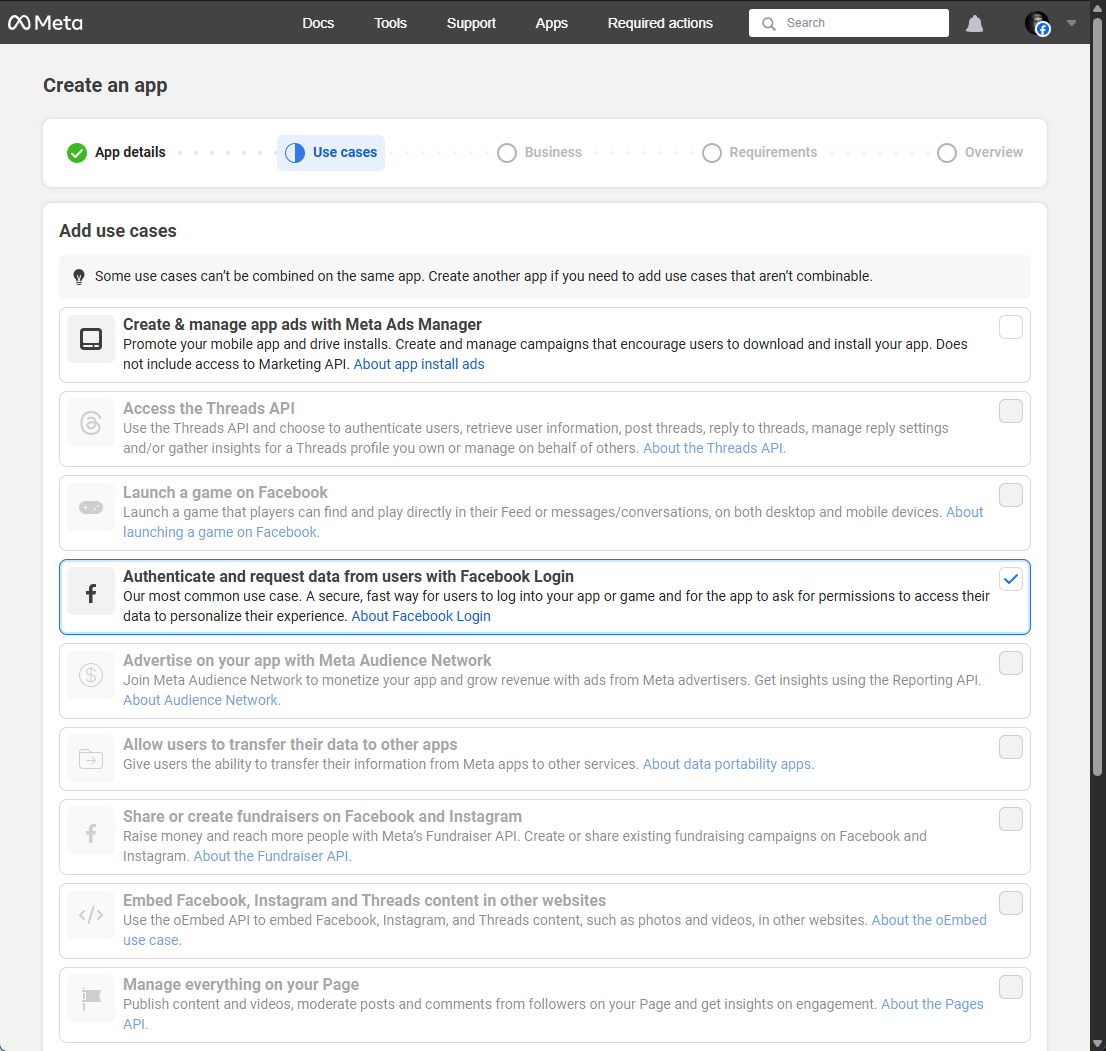
- In Use cases, select Authenticate and request data from users with Facebook Login, and then select Next.
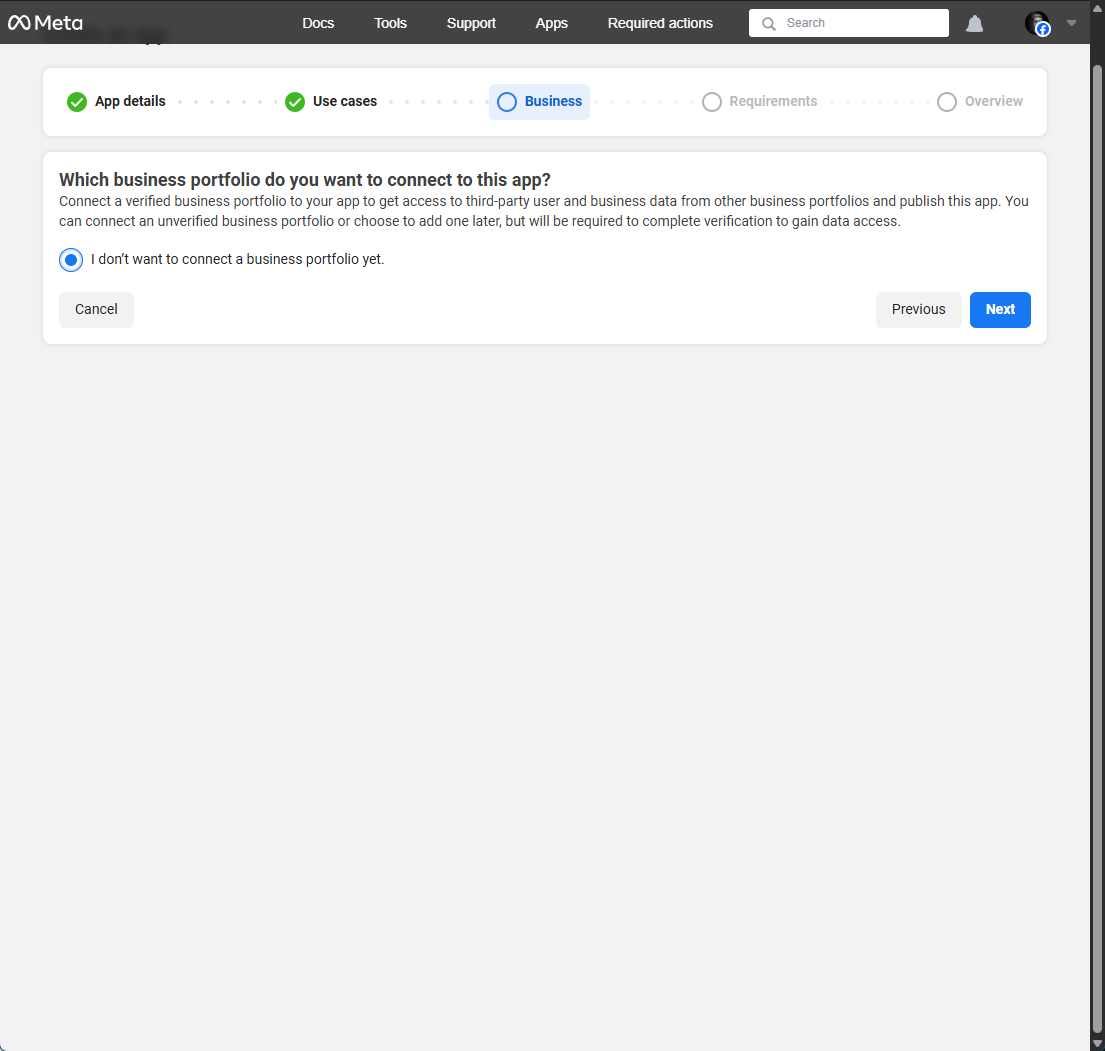
- In Business, select I don't want to connect a business portfolio yet, and then select Next.
- In Requirements, you get an overview of requirements that you need to complete to get and maintain access to user and business data. Select Next.
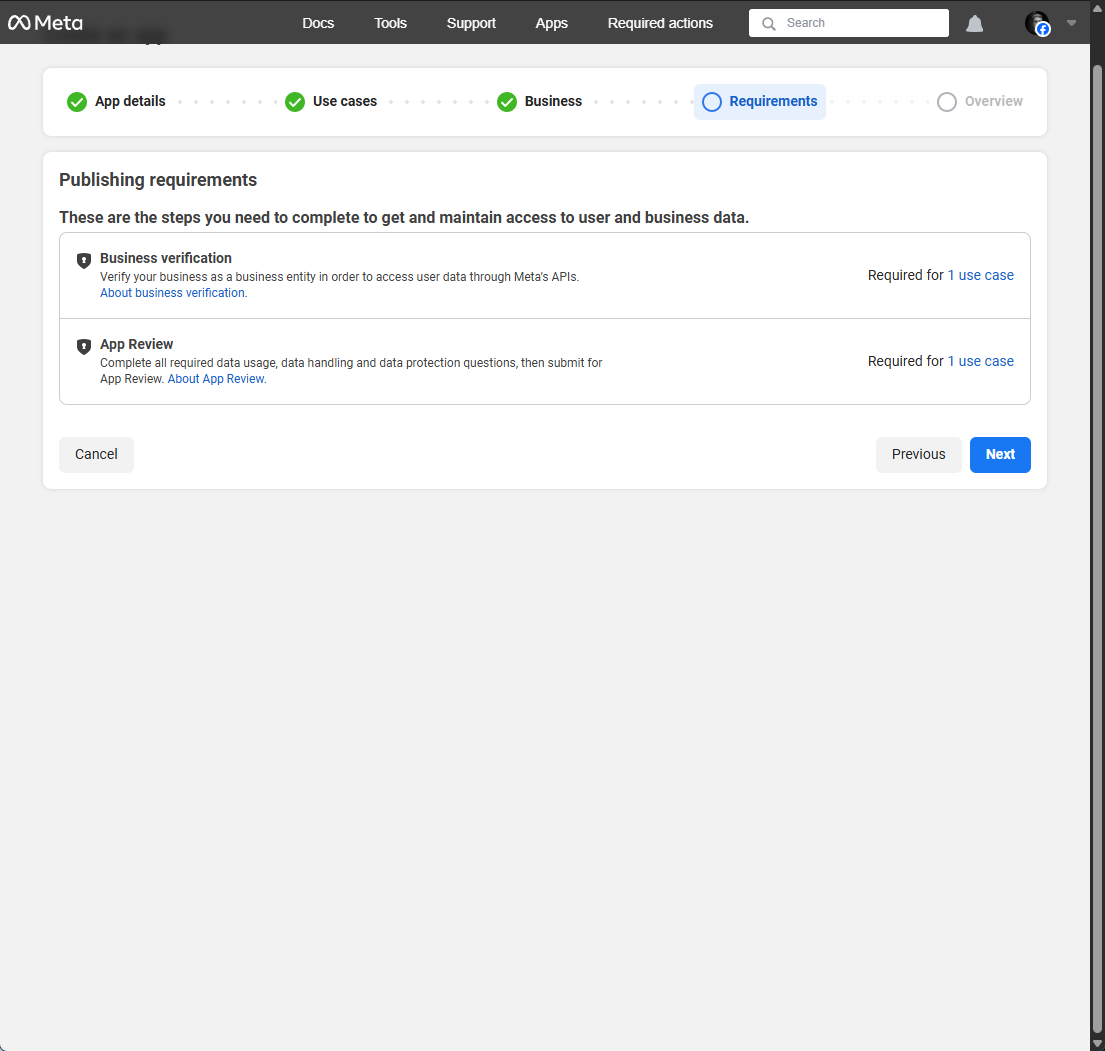
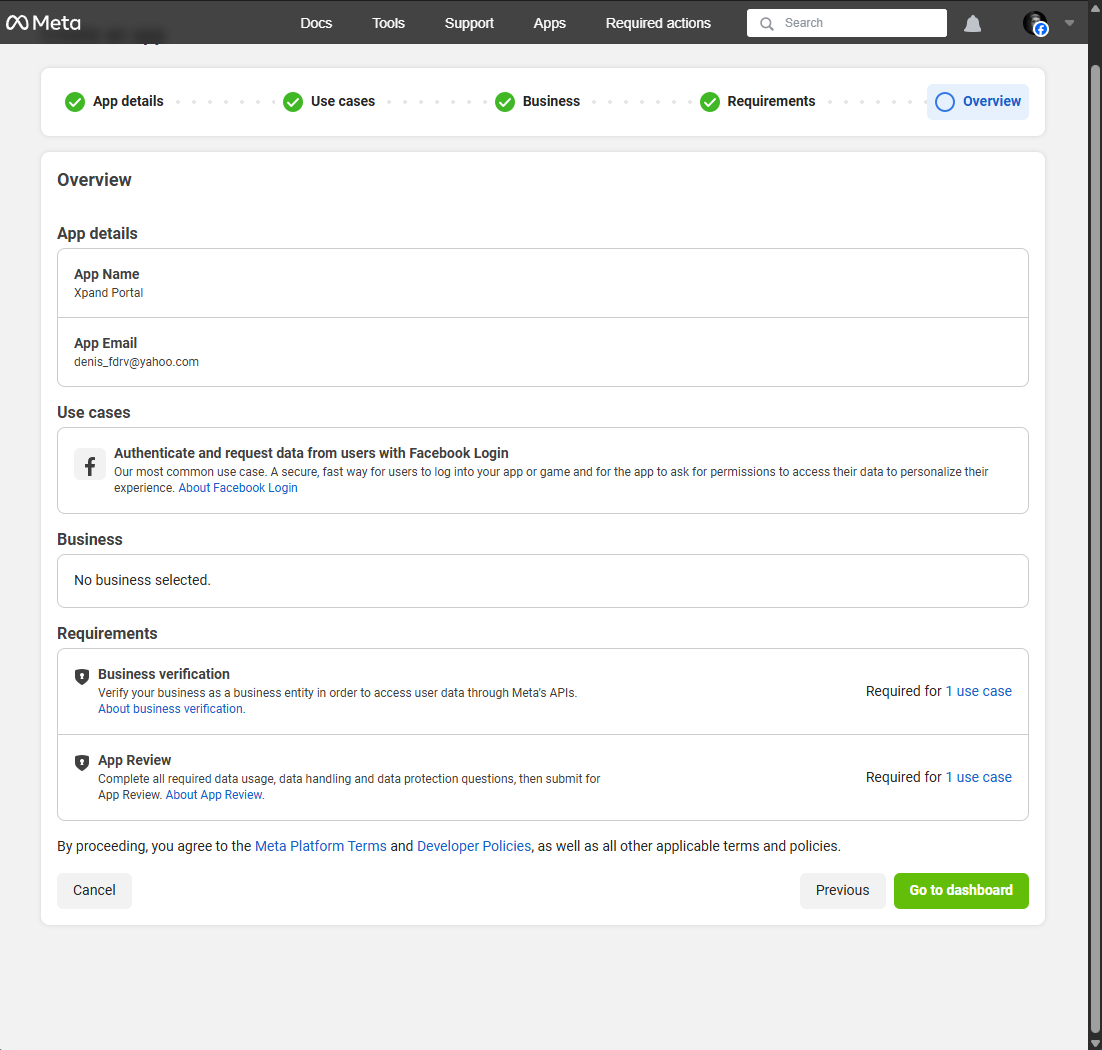
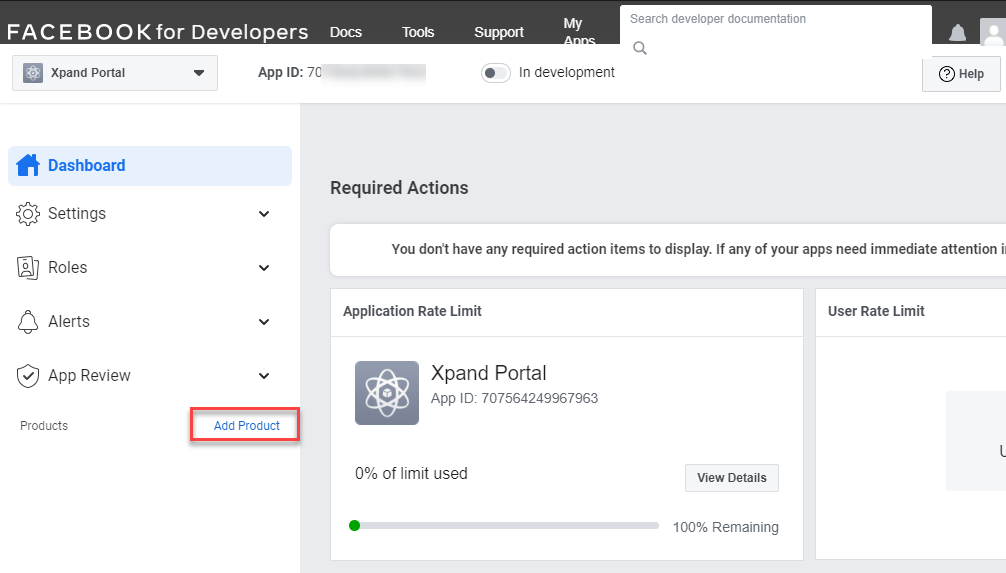
- In Overview, select Go to dashboard.
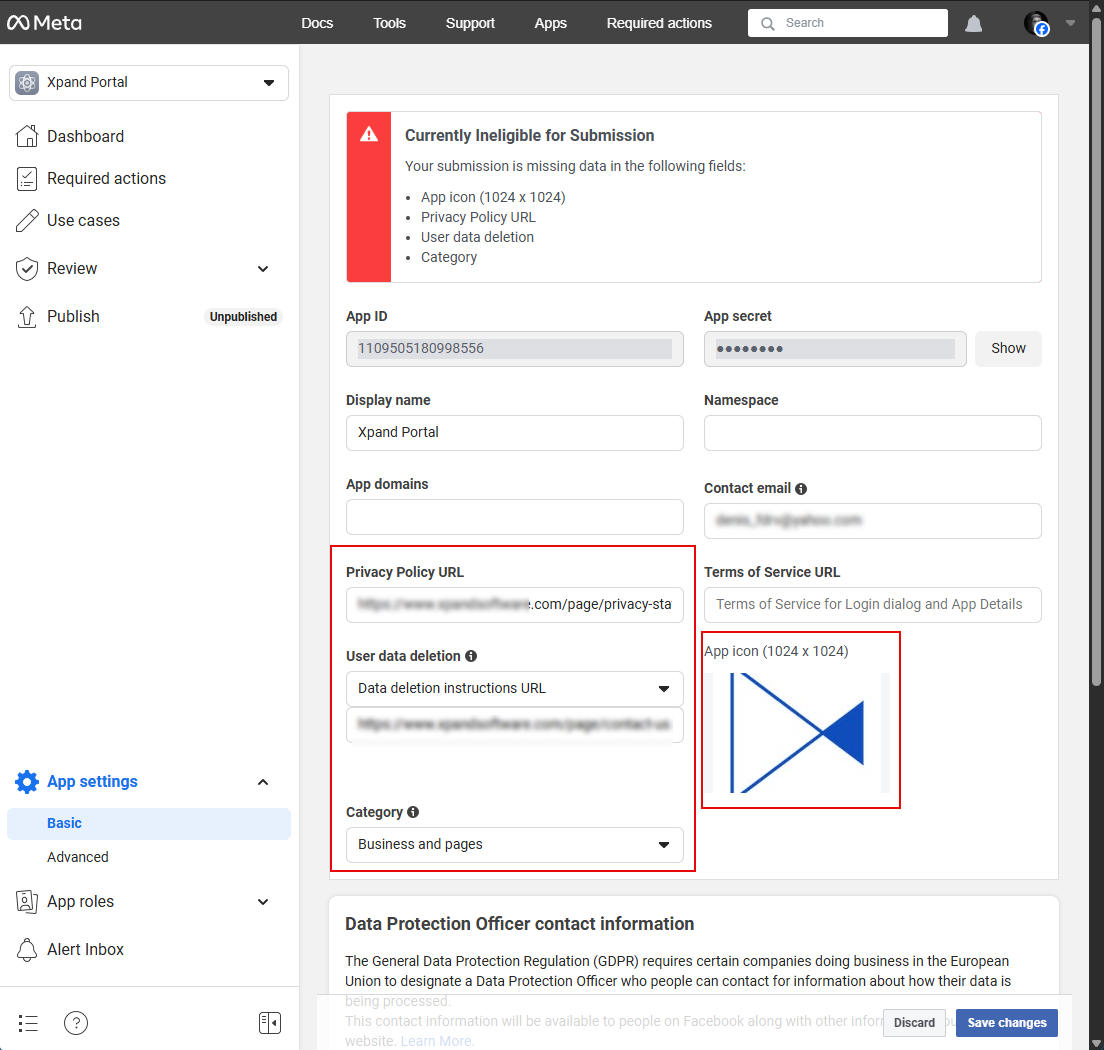
- Go to App settings > Basic and copy the client ID from the App ID field and the client secret from the App secret field—you will need them for further configuration of the SSO settings on Xpand Portal.
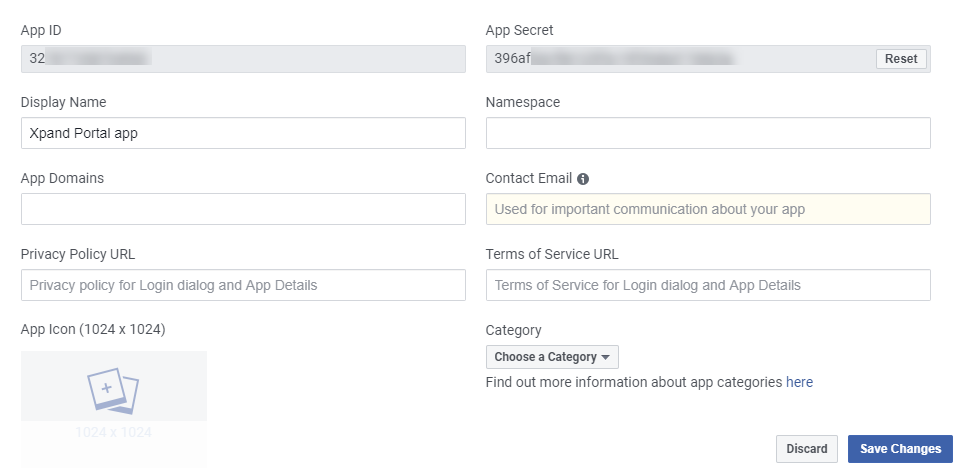
- Fill in the mandatory fields (Privacy Policy URL, User data deletion, Category) and upload the app icon, and then select Save changes.
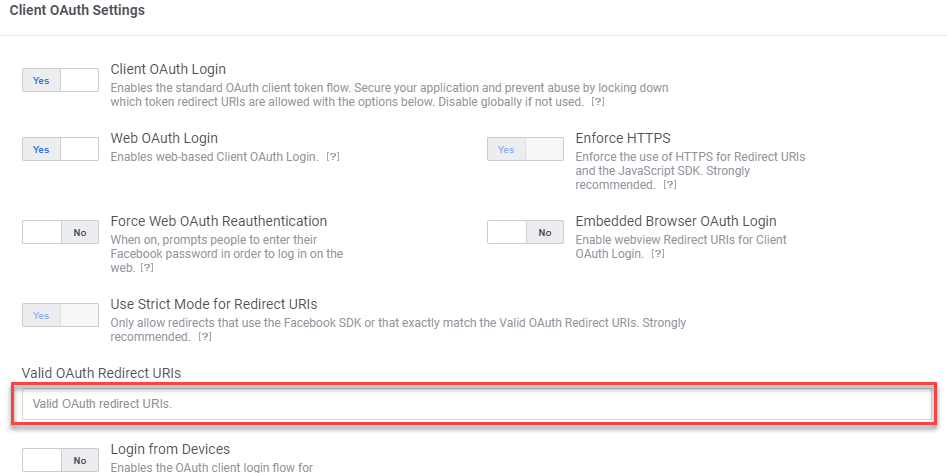
- Go to Use cases and select Customize next to the Authenticate and request data from users with Facebook Login use case.
- In the Settings section, under Valid OAuth Redirect URIs, add the following redirect URIs, and then select Save Changes:
https://[yourportaldomain]/umbraco-facebook-signin
https://[yourportaldomain]/umbraco/Surface/Member/externallogin-facebook
where [yourportaldomain] is the domain where your Xpand Portal solution is deployed.
-
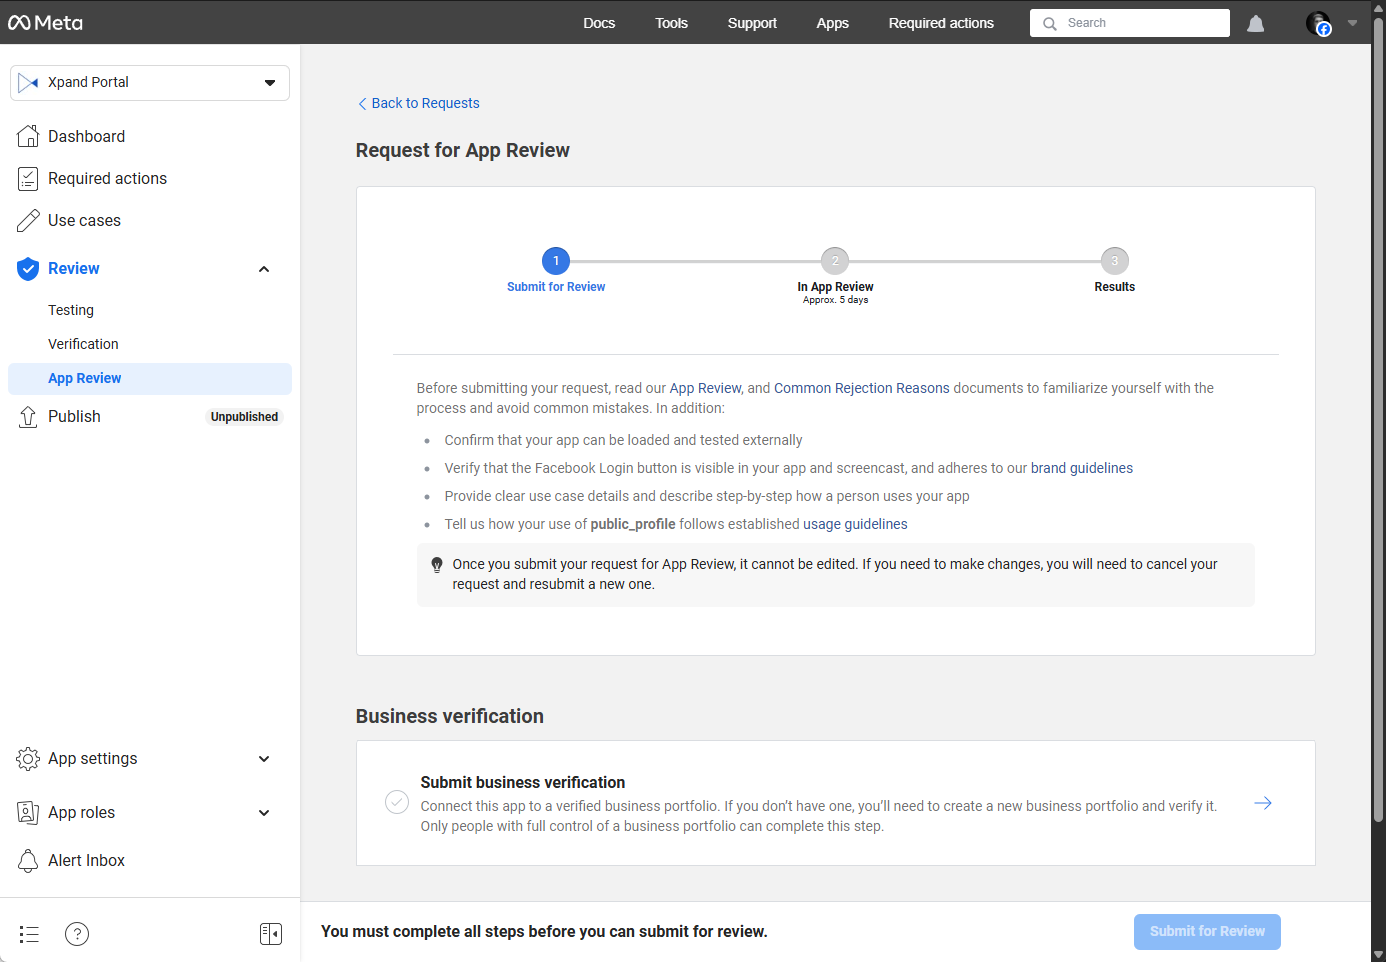
To get access to data from users, Meta requires business verification. Go to Review > Verification and select Start verification and then follow the prompts on the screen. Only people with full control of a Business Account can complete this process. Learn more about business verification.
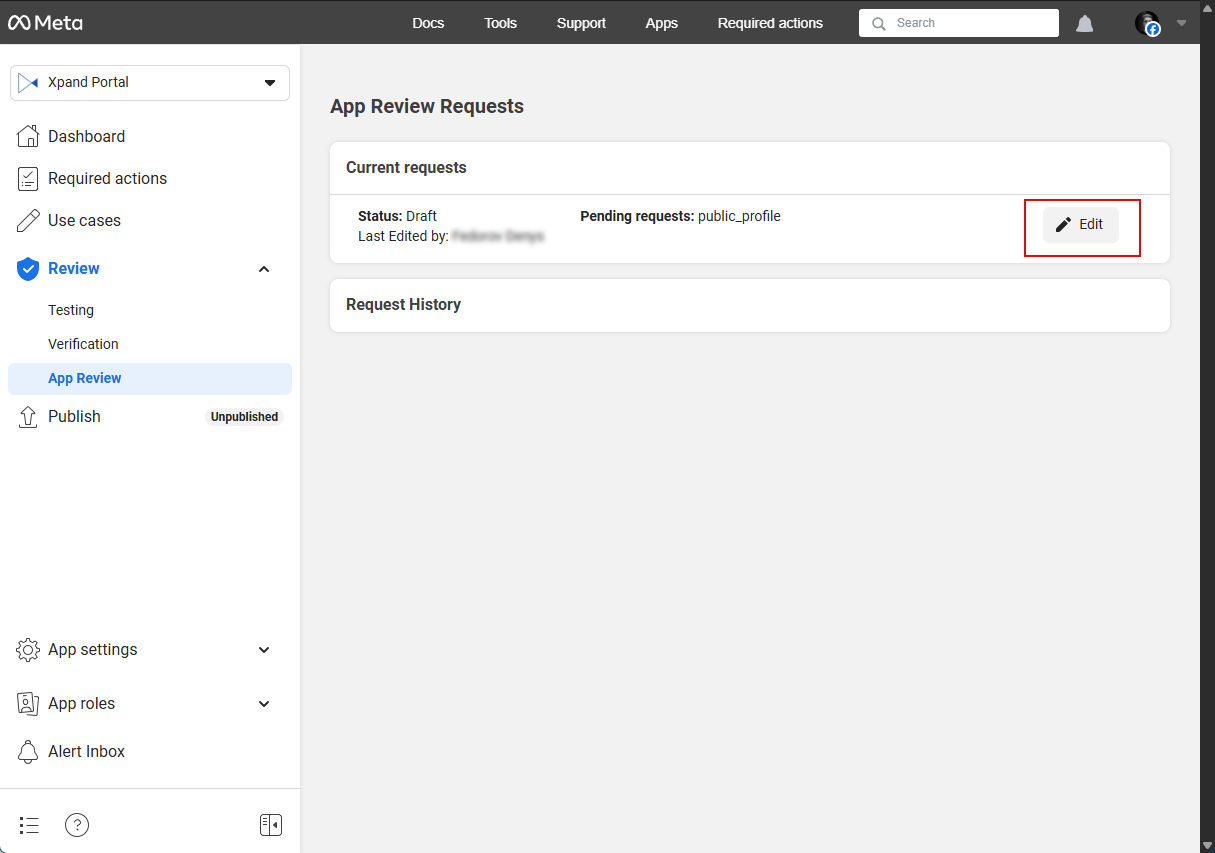
- After business verification, submit your app for review and approval: go to Review > App Review and select Edit, and then select Submit for Review. The previous steps must be completed. The app review process may take up to 5 days.
- Once the app is reviewed and approved, publish the app: go to Publish, and select the Publish button.
Configuring Google for SSO
To register and configure your app on Google for SSO, follow these steps:
- Go to Google Cloud Platform and sign in with your Google account or create a new one.
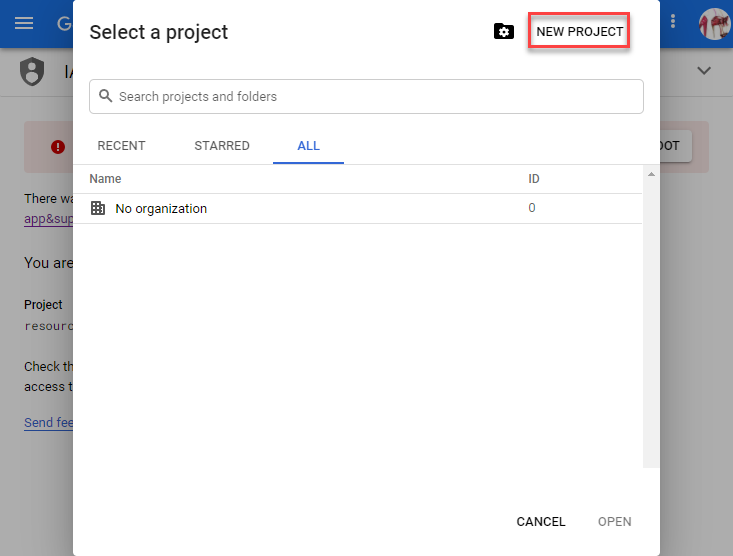
- On the header, select the Select a project action.
- In the Select a project window that opens, select New project.
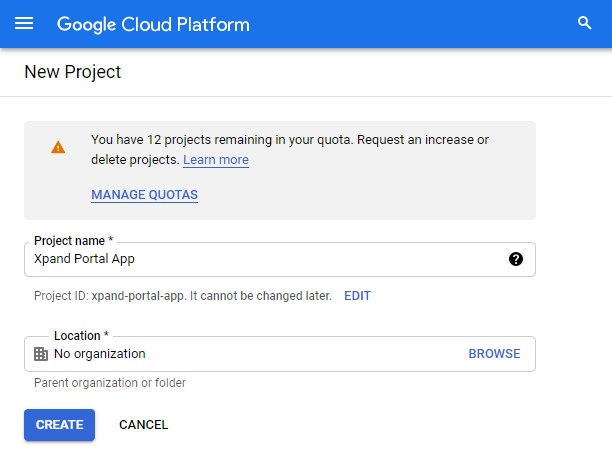
- In the New Project window, add the name of your app and select Create.
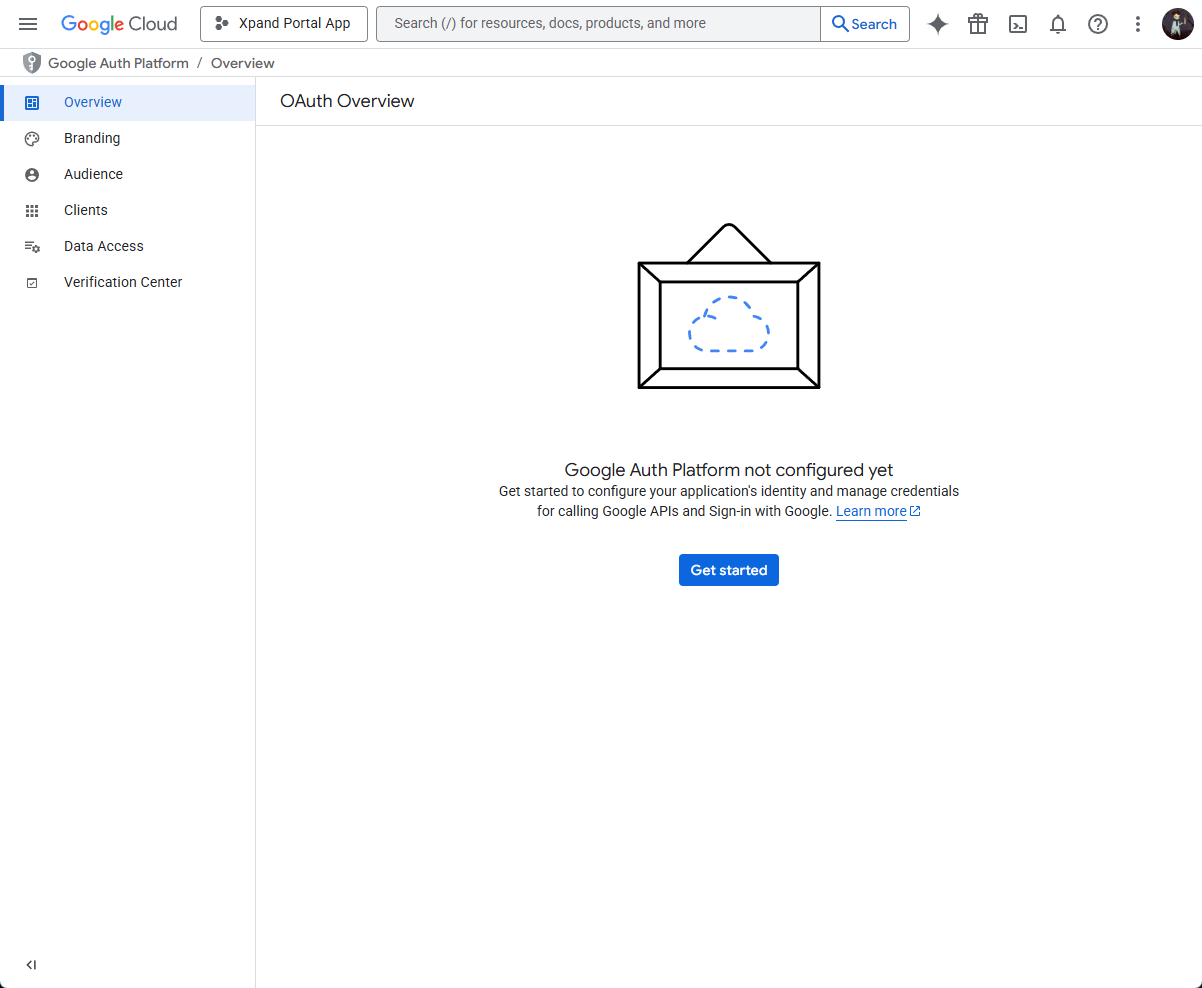
- On the OAuth Overview page, select Get started and fill in the required fields.
- Select Create to finish the project creation.
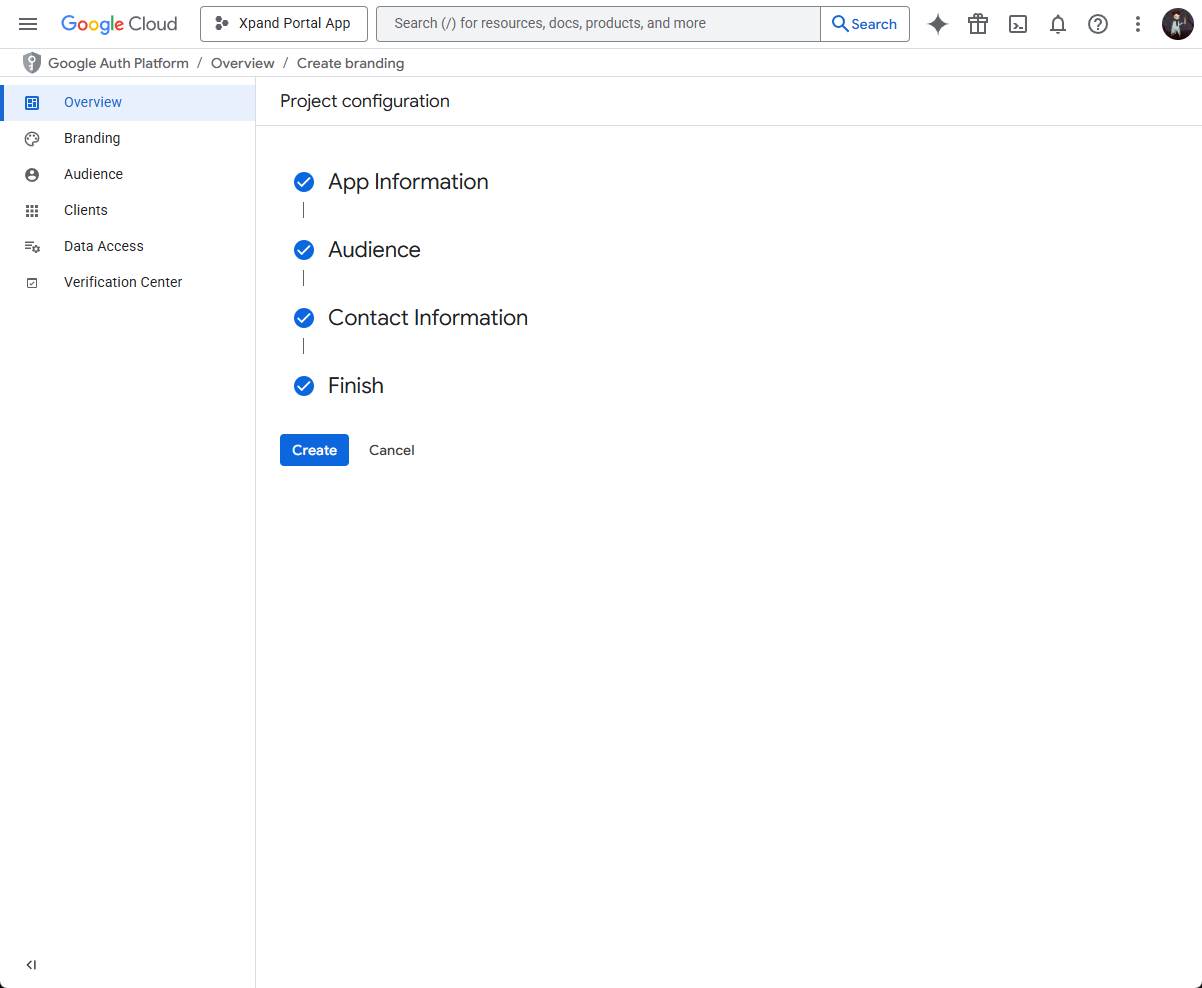
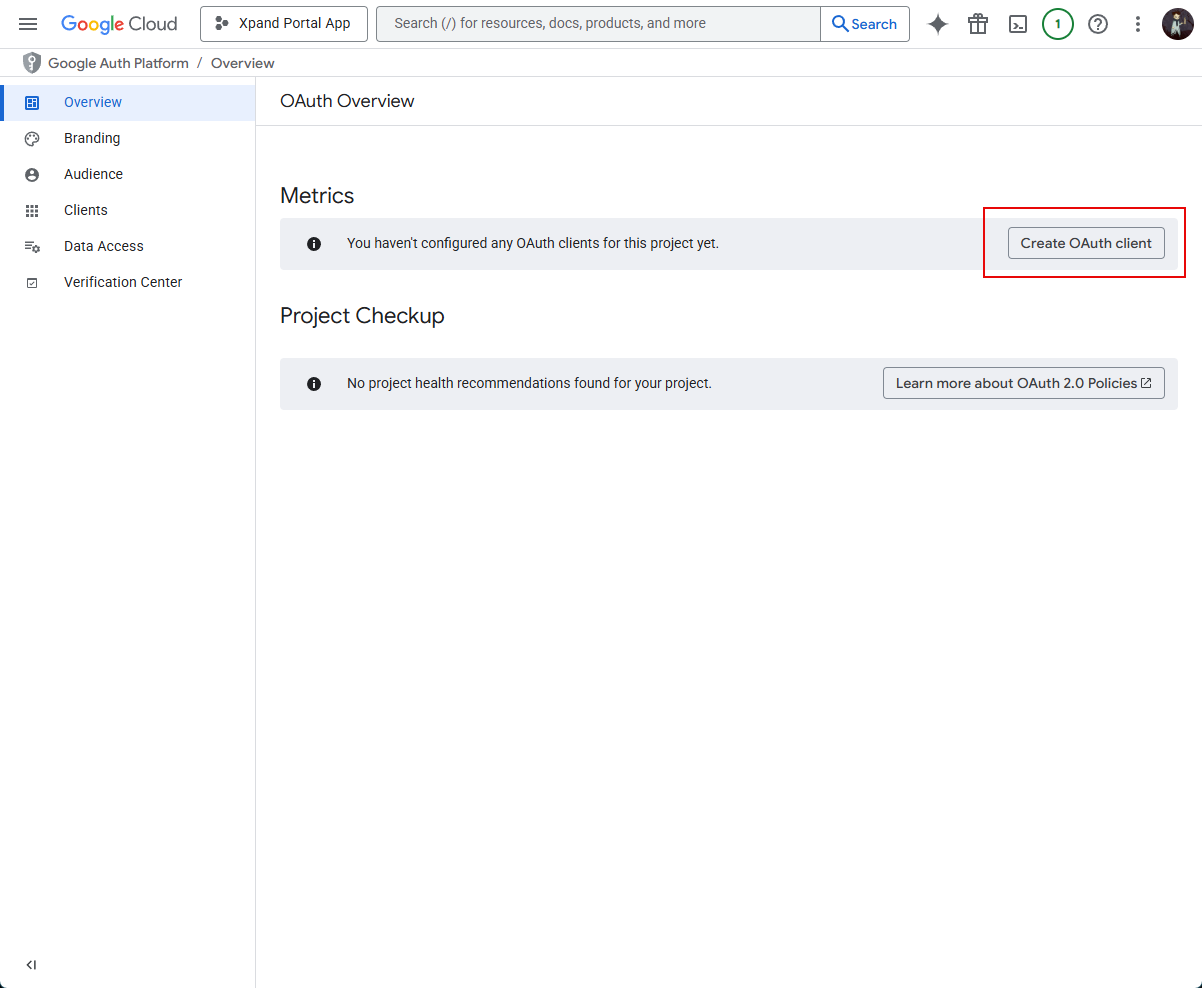
- On the OAuth Overview page, select Create OAuth client.
- In the window that opens, on the navigation pane on the left, select OAuth consent screen.
- In the Create OAuth client ID window, in the drop-down menu, select Web application.
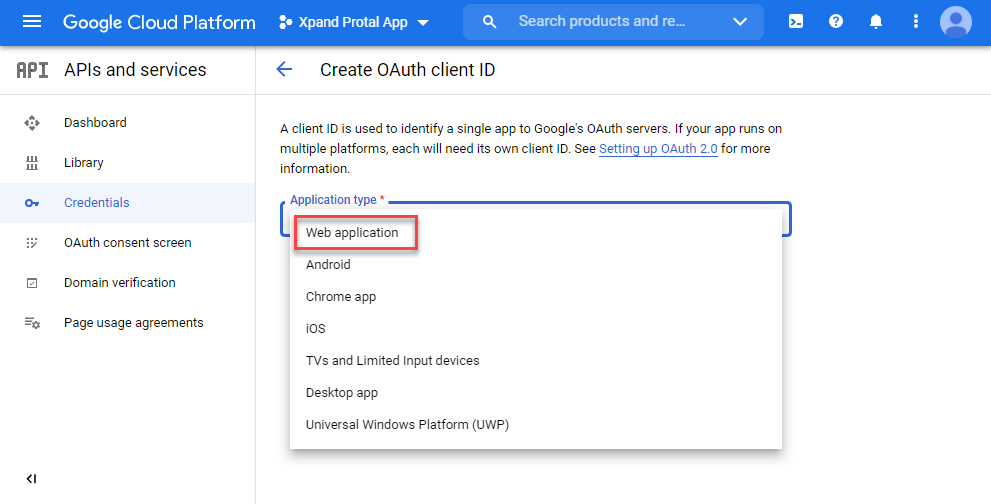
- In the Create OAuth client ID window that opens, enter the client name.
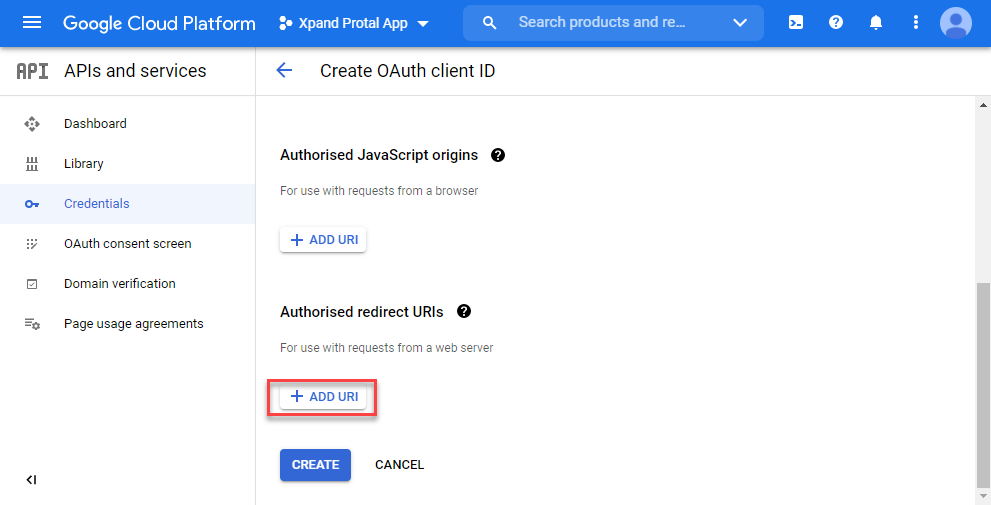
- Under Authorised redirect URIs, select Add URI and add the links given below, and then select Create.
- https://[yourportaldomain]/umbraco-google-signin
- https://[yourportaldomain]/umbraco/Surface/Member/externallogin-google
where [yourportaldomain] is the domain where your Xpand Portal solution is deployed.
 Note
NoteGoogle Cloud only allows redirect URIs with public top level domain (such as .com or .org). To be able to use Google as a SSO provider, your portal domain must meet this requirement.
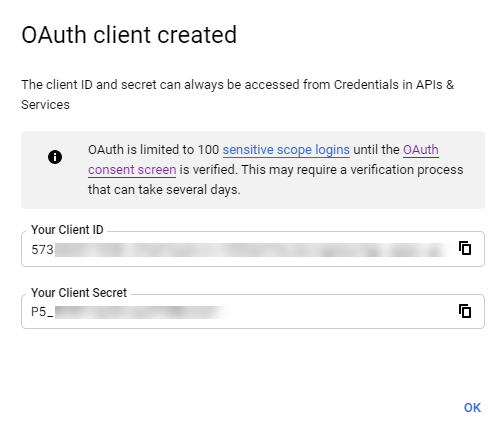
- From the OAuth client created message that appears, copy the client ID from the Client ID field, and the client secret—from the Client secret field, as you will need them for further configuration of the SSO settings on Xpand Portal, and then select OK.
Configuring Microsoft for SSO
A Microsoft account with administrator permissions is required for this.
To register and configure your app in the Microsoft Azure portal to use it for SSO, follow these steps:
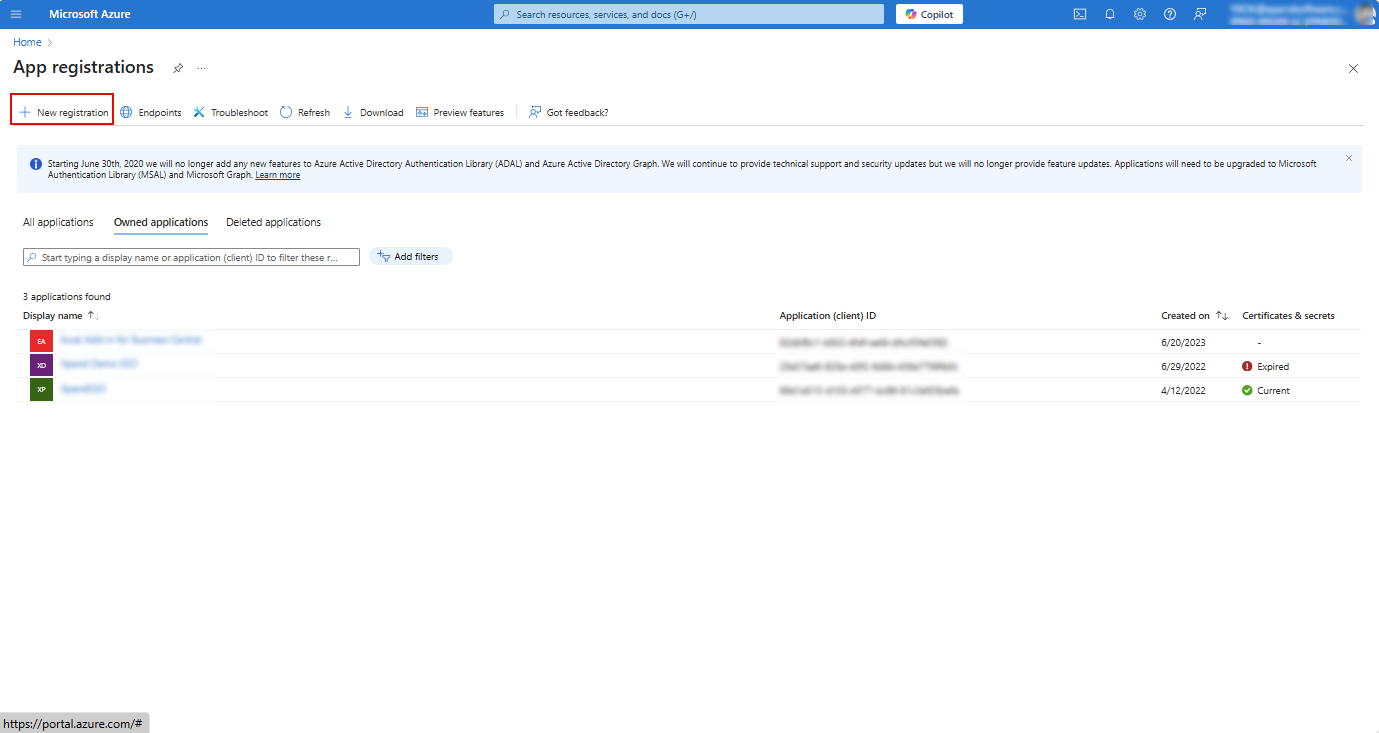
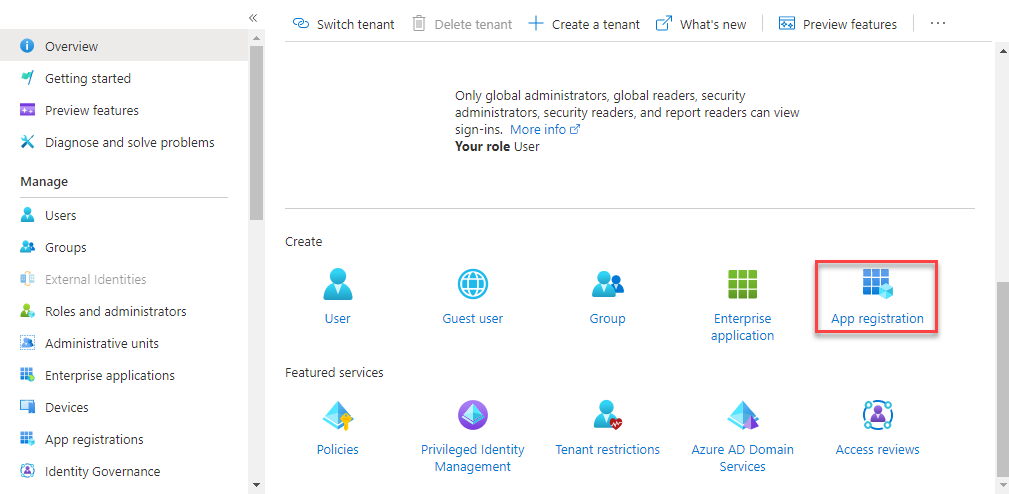
- Go to App registrations in the Azure portal. If needed, sign in with a Microsoft account that has administrator permissions.
Note
If you already have a registered app for your portal (which was created and configured, for example, for the SMTP functionality), you don't need to create another app registration. In this case, skip the next step, and then expand the existing app configuration with additional setting that are required for SSO.
- Create a new app registration:
- Select New registration, then enter an application name.
 Note
NoteOnly Microsoft accounts with administrator permissions can create new app registrations.
- In the Register an application window, enter the name of the application (leave the Redirect URI section empty for now), and then select Register.
- Select New registration, then enter an application name.
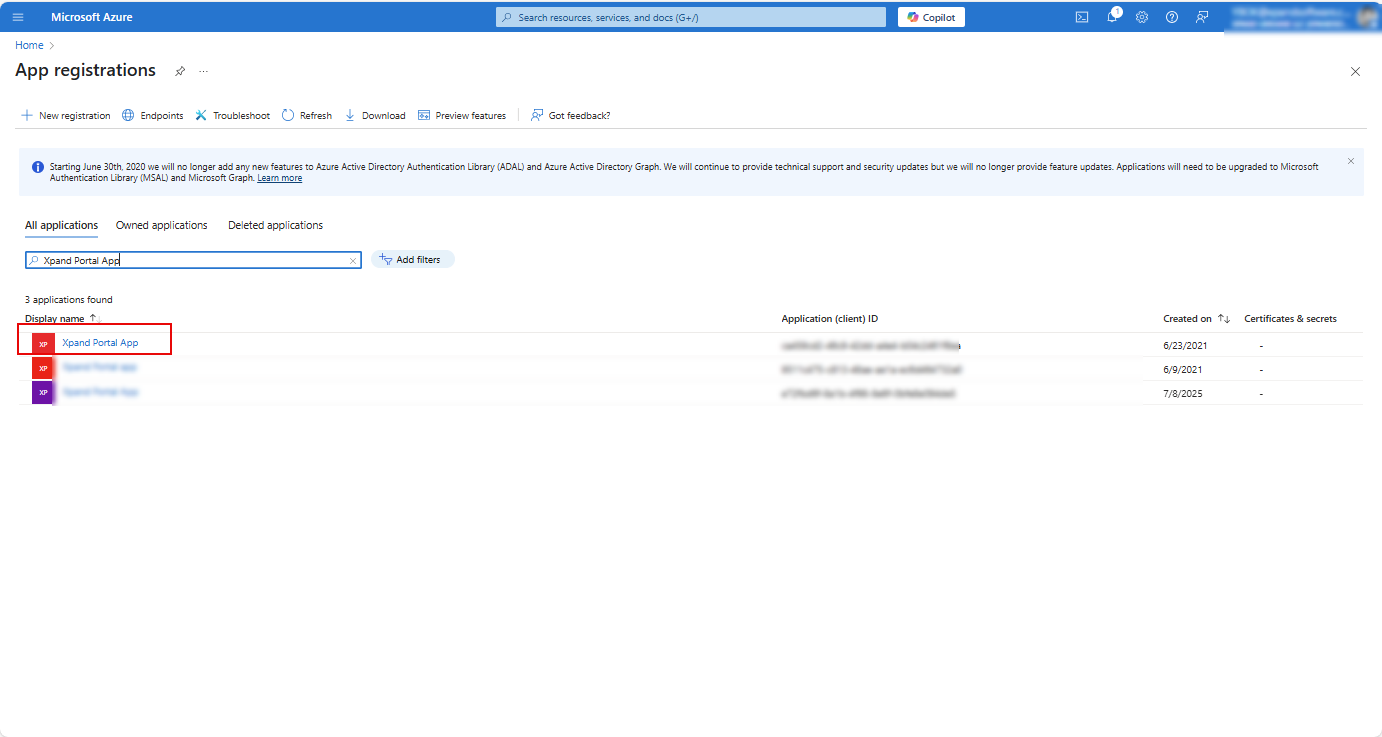
- In the App registrations window, open the registered app by selecting its name in the app list.
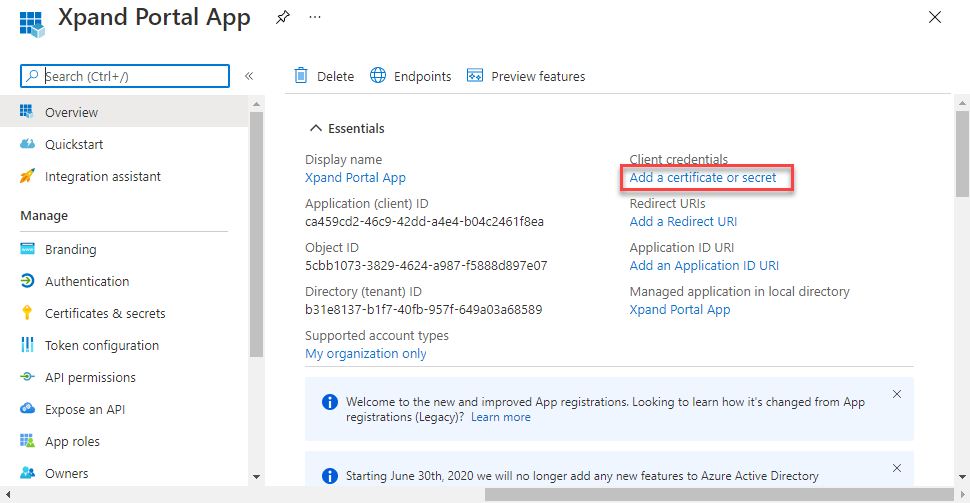
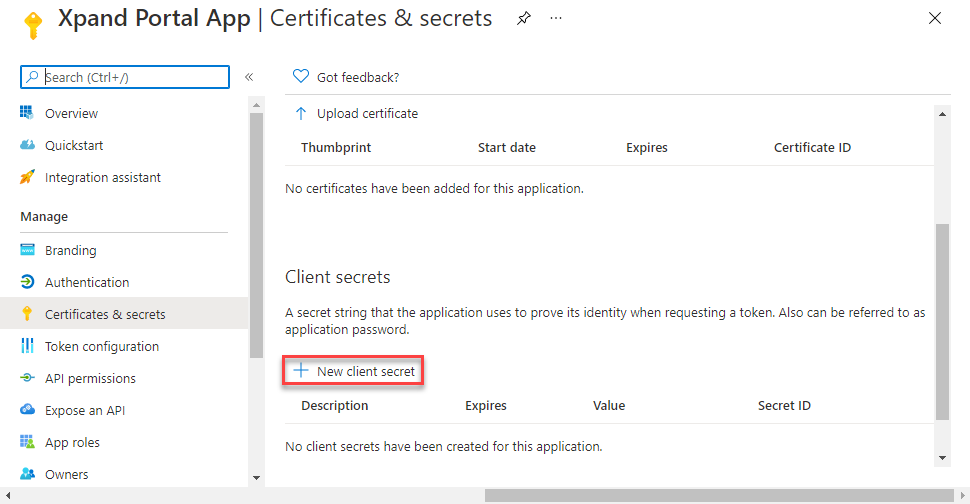
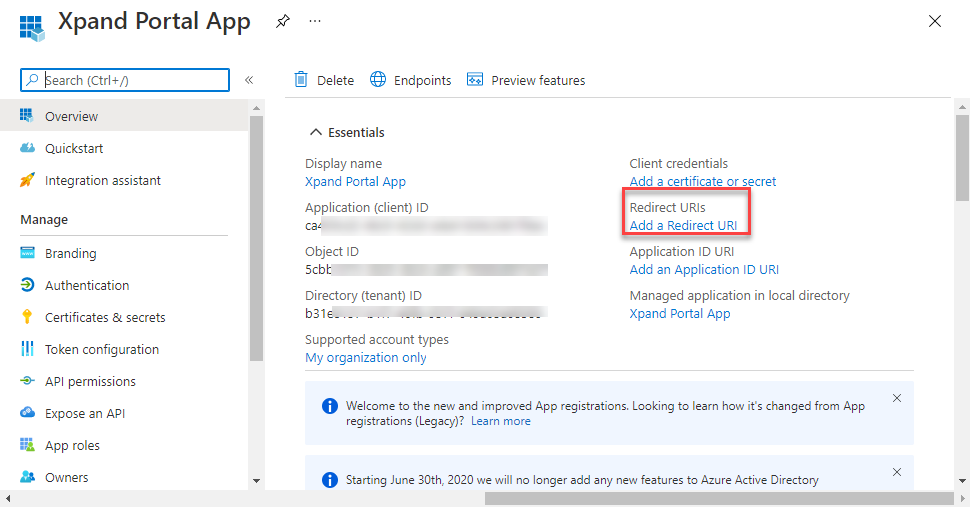
- In the Overview section, select Add a certificate or secret next to Client credentials.
- In the Certificates & secrets window that opens, under Client secrets, select New client secret.
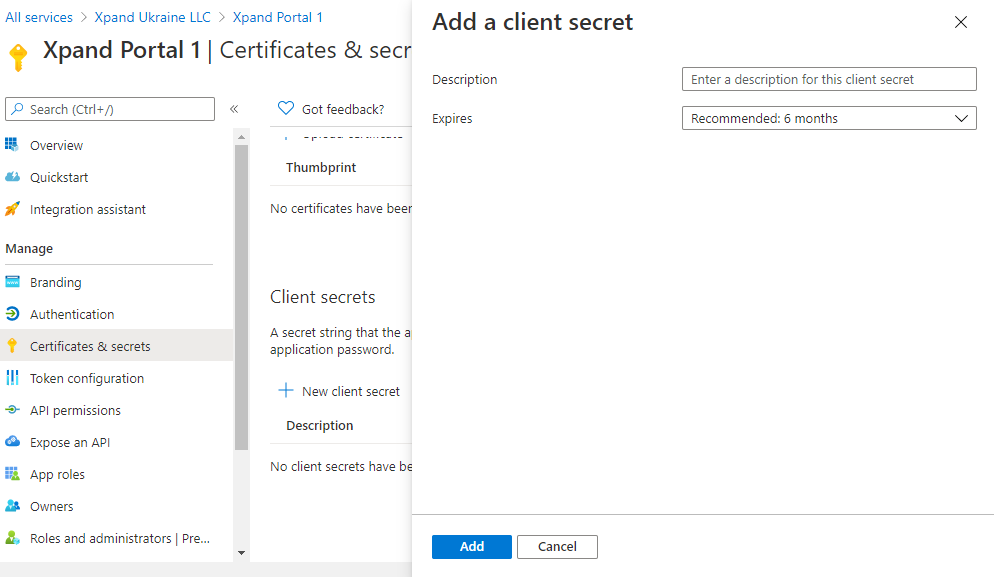
- In the Add a client secret window, fill in the required fields, and then select Add.
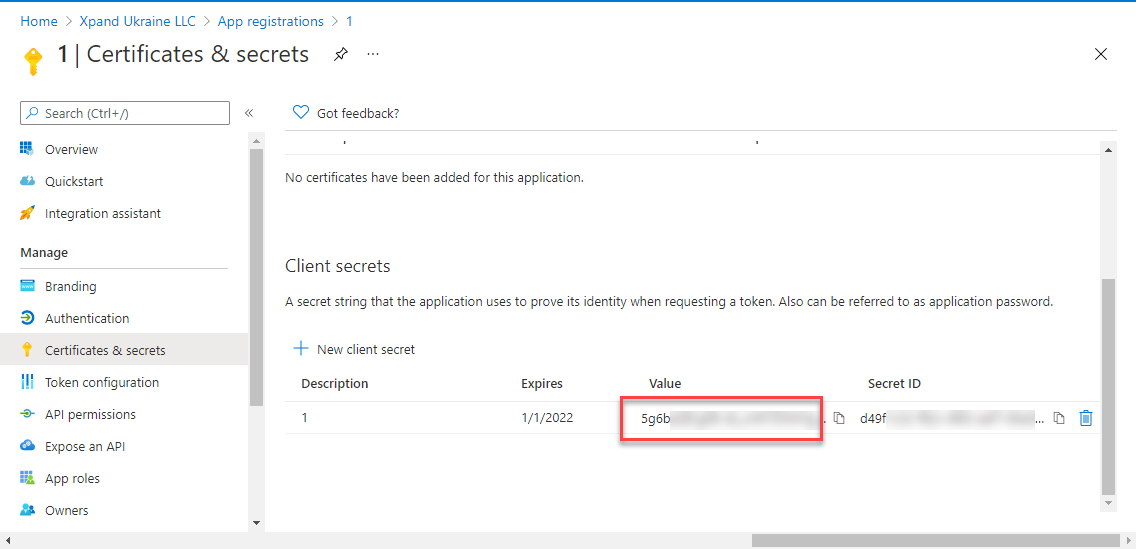
- Copy the client secret from the Value field as you will need it for further configuration of the SSO settings on Xpand Portal.
 Note
NoteMake sure to copy the client secret from the Value field as you will not be able to access it in future.
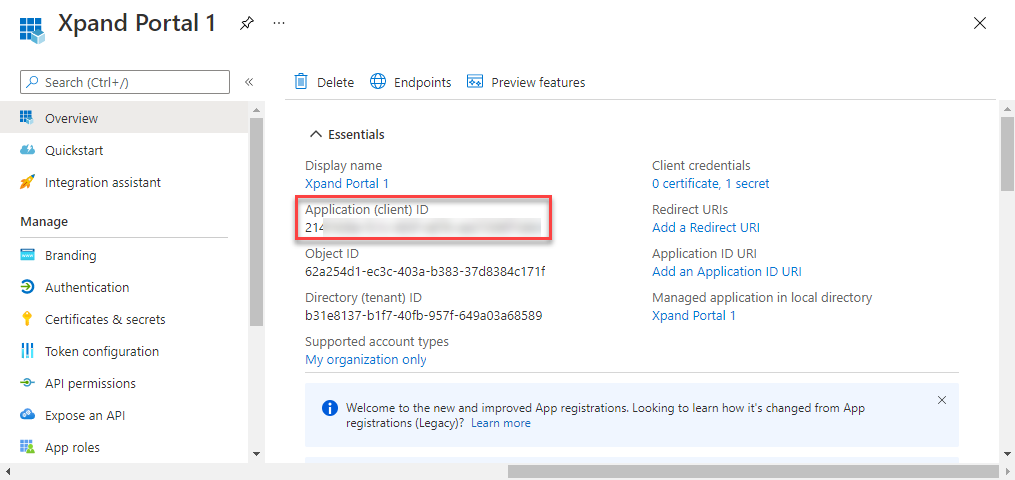
- In the navigation pane on the left, select Overview and copy the client ID from the Application (Client) ID field as well as tenant ID from the Directory (tenant) ID field as you will need them for further configuration of the SSO settings in the Xpand Portal backoffice.
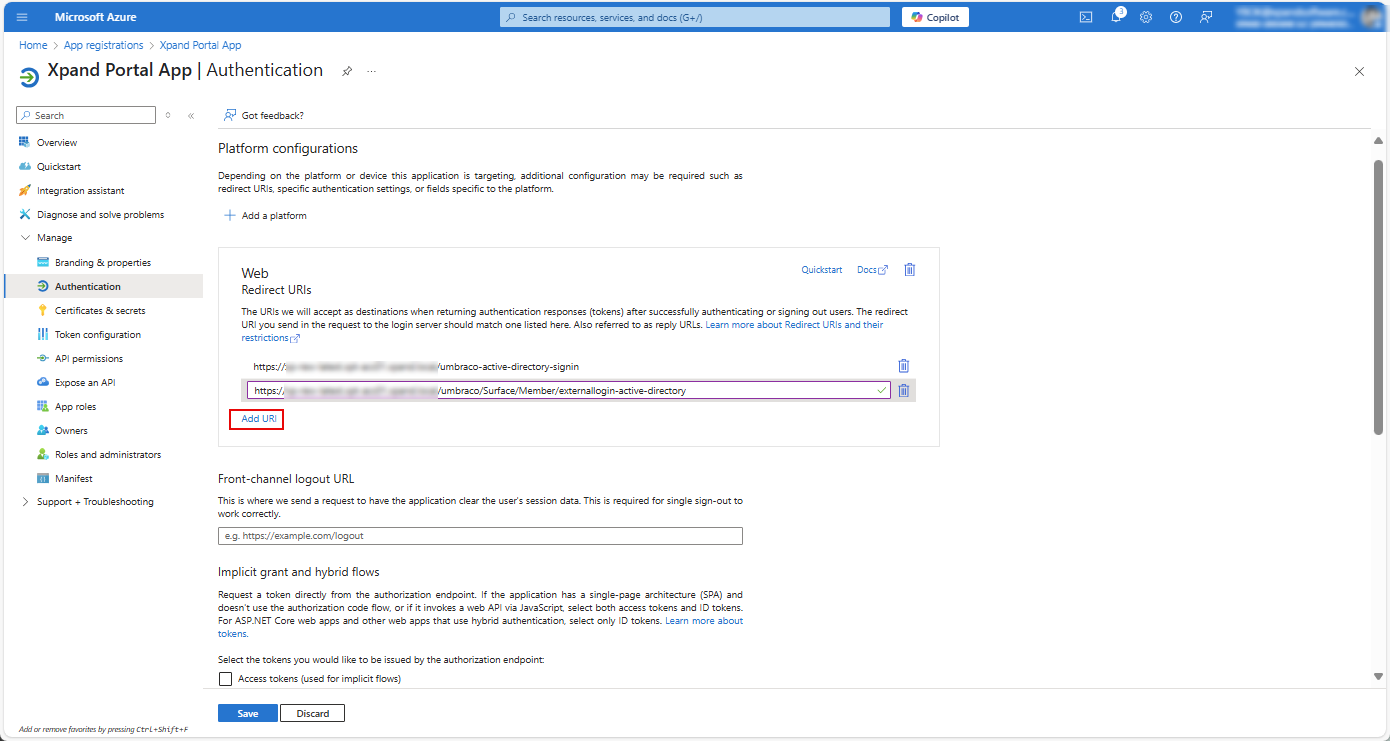
- Select Add a Redirect URI next to Redirect URIs.
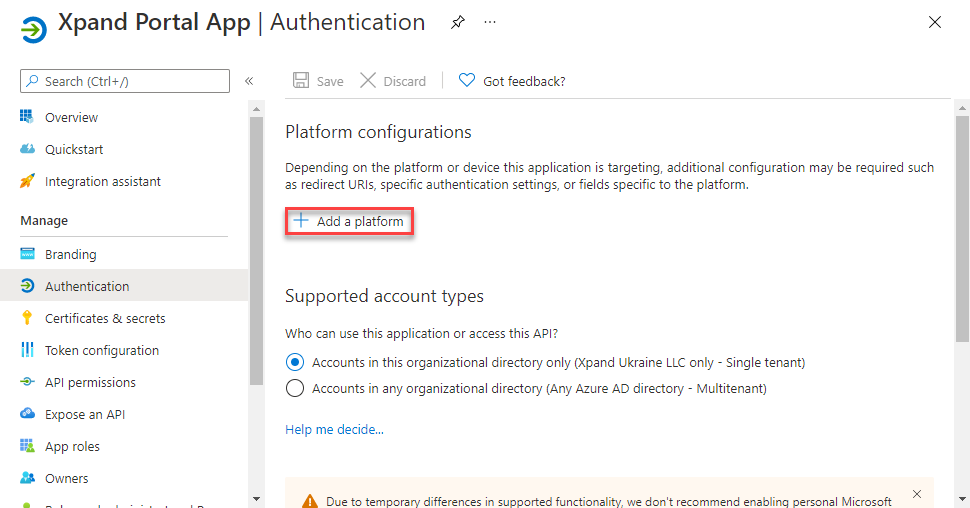
- In the Authentication window that opens, under Platform configurations, select Add a platform.
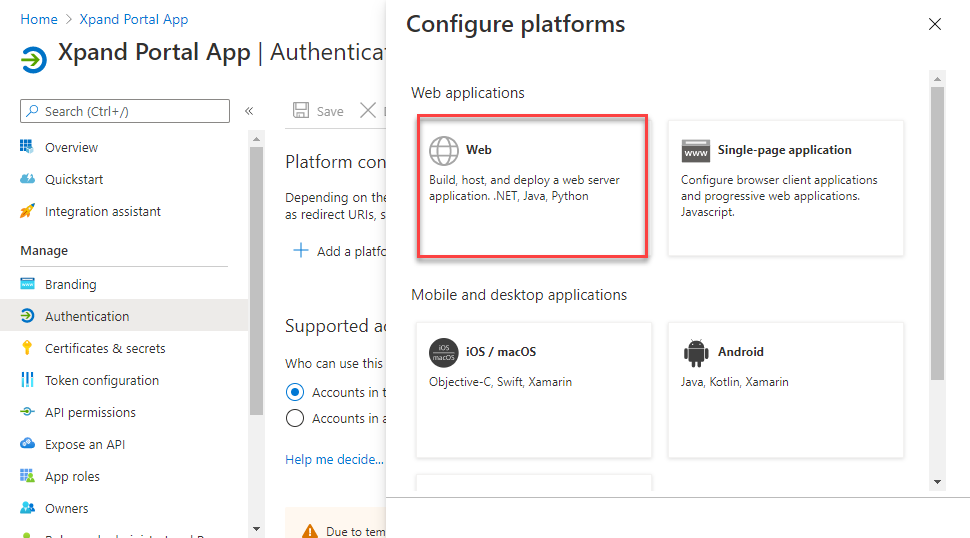
- In the Configure platforms window that appears, select Web.
- In the Configure Web window, fill in the Redirect URIs field with one of the the values given below, and then select Configure.
https://[your_portal_domain]/umbraco-signin-microsoft
https://[your_portal_domain]/member-signin-microsoft
where [your_portal_domain] is the domain where your Xpand Portal solution is deployed.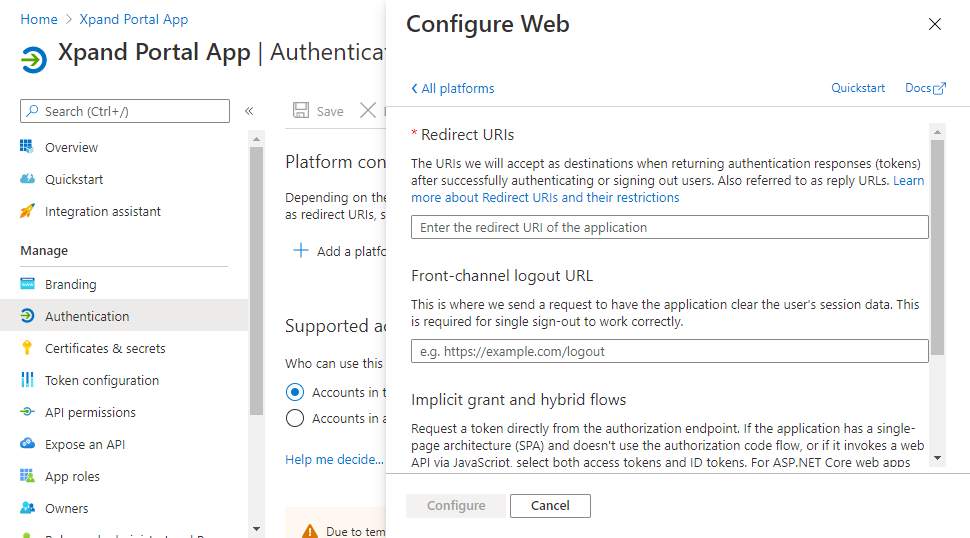
- Use the Add URI action that appears to add the second redirect URI, and then select Save.
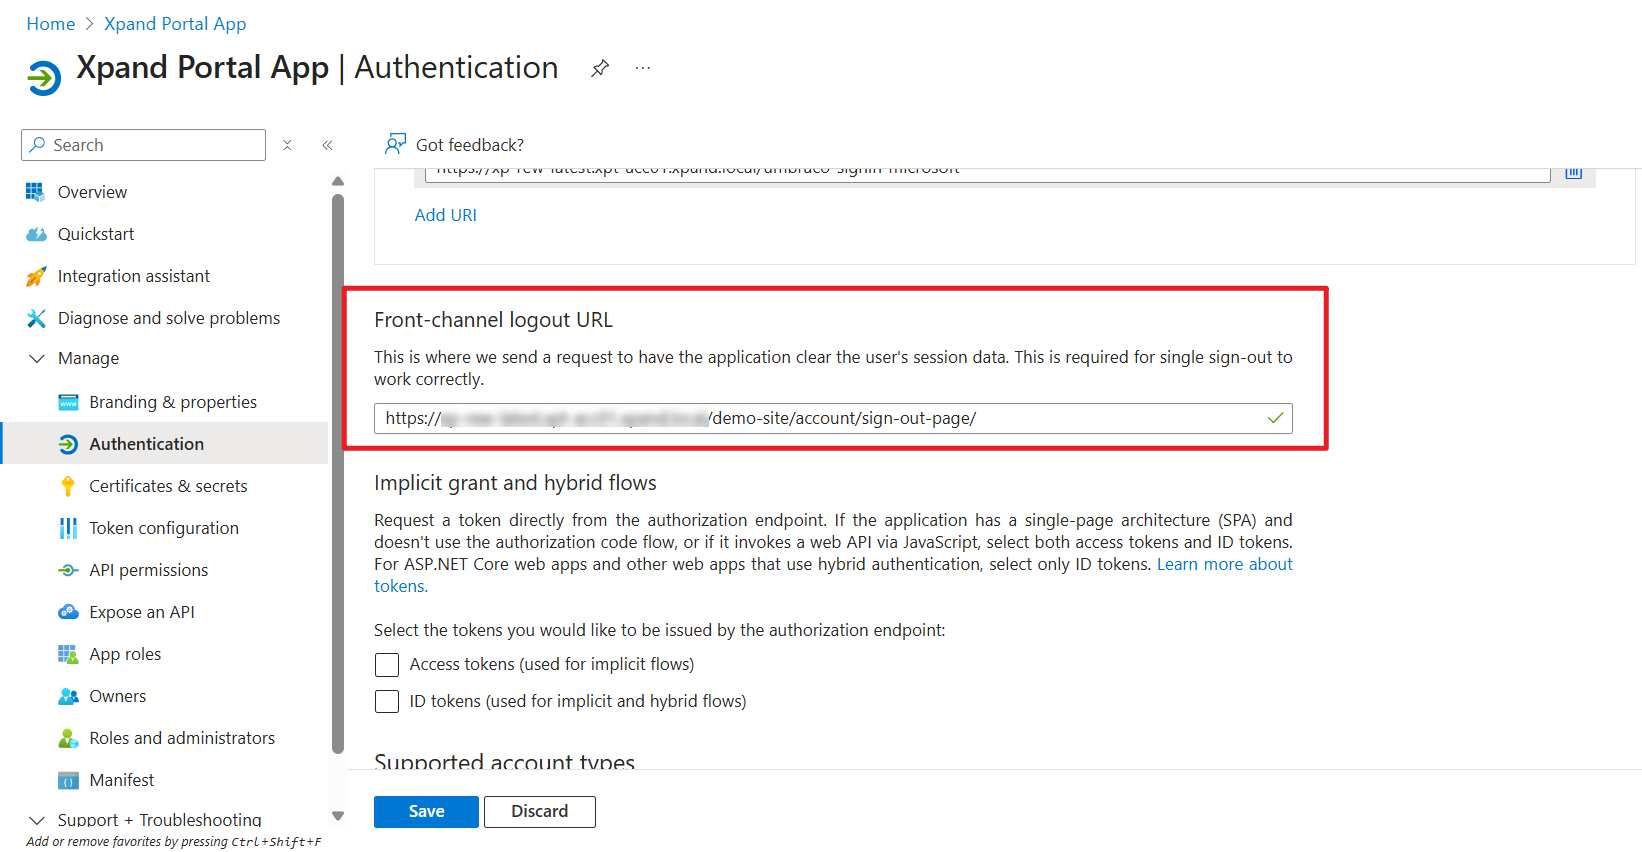
- In the Front-channel logout URL section, specify the logout page of your portal. For example, https://[your_portal_domain]/demo-site/account/sign-out-page/ where [your_portal_domain] is the domain where your Xpand Portal solution is deployed and /demo-site/account/sign-out-page/ is the path to the sign-out page on your portal (in portal settings, it is specified in the Account registration page settings, on the Related pages tab, in the Sigh-out page setting; the Sign-out page must be created and configured).
- Now you can return to the portal SSO settings and set up SSO for the front end and/or back end using the client ID, client secret, and tenant ID that you obtained in the Microsoft Azure portal.