Custom data format configuration examples
When you are setting up fields for a grid page or fields on a field set/extended field set for a detail page, you have the Data format field setting at your disposal. This setting specifies how a field value will look like and what data it will contain. If this setting is not used, the field simply displays the value from the source table. There are several predefined options available as well as an option to use a fully custom string. In this custom string you can use plain text, variables, function calls, templates, etc., for multiple configuration scenarios that suit your business needs. This topic provides examples of such scenarios.
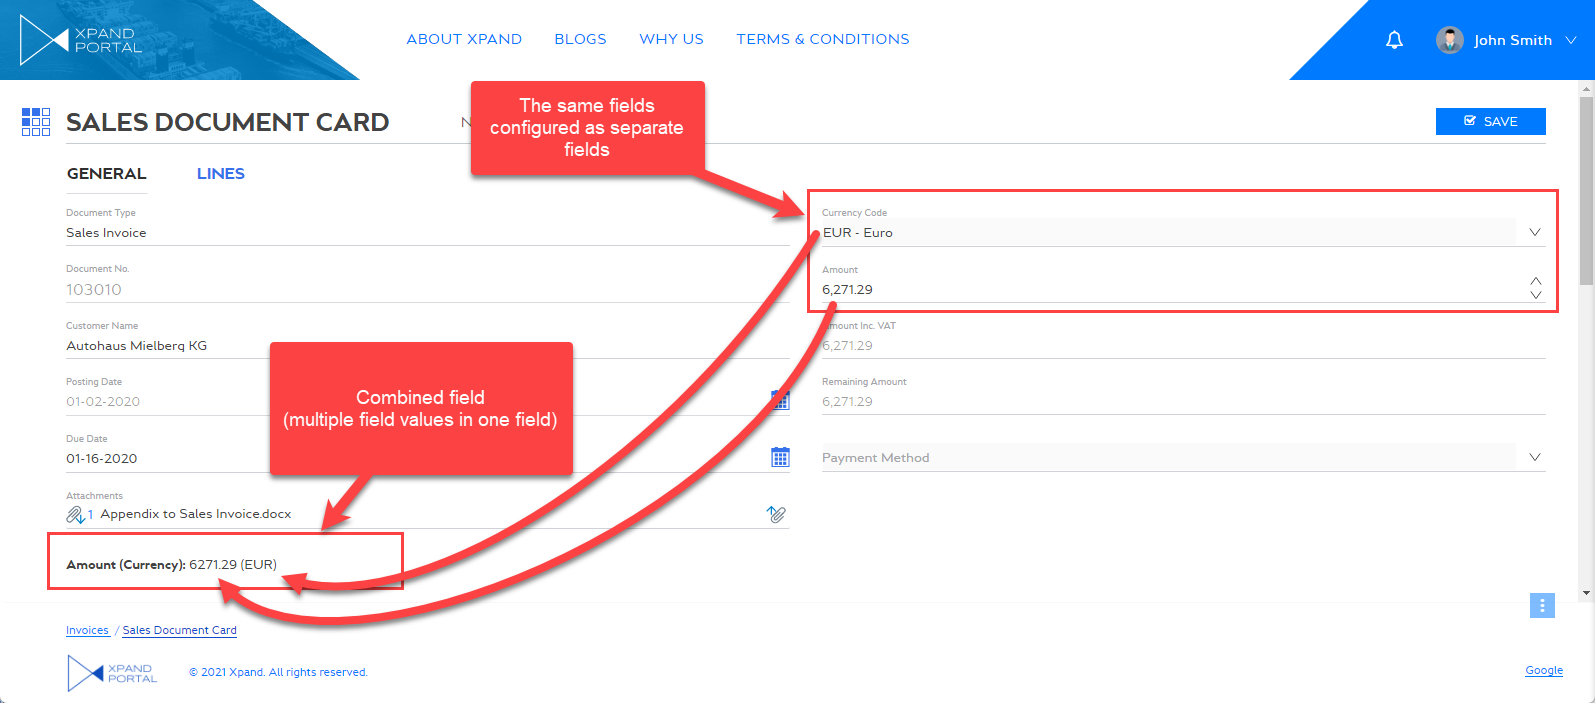
Display concatenated value (multiple field values in one field)
Using the Fully custom format string option of the Data format string field setting for grid or detail page fields, you can add a field that would display concatenated value (several field values in a single field). This may be useful when several fields are closely related to each other, and you would like to see their values as one field, for example, a Quantity (UOM) field that would take values from a separate Quantity field and Unit of Measure field and display it as a single value, such as 10 BAGS.
To configure a field on a grid page or fields on a field set/extended field set for a detail page in such a way that it would display multiple field values, you need to ensure that the following conditions are met:
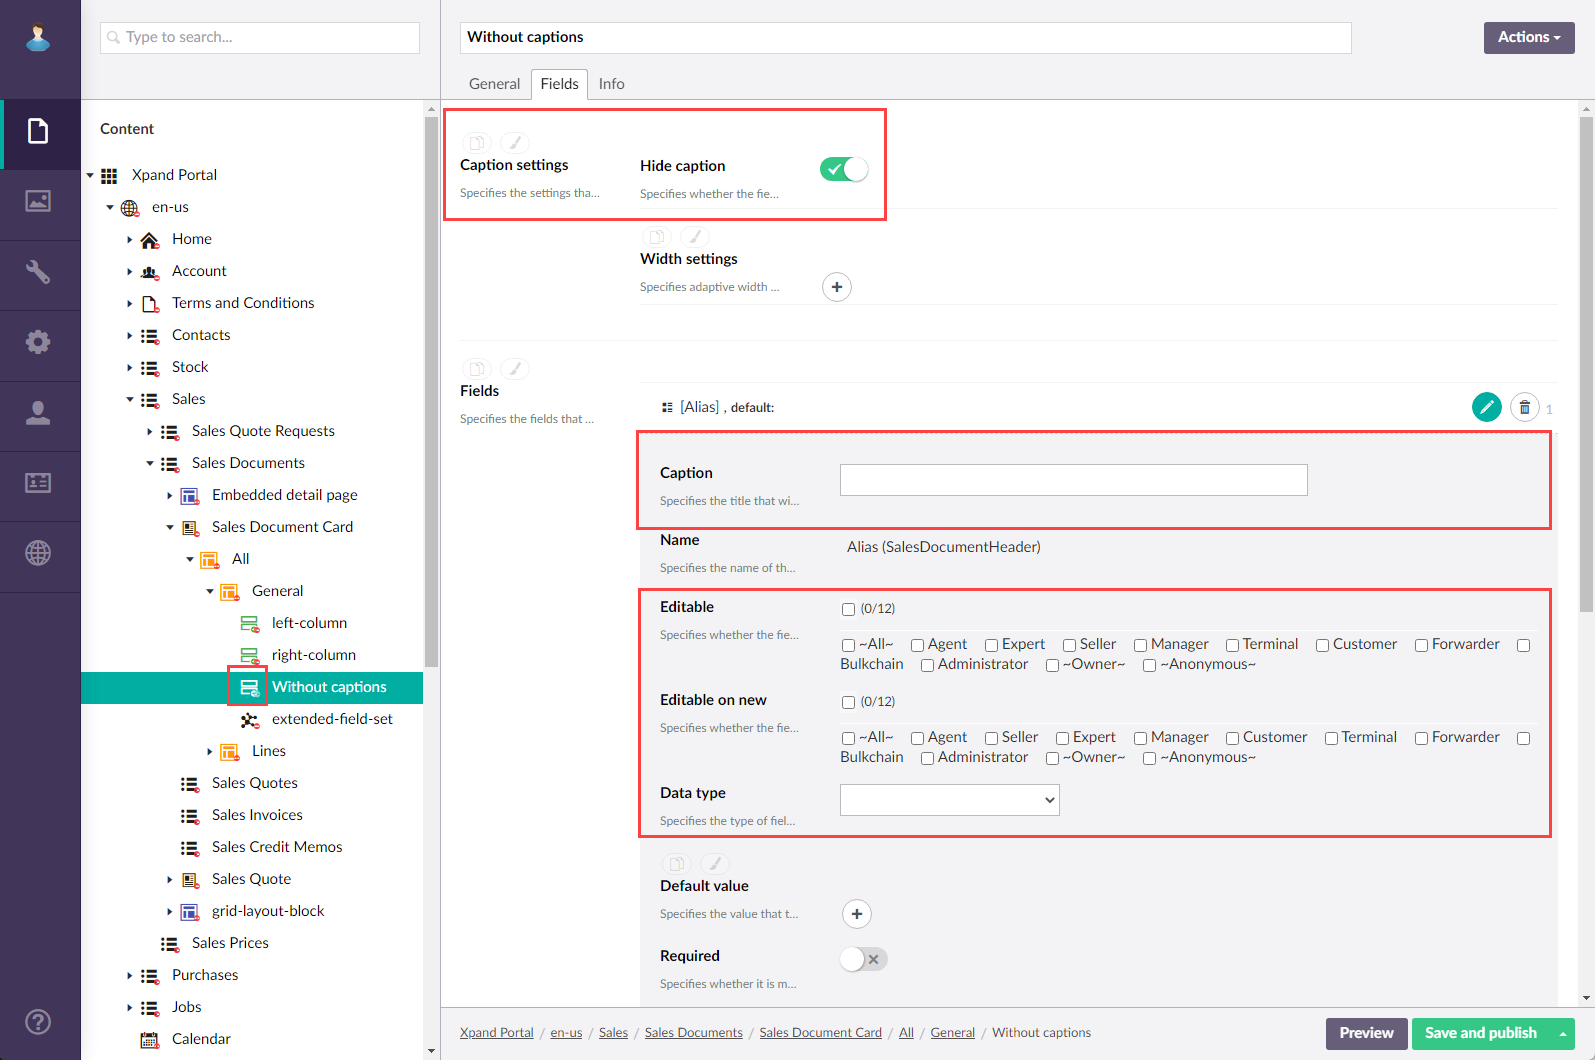
- If this is a detail page field, ensure that the Hide caption setting is turned on on the Fields tab of the field set/extended field set, otherwise the values will not be displayed properly. Correspondingly, there is no need to fill in the Caption setting for such a field; you can leave it empty.
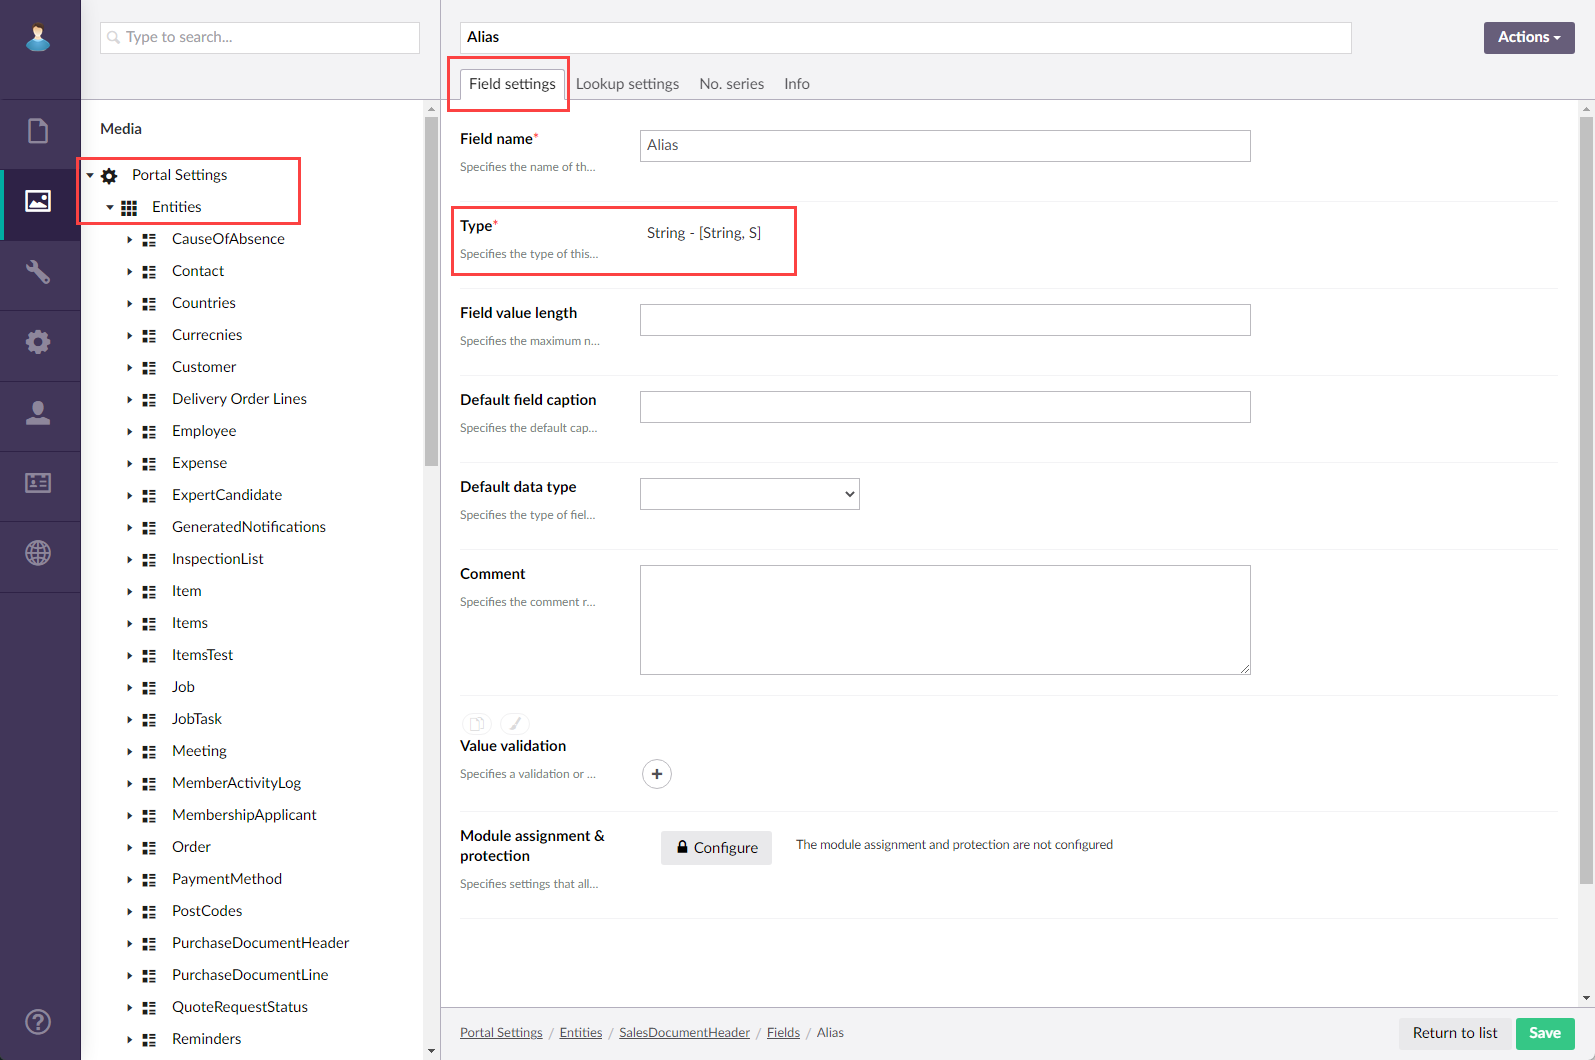
- In the Name field setting, where you usually choose a table field that data will be displayed from, must be a field with the type String (in the entity field settings) and have no value in the source table. For the purpose of such configuration scenario, we recommend creating a new field in the corresponding entity.
- The editability (the Editable (existing record) and Editable (new record) settings) must be disabled for such a field.
- The Data type field setting must be empty or set to Default.
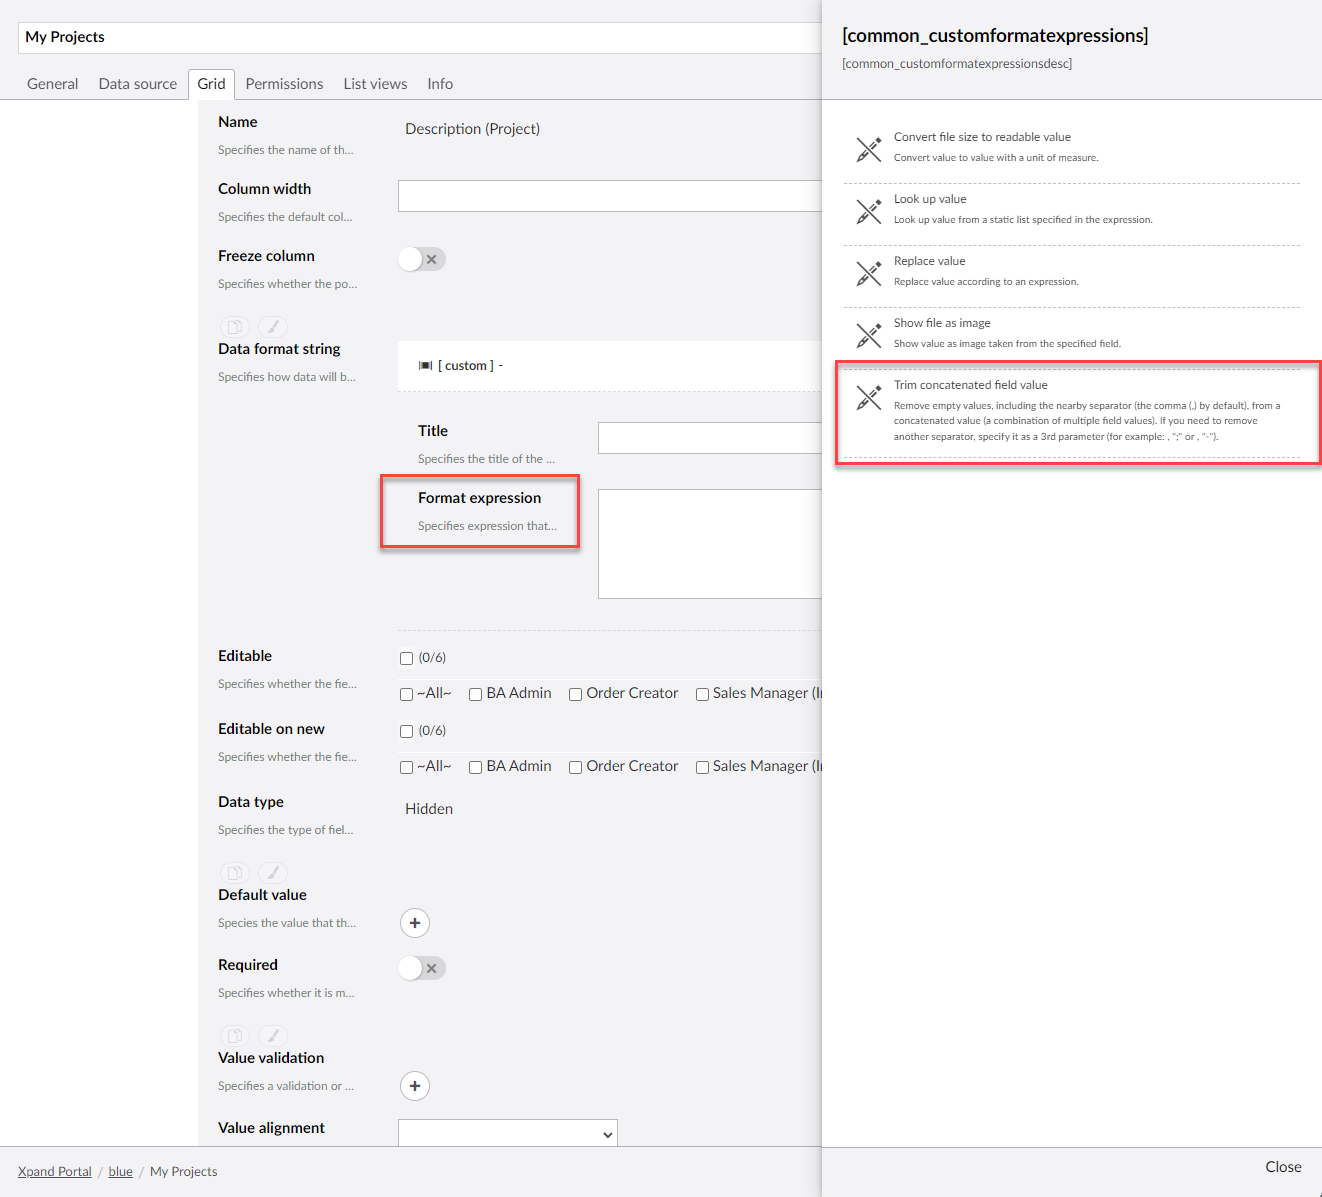
In the Format expression setting (within the Data format string setting) for such a field, ensure that you add the following:
- Add at least one paragraph using the <p> and </p> tags. If you add multiple paragraphs, the field value will have multiple lines.
- Add variables of the fields, the values from which should be shown in double square brackets. E.g. [[field1]] [[field2]], etc., where field1 and field2 are the names of the fields in the data source of the current page.
- Use the
 icon next to the Format expression setting and select the Trim concatenated field value to automatically remove empty values including the nearby separator (the comma (,) by default) from the concatenated value. If you need to remove another separator, specify it as a third parameter (for example, , ";" or , "-").
- Optionally, add additional HTML formatting, text, links, etc. E.g. You can add text that would be used as a field caption.
Example
Format expression = <p><b>Amount (Currency):</b> [[Amount]] ([[CurrencyCode]])</p>
In this example, the Amount (Currency) text with bold formatting (the <b> and </b> tags) was added as a caption. Data will be displayed from two fields, Amount and CurrencyCode. Parentheses were added to display the second value in brackets.
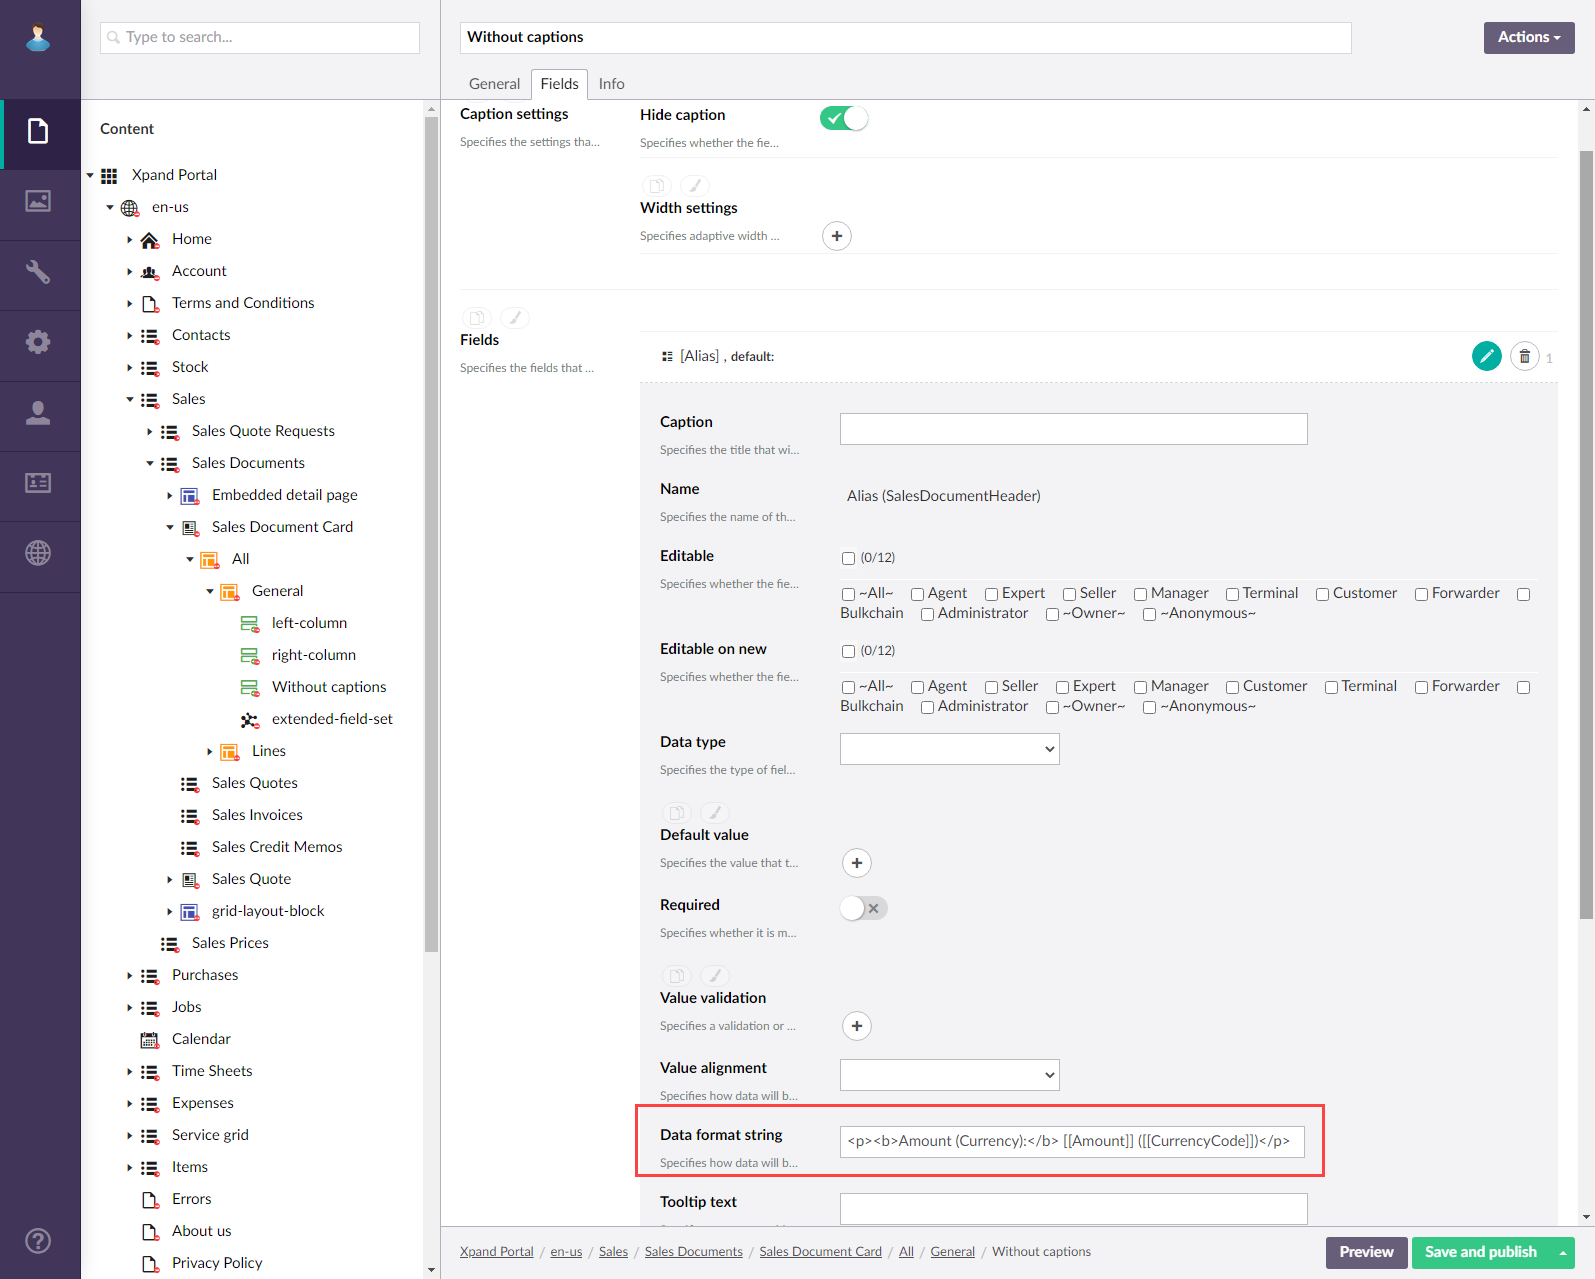
Result:
Use field value as a link to a related record from different entity
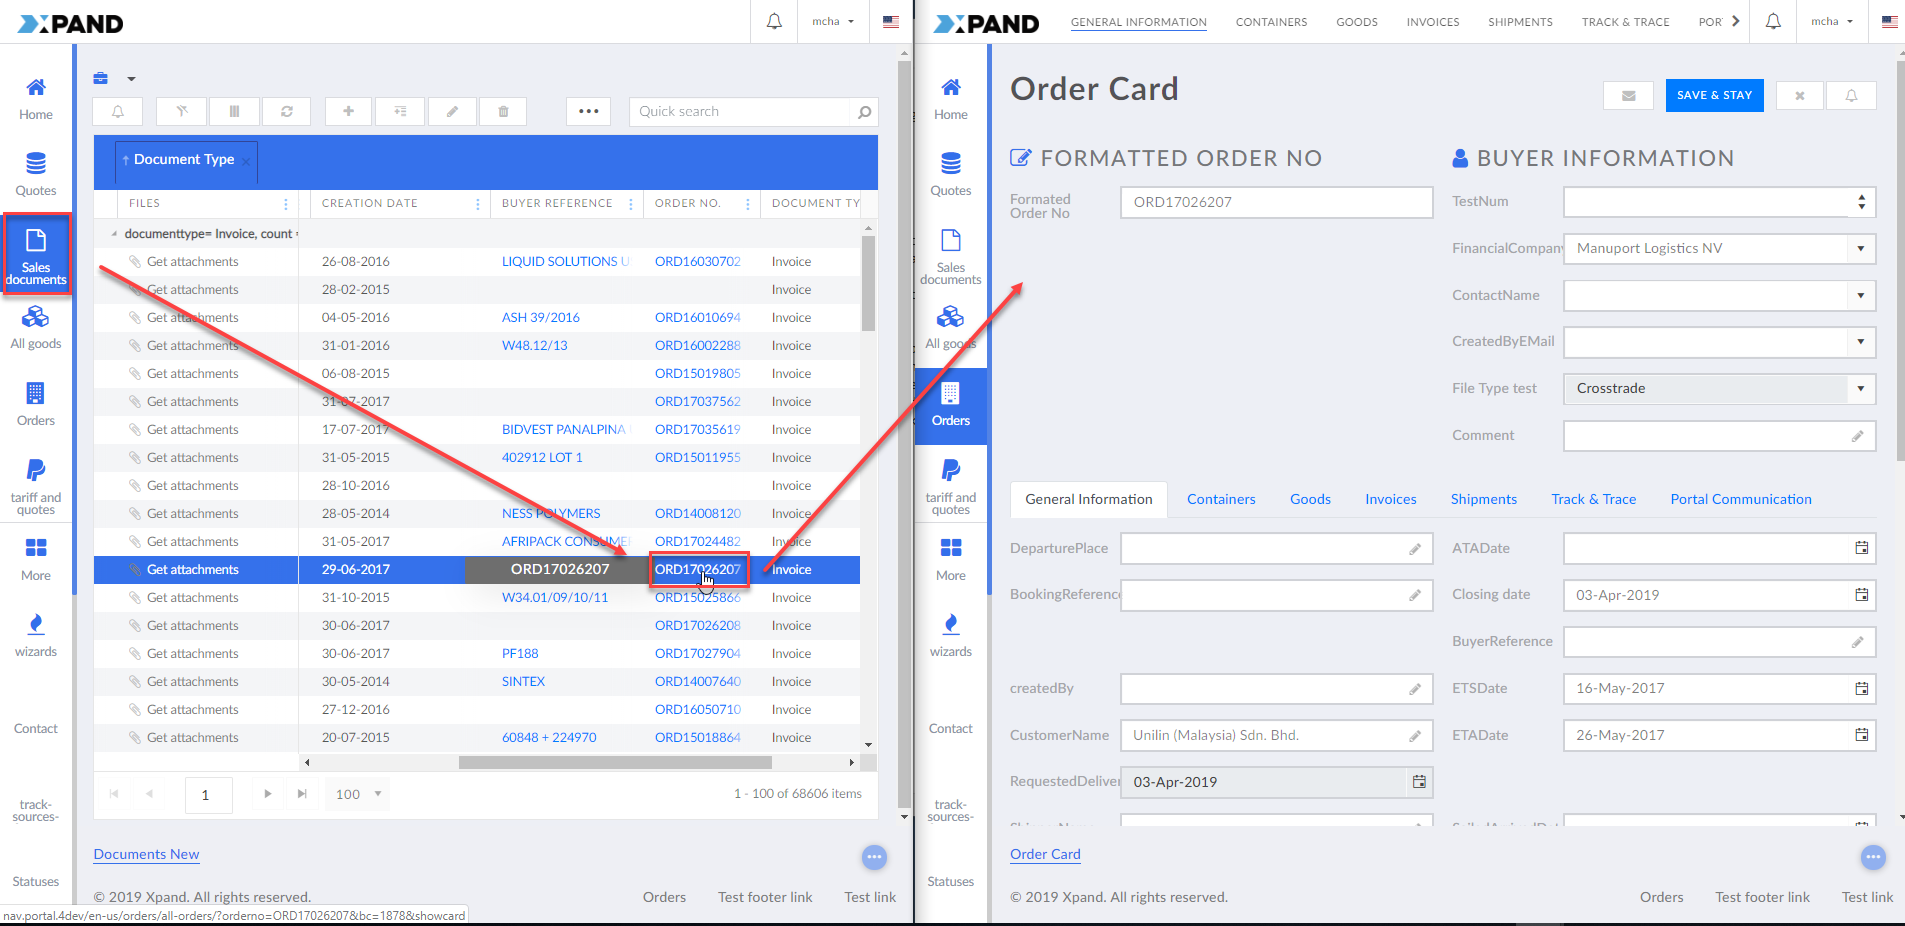
When you are configuring a grid page, you may want to have the ability to open a detail (card) page for a record from a different entity grid page when the portal member selects the value in a field. This may be useful when, for example, you have a number of a document specified, but this document is a different portal entity with its own grid and detail pages, and you want to open the related detail page by selecting the document number.
To achieve this, you need to set up the following:
- A data format string for a field on the source entity grid, the value of which you want to use as a link to a detail page for a record of another portal entity. To have a detail page opened (instead of the grid page) when a portal member selects a field value on the source entity grid page, use the &showcard parameter in the data format string.
- A data source URL filter by the corresponding field name on the grid of the target portal entity.
To use a field value as a link to a related record from a different entity
- In the backoffice, open the settings for the source entity grid page, that contains a field, the value of which you want to use as a link to a detail page for a record from another portal entity.
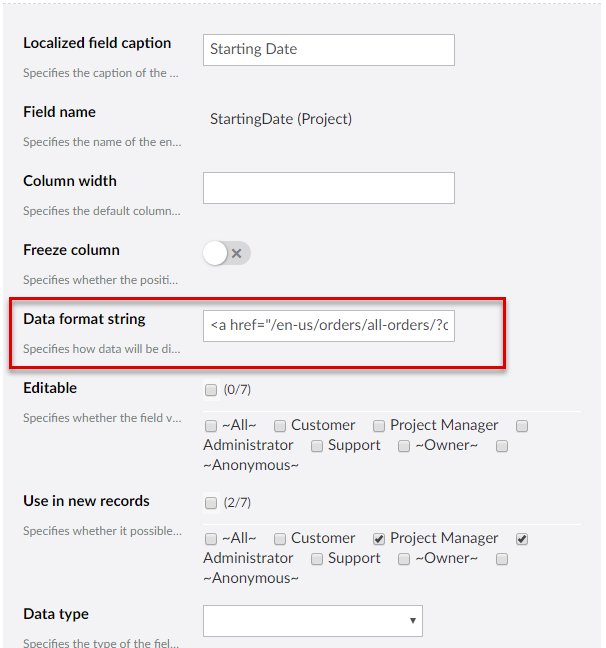
- Go to the Grid tab, and, under Fields, locate and expand the field settings for the field the value of which you want to use as a link to a detail page for a record from another portal entity.
- In the Data Format String setting, use the Fully custom option string option, and in the Format string setting, specify the data format string as follows: <a href="<path_to_the_target_grid>?<target_grid_field_name>=[[<source_grid_field_name>]]&showcard" target="_blank">[[ <source_grid_field_name>]]</a> where <path_to_the_target_grid> is the portal path to the grid page of the target entity, <target_grid_field_name> is the name of the related field on the target entity grid, by which data will be filtered, and <source_grid_field_name> is the name of the field on the source entity grid, the value of which you want to use as a link to a detail page for a record from another portal entity. The &showcard parameter is necessary to have the detail page opened instead of the grid page. For example: <a href="/en-us/orders/all-orders/?orderno=[[orderno]]&showcard" target="_blank">[[orderno]]</a>
Additionally, you can enable activity tracking for this field value link by adding the attribute data-activity="link click" to the link. When a member follows this link, it will be shown in the member activity log with the link click activity type. For example: <a href="/en-us/orders/ground-orders-with-preview/detail-page-order/?id=[[UniqueId]]" data-activity="link click">[[OrderNo]]</a>
- Save and publish the changes.
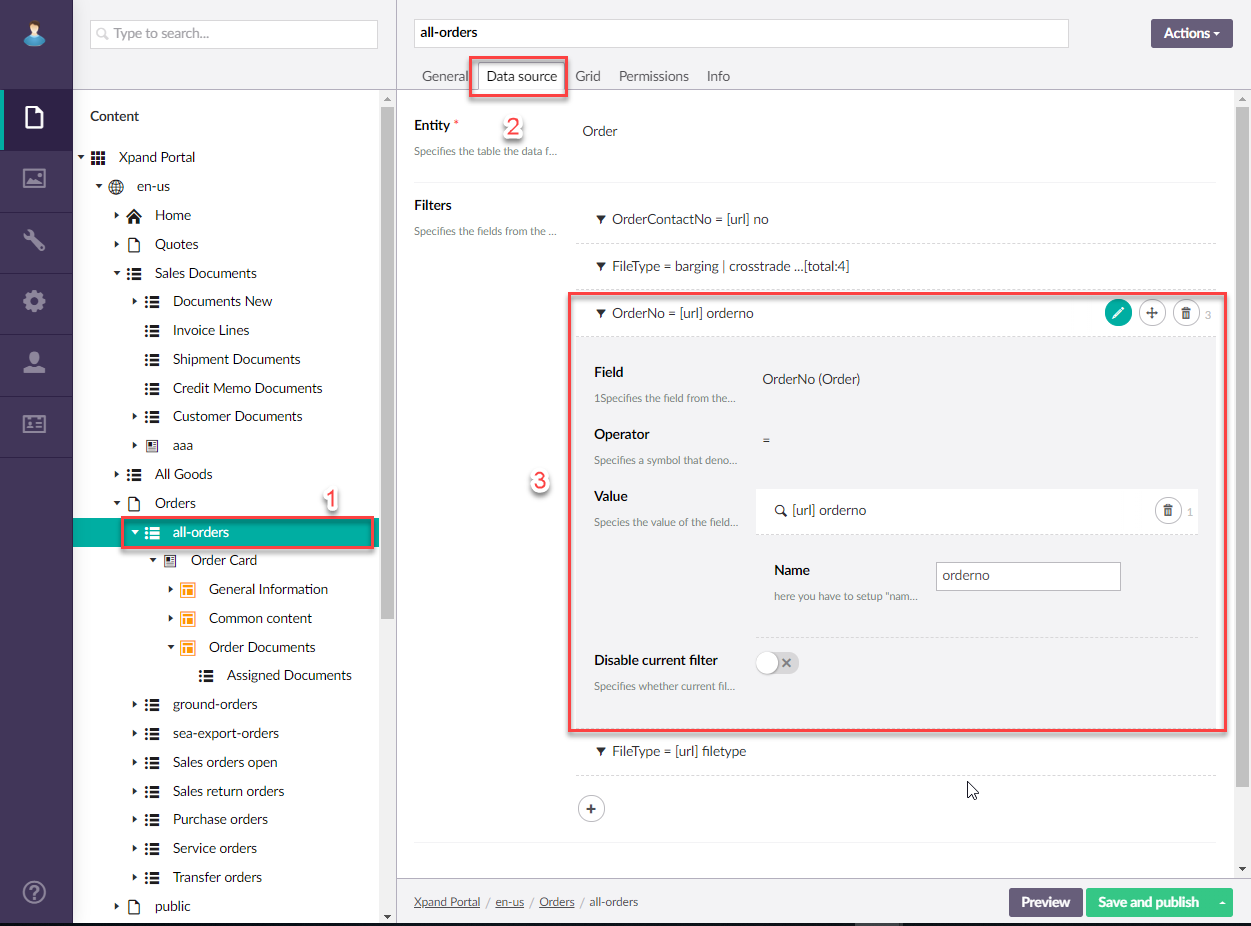
- Open the settings for the target entity grid page.
- Go to the Data source tab, and, under Filters, add a URL filter: by the field the value of which you want to use as a link to a detail page for a record from another portal entity:
- Field: Specify the field the value of which you want to use as a link to a detail page for a record from another portal entity.
- Operator: Select the = operator.
- Value: Select Address field value (URL), and then, in the Name setting, enter the name of the related field from the target entity (for which you configured the data format string).
- Save and publish the changes.
Now, when a portal member selects the value of the specified field on the source entity grid page, the detail page for the corresponding record from the target entity grid page will be opened.
Custom date/time format for Date and DateTime fields
By default, the date and time format for fields with the Date and DateTime types correspondingly is taken from the Data format setting within the localization settings where you configure it for all fields in the localization.
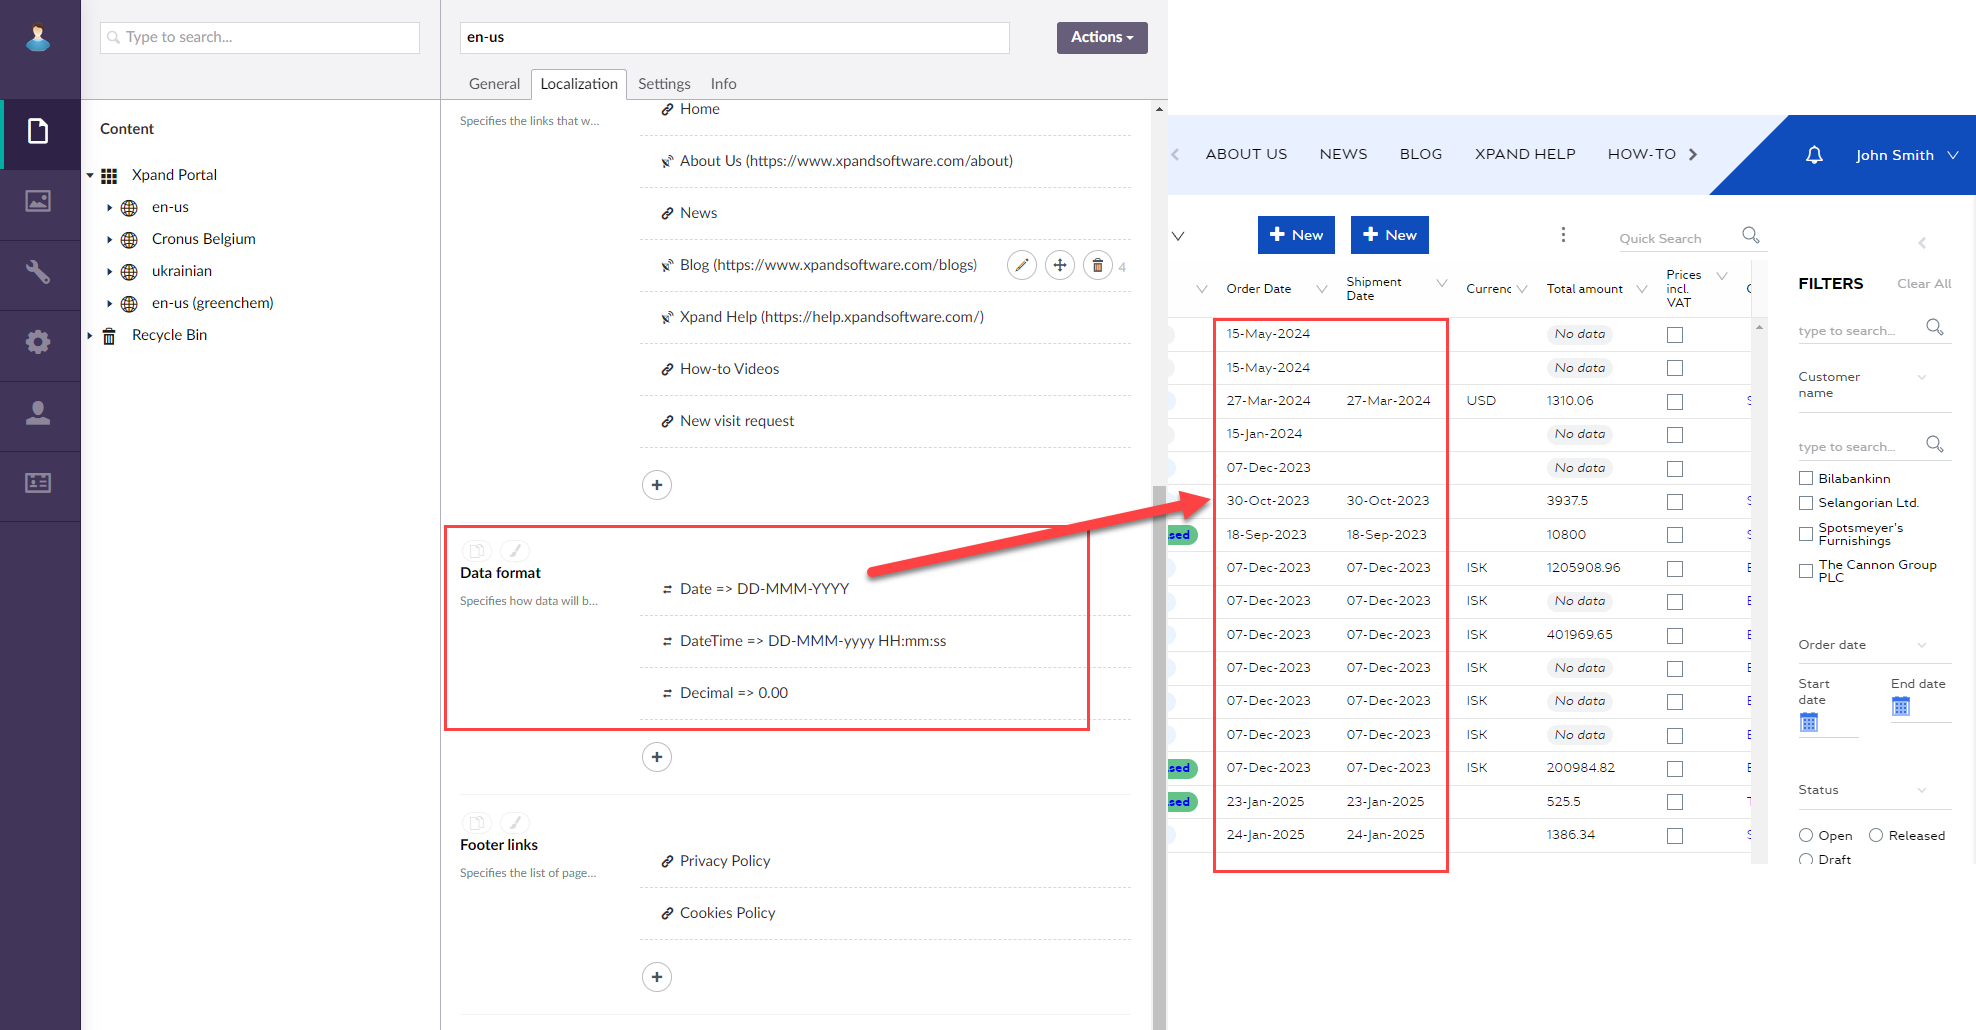
There may be a case when you need to override these data format settings for a specific field. You can do this by using the Fully custom format string settings within the Data format setting of a field.
Prerequisites
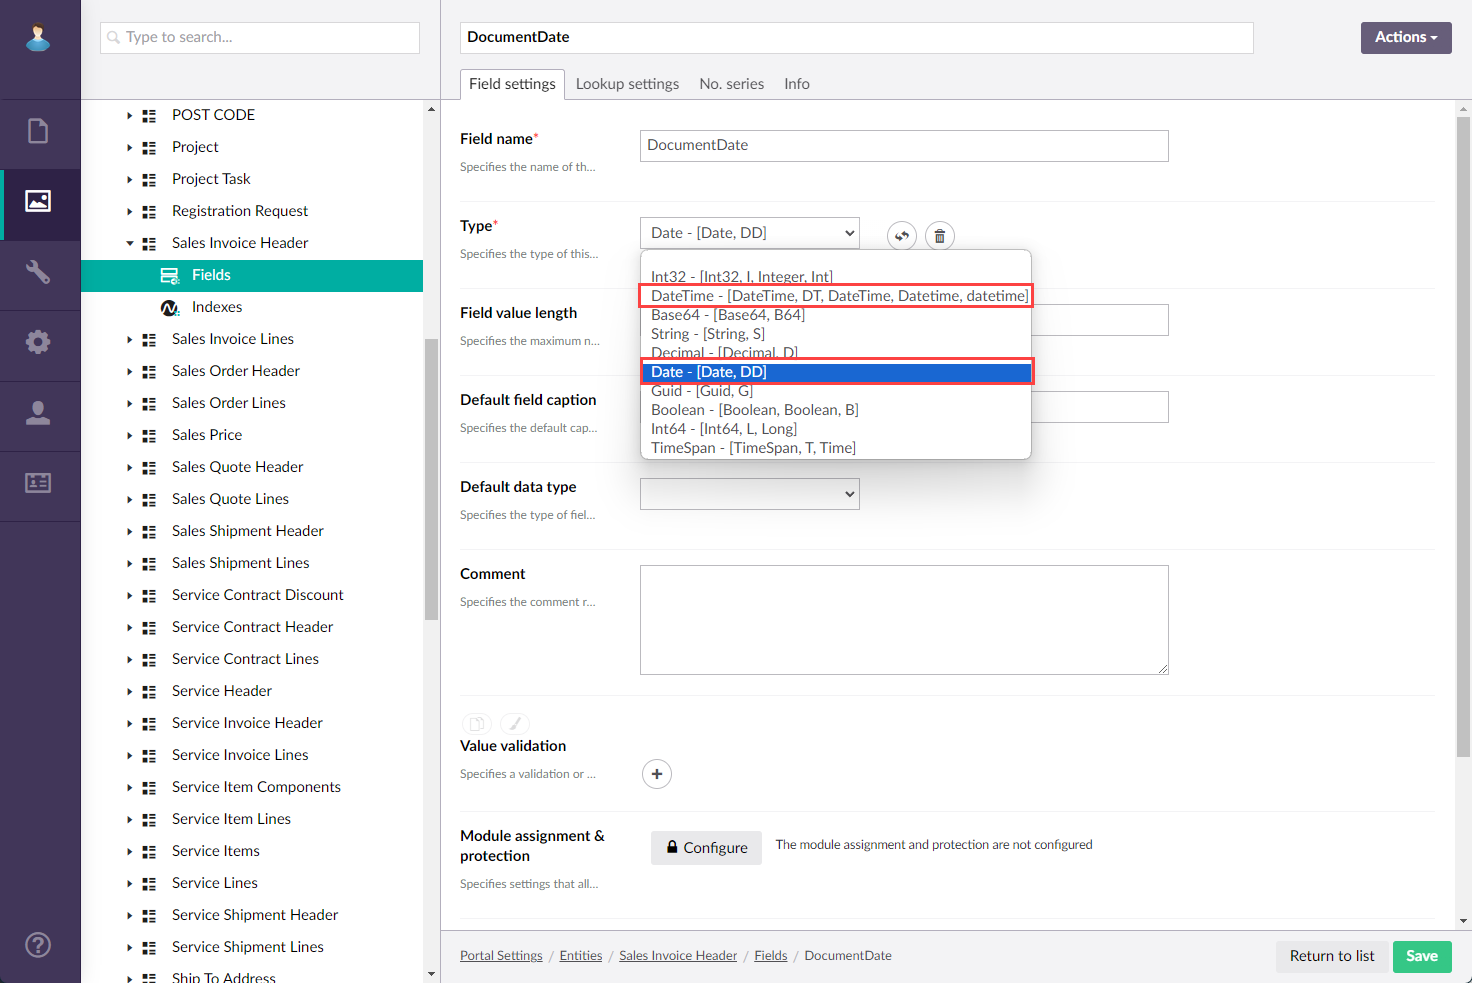
- To set up a custom Date format for a field, its type in the entity field settings must be Date.
- To set up a custom DateTime format for a field, its type in the entity field settings must be DateTime.
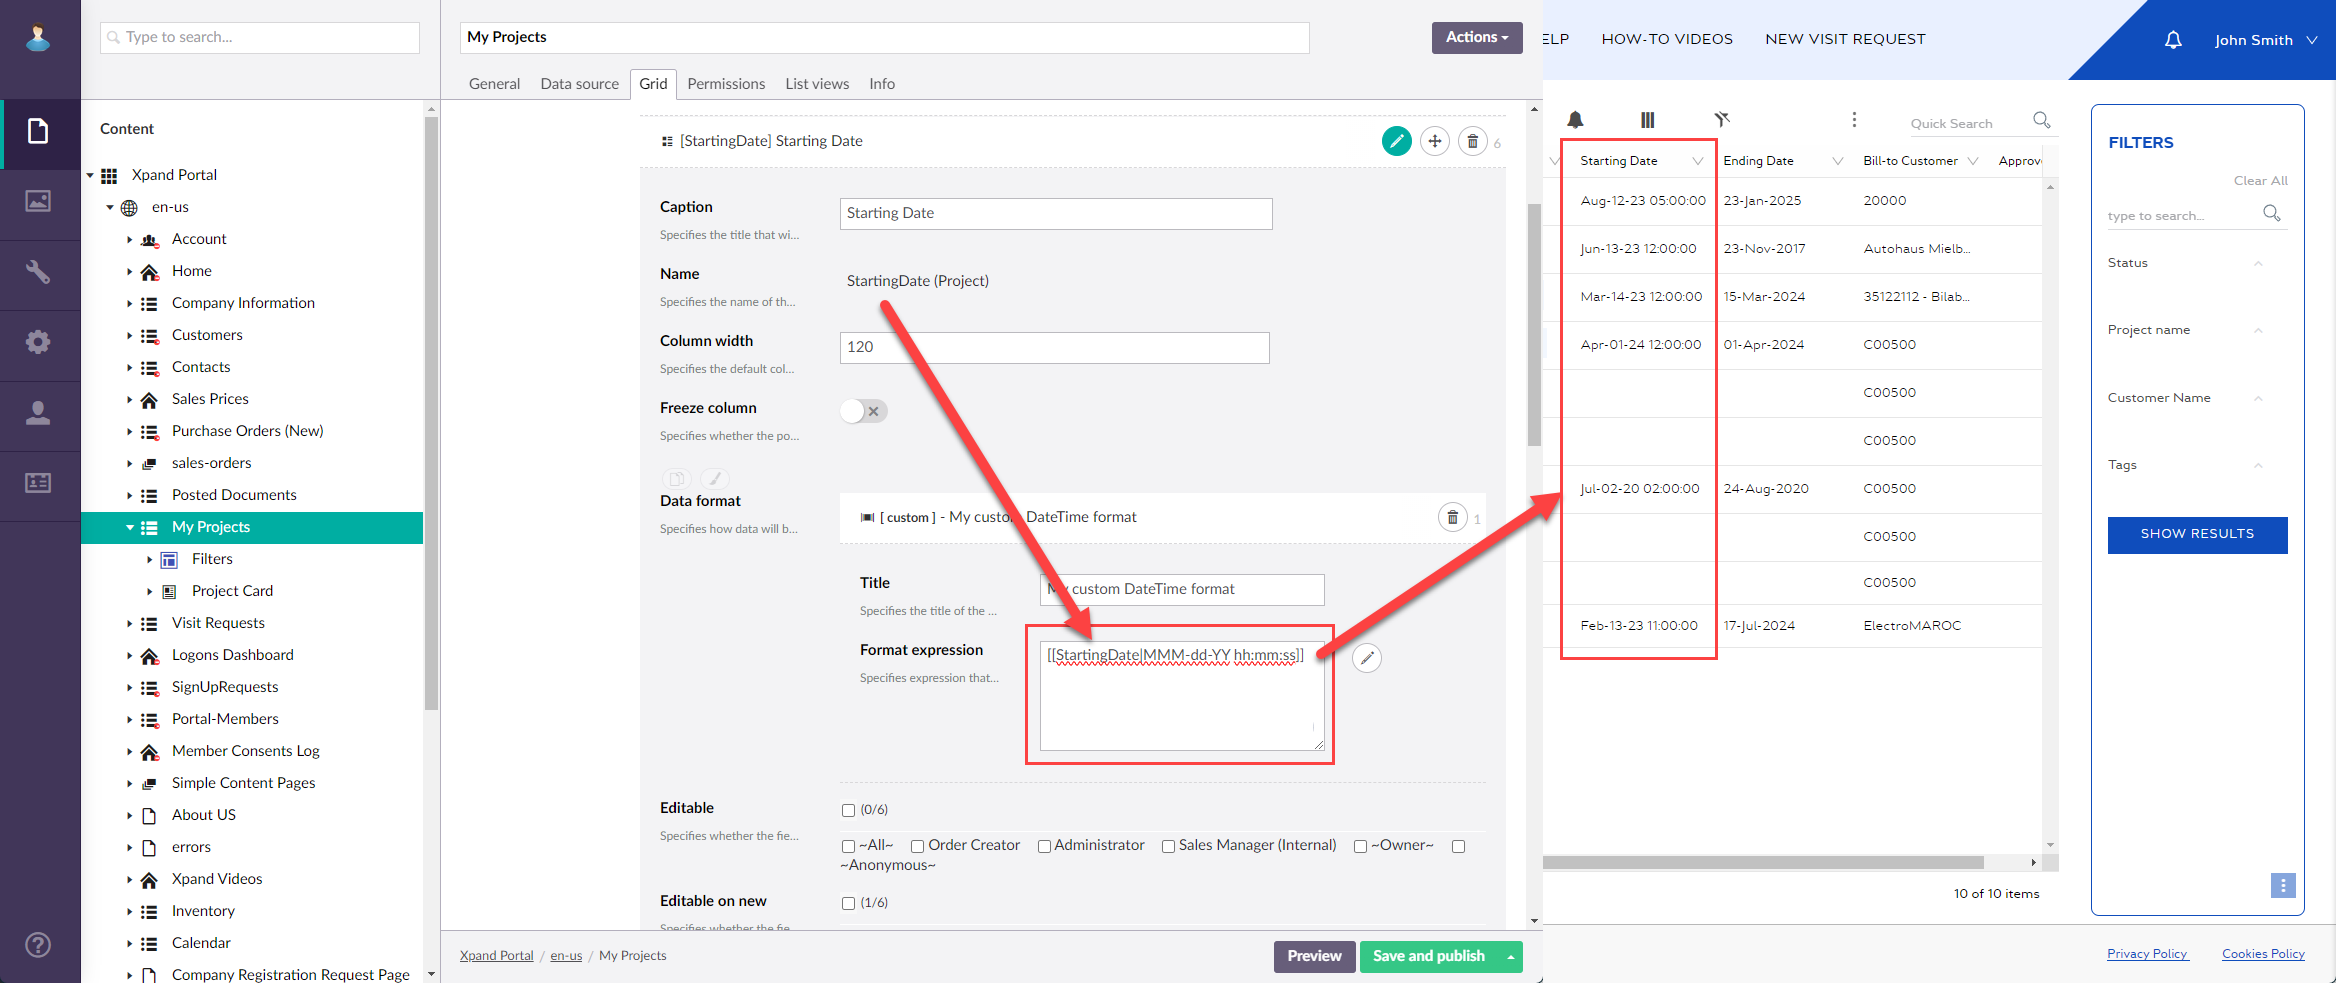
To set up a custom date/time format for a field
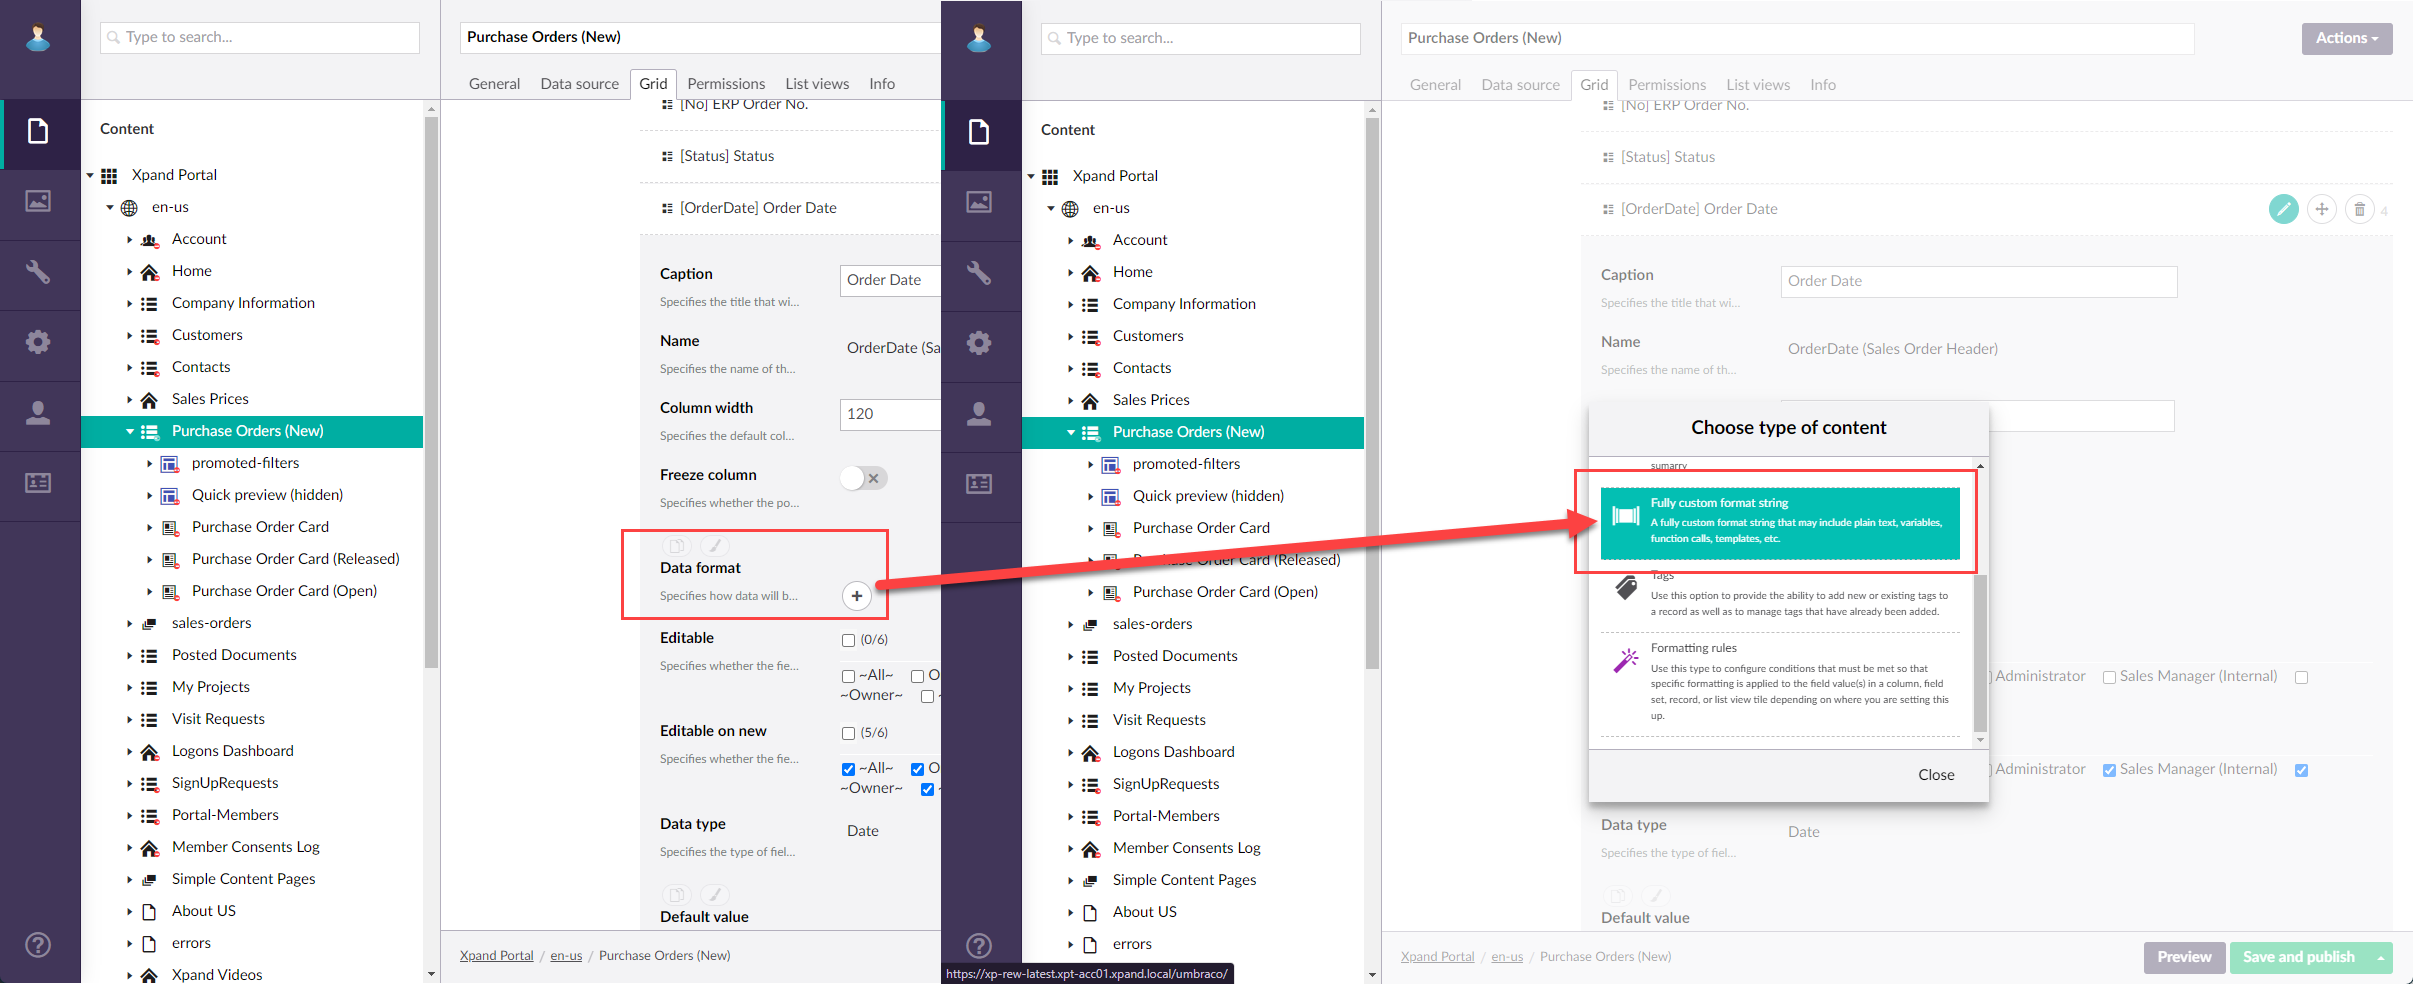
- In the backoffice, go to the page settings that contains a field, for which you want to set up custom date/time format.
- Locate the field settings (for example, on a grid page, go to the Grid tab > Field > expand the field settings).
- In the Data format setting, select the
 icon, and then select Fully custom format string.
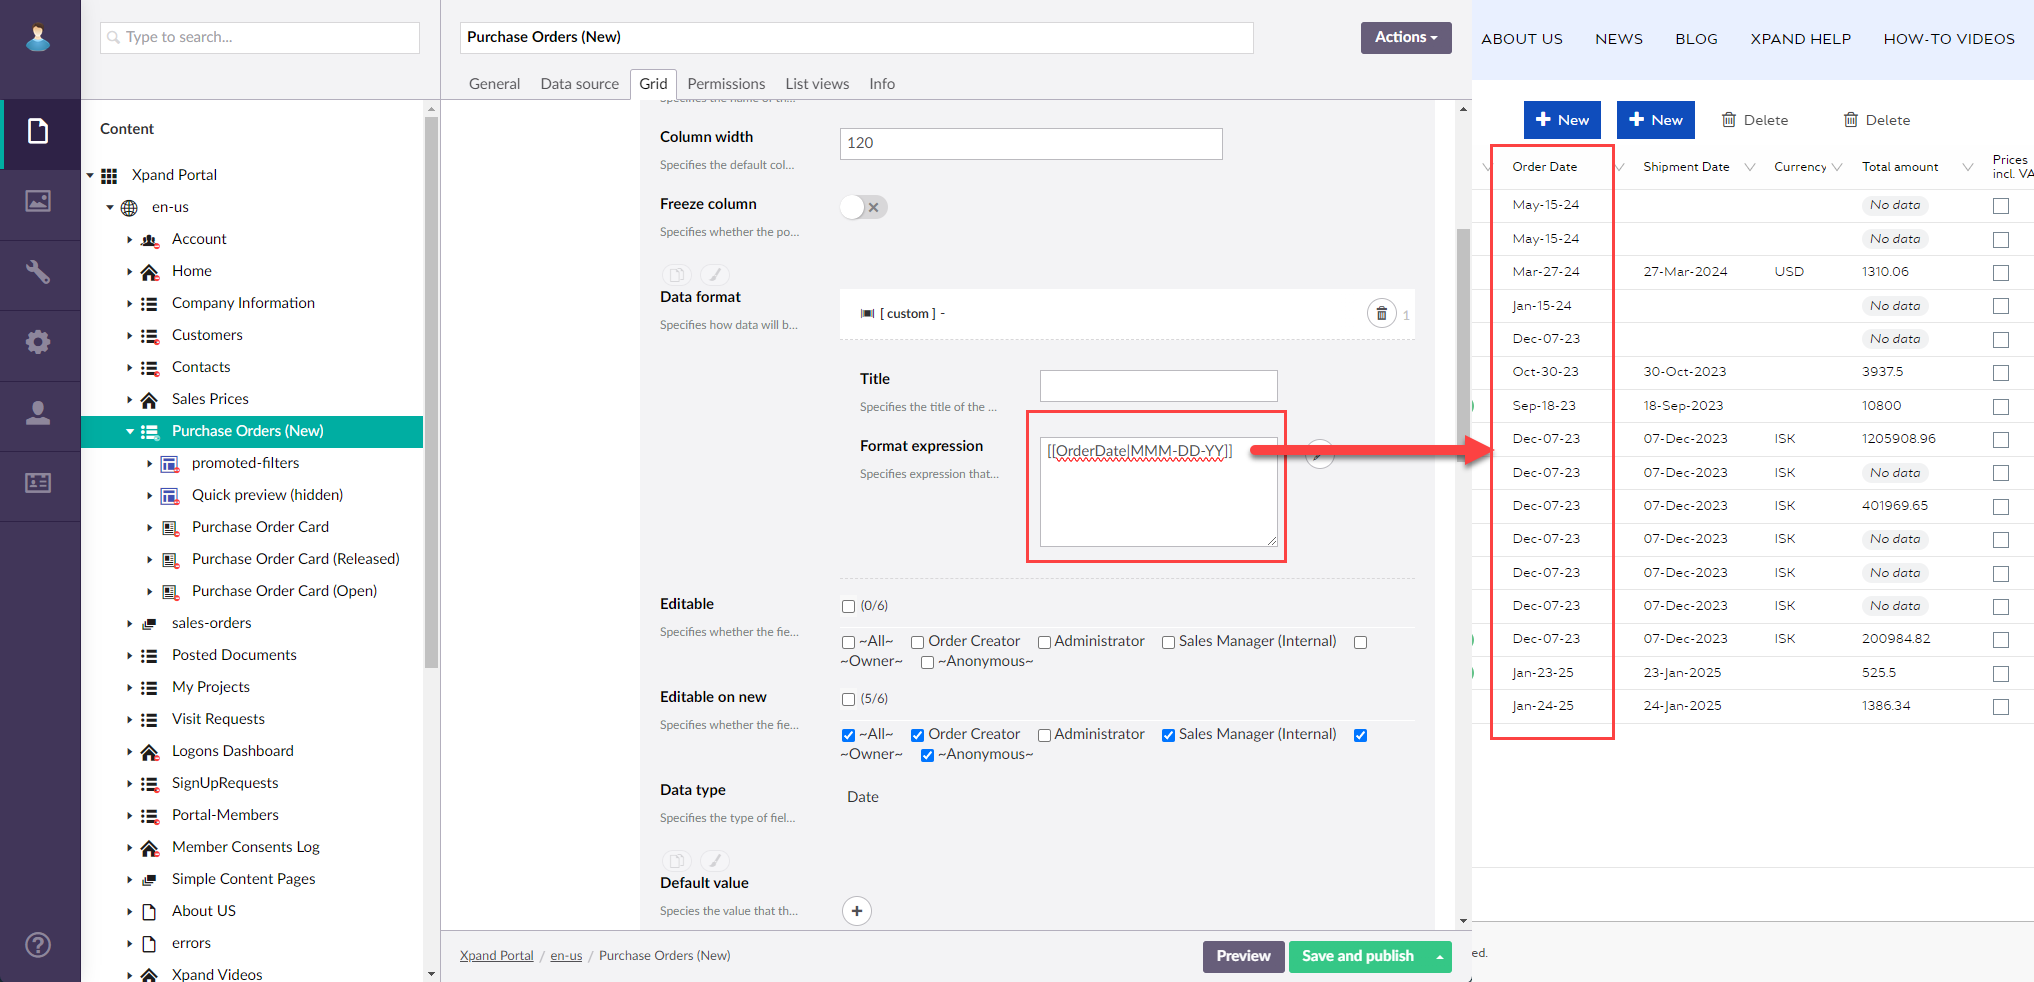
 - In the Title field, type the title of the custom string that will be used to identify it.
- In the Format expression field, type the expression of the custom Date or DateTime format in double square brackets as follows:
[[FieldName|customdatetimeformat]] where FieldName is the internal name of the entity field, which must be followed by a vertical line (|), and customdatetimeformat is the format of date or date & time.
Examples:- For a field with the Date type:
- [[OrderDate|MMM-DD-YYYY]]
- [[OrderDate|DD-MMM-YYYY]]
- [[OrderDate|DD-MMM-YY]]
- [[OrderDate|MMMM d, yyyy]]
- [[OrderDate|yyyy-MM-dd]]
- [[OrderDate|d MMMM yyyy]]
- [[OrderDate|MMMM yy]]
- etc.
- For a field with the DateTime type:
- [[OrderDate|dd-MMM-yyyy hh:mm:ss]]
- [[OrderDate|dd-MMM-yyyy hh:mm]]
- [[OrderDate|MMM-dd-yy hh:mm:ss]]
- etc.
- For a field with the Date type:
- Save and publish the changes.
When setting a custom date or date+time format, you can:
- change the order of format elements (MMM-dd-yyyy, dd-MMM-yyyy, etc.)
- change the length of format elements (MMM-dd-yy, dd-MMMM-yyyy, etc.)
- change/remove the delimiters (MMMM d, yyyy) (dd-MMM-yyyy), etc.
- remove format elements (dd-MMM-yyyy hh:mm:ss, dd-MMM-yyyy hh:mm, etc.)
|
When you are configuring the format string for the Date and DateTime data types, use the kendo date formatting. |