Creating document templates
Qvaba Flexible Documents enables you to generate Word, PDF, and Excel documents from document templates that have your own custom layout. To be able to generate documents from templates, first you must create document templates and design the document layout. You can also use the preconfigured document templates that are shipped with the app.
To create a new document template:
- In Business Central with the Qvaba Flexible Documents app installed, choose the
 icon, enter Document Template List, and then choose the related link.
 - In the Document Template List window, choose New.
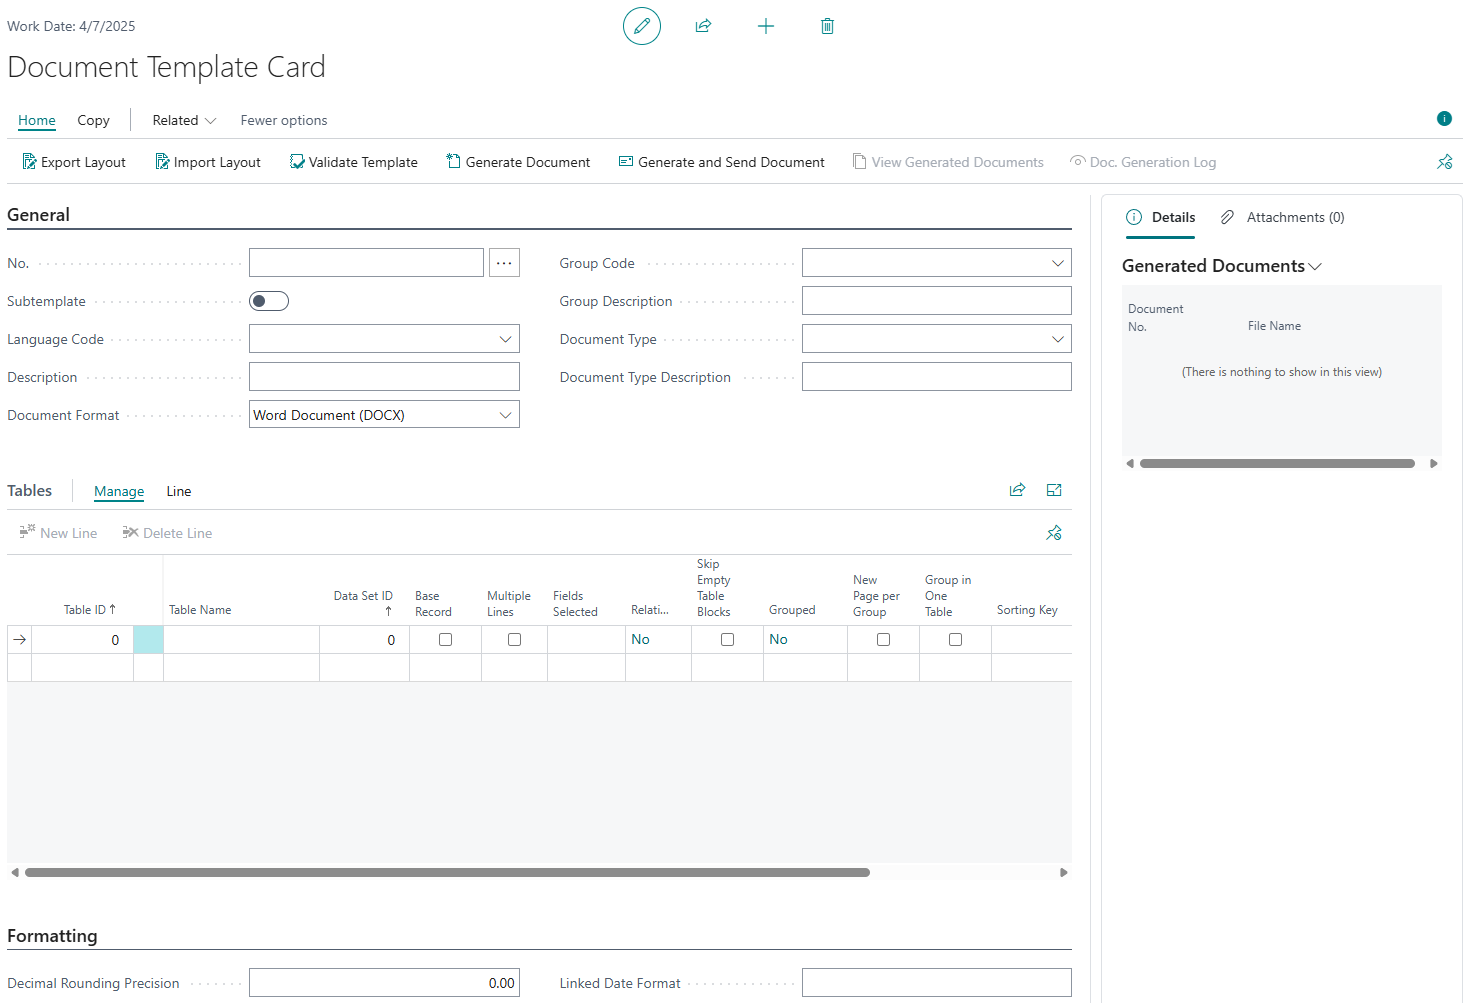
- In the Document Template Card window, on the General FastTab, enter the general information about the document template, such as its description, type, template group it will be assigned to, etc.
- No. - Specifies the number of the document template that will be used to identify it. This number can contain alphanumeric characters. If you have the number series set up, press Enter to have this field filled in automatically.
- Subtemplate - Specifies that the template is a subtemplate to another template. Document subtemplates are used in conjunction with document templates and represent a part of a template. Creating a subtemplate can be useful when a part of a document is the same on multiple templates. For example, a subtemplate can be created for a document header that contains the company logo. After a subtemplate is created, it can be linked to another template. It becomes available for selection as a subtemplate code in the Insert Merge Field on the Mailings tab of Microsoft Office Word.
- Language Code - Specifies the language code of the document template. This is the language that was probably used on the document layout. During document template selection setup, you will be able to set up a document template for an entity only if their language codes are the same.
- Description - Specifies a description of the document template.
- Document Format - Specifies the format that documents generated from this template will have: Word Document (DOCX), Portable Document (PDF), or Excel Document (XLSX).
 Note
NoteWhen you change the document format of a document template from Excel Document (XLSX) to any other type or from any other type to Excel Document (XLSX), the existing template layout will be deleted.
- Group Code - Specifies the code of a document template group that this template is assigned to. Document templates groups are used to group multiple document templates with similar purpose, layout, etc.
- Group Description - Specifies a description of the document template group.
- Document Type - Specifies the type of the document that this template is designed for.
- Document Type Description - Specifies a description of the document type that the given template is designed for.
- On the Tables FastTab, create a line to add a table from which data will be retrieved:
- Table ID - Specifies the ID of a table that will be used as a source of data for the given document template. In one template, you can use multiple tables if necessary as well as one and the same table several times.
- Table Name - Specifies the name of a table that will be used as a source of data for the given document template. This field is filled in automatically.
- Data Set ID - Specifies the ID of the data set on the given line. Each table represents a set of data that you can add to the template. You can use one and the same table multiple times, for example, for different blocks of information retrieved from the same table. In this case, the same tables but with different blocks of information from them represent data sets and each data set has its own ID. This ID is filled in automatically when you add a new table line. When you add a line with a table that has already been used, a new data set ID will be automatically assigned to differentiate this data set. The data set ID is increased sequentially whenever you create a line with a table that is already used in the given template.
- Base Record - Specifies that the table on this line is a base record in the given document template. In this case, other tables are linked to tables indicated as base records. If you have multiple table lines, you must set up at least one table as the base record. You can set up several tables as base records in a document template.
- Multiple Lines - Specifies that it is allowed to show multiple records from this table.
- Fields Selected - Specifies that the fields that will be used in the document template from this table have already been selected. Whenever you select at least one field to use in the template, this check box on the table line is selected automatically.
- Relationships - Specifies that relationships have been set up for this table line. This check box is selected automatically when relationships exist.
- Skip Empty Table Blocks - Specifies that table blocks without information will not be shown for this table in the Word/PDF document. A table block is a part of document layout that shows data from a Microsoft Dynamics 365 Business Central table. This table block is also referred to as multi-line construction. Such a table block may contain one embedded table block which will show information from a different table. Select this check box if you do not want to show empty blocks of information that do not have values. The field captions for the whole table block will not be shown. If you leave this check box cleared, the table blocks will always be shown regardless of whether there are records or not. In this case, the field captions for the whole table block will be shown.
- Grouped - Specifies that information for the given table block has grouped data (fields marked as Group). This check box is selected automatically after at least one field selected for this table is set as Group.
- New Page per Group - Specifies that a new document page will be used for each group of data in the template in the Word/PDF layout. Select this check box to use a new page per group of data. If you leave this check box cleared, it will be allowed to show multiple data groups on one page. This check box cannot be selected if you selected the Group in One Table check box.
- Group in One Table - Specifies that all groups of data are shown in one table (but still sorted by group). If this check box is cleared, each data group is shown in a separate table. This check box cannot be selected if you selected the New Page per Group check box.
- Sorting Key - Specifies the primary or secondary key of the table on the line. This key can be used to sort data on documents created from this document template. Choose the field and select either the primary key (the first one) or a secondary key (if available). The fields in the chosen key will be used for sorting data either in the ascending or descending order depending on the value in the Sorting Method field.
- Sorting Method - Specifies the method for sorting data from this table. This method is used to sort data from this table either in the ascending or descending order by the fields that are included in the key that you choose in the Sorting Key field. If the key consists of more than one field, each field will be used one by one to sort data.
- Ascending - Data will be sorted in the ascending order by the values in the field(s) in the chosen sorting key.
- Descending - Data will be sorted in the descending order by the values in the field(s) in the chosen sorting key.
- Repeat step 4 to add more tables if necessary.
Note
If you set up more than one table line, you must set up relation between tables. For information on how to set up relation between tables, see step 10.
- Select a line on the Tables FastTab and choose Line > Fields to select the fields from the given table from which data will be retrieved.
Note
The fields that you select here will be selectable for adding on the layout of the template.
- In the Document Template - Fields window, create a line to select a field from the table to use in the document template by filling in the fields as described below.
- Field No. - Specifies the number of a field that you will be able to add to the layout of the document template to display the value from the given field. The fields available for selection depend on the table for which you are setting up fields.
- Field Name - Specifies the name of a field that you will be able to add to the layout of the document template to display the value from the given field. This field is filled in automatically after you fill in the Field No. field.
- Date Format - Specifies the format that will be used for displaying a date if the given field in the document template is of type Date. Enter the format that you want to use for a date field.
- Skip Caption - Specifies that the code with the field caption for the given field will not be available for selection when adding fields to the template layout. If you select this check box, you will be able to add only the code for the field value to the layout.
- Skip Empty Field - Specifies that the caption will be hidden when the field does not contain a value. If you select this check box and this field in the created document does not have value, its caption will not be shown.
- Take First Value - Specifies that only the first value from the first table record for this field is shown when you do not use a multiline construction of fields. If the Multiple Lines check box is cleared on the Table FastTab in the Document Template Card window for the table a field from which you are setting up, and you select the Take First Value check box, the created document will show the field value only from the first table record. If you leave the Take First Value check box cleared for a field in such a table, all values of this field from all table records will be shown in a row.
Note that other filters may apply for records that are shown on a created document. - Group - Specifies that this field can be added to the layout of the template as a Group field code. This may be useful when you have a table data set with multiple records. A field used as a group field will group multiple records in such a way that the records that have the same value of the given field marked as Group will be shown together in a separate table, as a separate group of data. Additionally, for a field marked as Group a field code with Group (Gr.) in the name appears for selection which is used as a caption with the name of the group. You can use this group caption instead of adding field code so that only a group name was shown as opposed to repeating the field with the group name on every record line.
- Separator Type - Specifies the type of separator between the field name and its value. This may be necessary when you use a non-multiline structure of fields and there are multiple records to display. These records are shown in a row. If you do not specify a separator, the field value will be shown right after the field name, without a space. Choose the field and select a type:
- Paragraph - A paragraph will be used to separate a field from its value.
- Custom Text - The separator that will be used separate a field from its value is any text that you specify in the Separator field.
- Separator - Specifies the separator between the field name and its value. Enter a symbol (hyphen, colon, etc.) or a space that will separate the field name from its value. This field is editable only if the Separator Type field is set to Custom Text.
- Decimal Rounding Precision - Specifies how many digits after the decimal point should be displayed for numeric field values in this document template. By default, the decimal rounding precision setting defined for the whole template (on the template card, on the Formatting FastTab) is used, but it can be overidden for a specific field here. For example:
- 0.00 - This is the default value. With this value, Business Central automatically determines how many digits to show after the decimal point — but not more than two. If the number has fewer than two digits, fewer will be displayed; if it has more, it will be rounded to two digits.
- 0.10 - With this value, one digit is shown after the decimal point. If the value has more, it will be rounded to one digit. One digit after the decimal point is always displayed even if it is zero.
- 0.01 - With this value, two digits are shown after the decimal point. If the value has more, it will be rounded to two digits. Two digists after the decimal point are always displayed even if they are zeros.
- 0.001 - With this value, three digits are shown after the decimal point. If the value has more, it will be rounded to three digits. Three digists after the decimal point are always displayed even if they are zeros.
- Alternative Field No. - Specifies the number of a field from which value will be retrieved in case the value in the primary field is not found. If you want to set up an alternative field, choose the field and select a field number.
- Alternative Field Name - Specifies the name of the field from which value is retrieved in case the value in the primary field is not found. This field is filled in automatically.
- Use Date Conversion - Specifies that date conversion will be used when creating a document based on this document template. You can enable date conversion only for date fields. If you select this check box, use the Convert Date Format field to specify in which format the date will be displayed.
- Convert Date Format - Specifies in which format the date will be displayed. This is applicable only for date fields. You can edit this field only if the Use Date Conversion check box is selected. Choose the field and select one of the formats:
- Days - The date will be shown as the number of the day in a year.
- Weeks - The date will be shown as the number of the week in the month.
- Months - The date will be shown as the number of the month in the year.
- Years - The date will be shown as the last two digits of the year from the date.
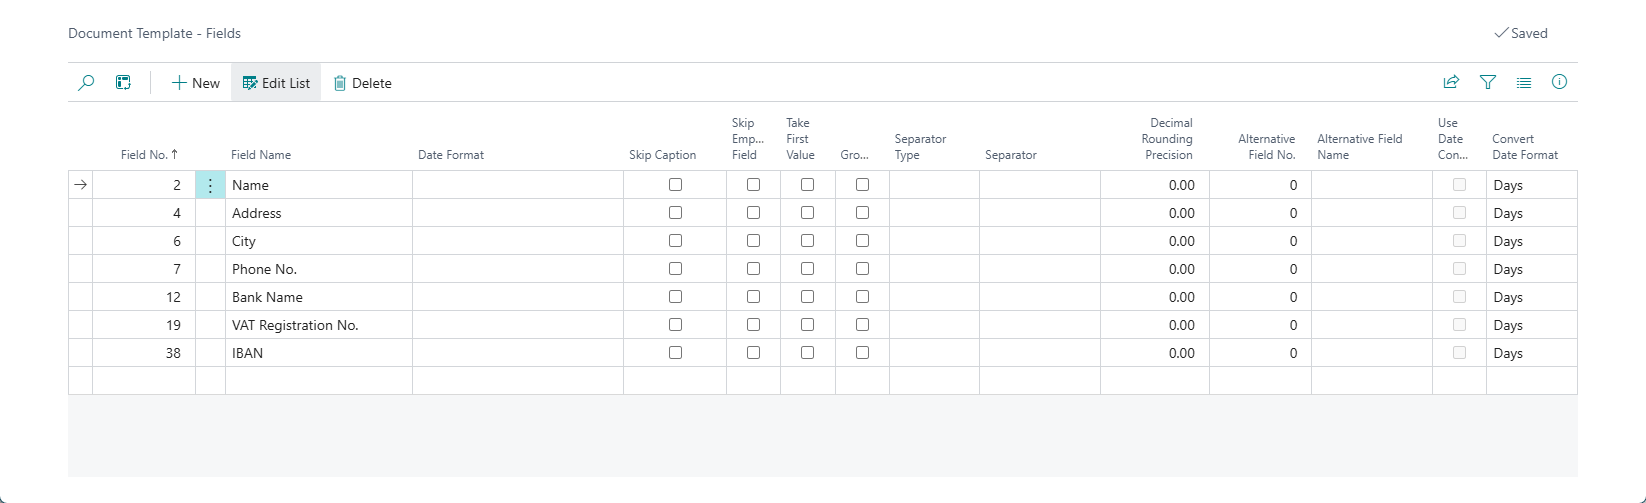
- Repeat step 7 to select more fields if necessary, and then close the Document Template - Fields window.
- Repeat steps 6 through 8 for other table lines to select fields that will be used from those tables in this document template.
- On the Tables FastTab, in case you created more than one table line, choose Line > Relations to set up table relations.
- In the Document Template - Table Relations window, create lines to link tables through key fields. This is necessary to filter the data that will be retrieved for the table marked as Base Record. You need to link every table on the Tables FastTab to the one marked as Base Record. Fill in the fields as described below.
- Field Name - Specifies the name of a field from the table that you want to link to a base record.
- Related-to Table Name - Specifies the name of a table marked as Base Record to which a relation is set up.
- Related-to Field Name - Specifies the name of a field in the related-to table to which a relation is set up.
- Logical Operator - Specifies the logical operator that will be used to compare data in the fields specified in the Field Name field and in the Related-to Table Field Name field. Alternatively, you can compare the value in the Field Name field with a constant value to specify a condition for taking data. In this case, you do not need to specify a field from the base record table. Choose the field and select one of the following operators:
- = - Select this operator when the condition for retrieving data from a subtemplate is that the value in the Field Name field and in the Related-to Table No. field must be the same.
- <> - Select this operator when the condition for retrieving data is that the value in the Field Namefield must not be the same as the value specified in the Constant Value field.
- < - Select this operator when the condition for retrieving data from a subtemplate is that the value in the Field Name field must be less than the value specified in the Constant Value field.
- >- Select this operator when the condition for retrieving data from a subtemplate is that the value in the Field Name field must be bigger than the value specified in the Constant Value field.
- Constant Value - Specifies a constant value with which you can compare the value in the Field Name field to identify the data to retrieve from the table for which you are setting up a relation.
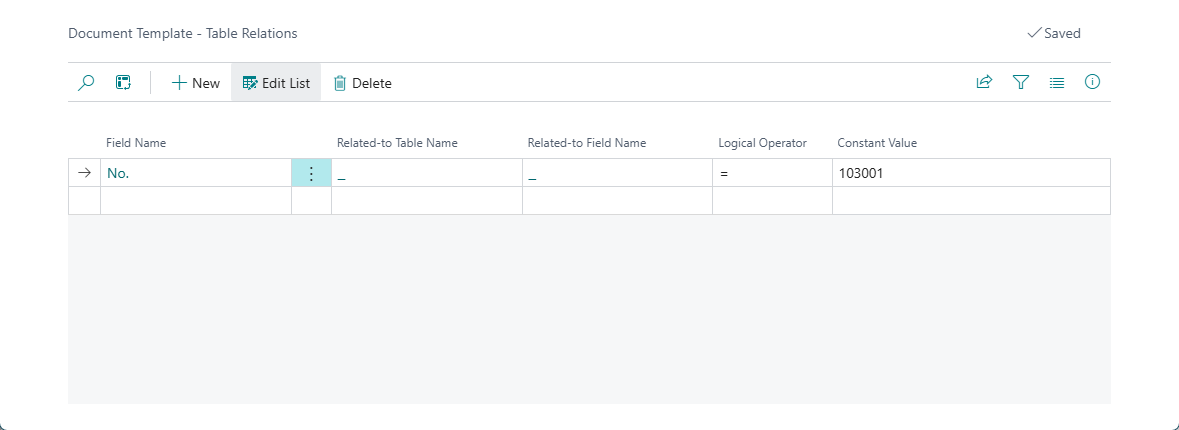
- Close the Document Template - Table Relations window.
- On the Formatting FastTab, you can set up the formatting settings:
- Decimal Rounding Precision - Specifies how many digits after the decimal point should be displayed for numeric field values in this document template. This setting will be used by default, but can be overidden for a specific field within the field settings for a data source table. For example:
- 0.00 - This is the default value. With this value, Business Central automatically determines how many digits to show after the decimal point — but not more than two. If the number has fewer than two digits, fewer will be displayed; if it has more, it will be rounded to two digits.
- 0.10 - With this value, one digit is shown after the decimal point. If the value has more, it will be rounded to one digit. One digit after the decimal point is always displayed even if it is zero.
- 0.01 - With this value, two digits are shown after the decimal point. If the value has more, it will be rounded to two digits. Two digists after the decimal point are always displayed even if they are zeros.
- 0.001 - With this value, three digits are shown after the decimal point. If the value has more, it will be rounded to three digits. Three digists after the decimal point are always displayed even if they are zeros.
- Linked Date Format - Specifies the expression (format) that defines how the document generation date will look like. This date can be added to the layout using the LINKDOC_DATE merge field.
- Decimal Rounding Precision - Specifies how many digits after the decimal point should be displayed for numeric field values in this document template. This setting will be used by default, but can be overidden for a specific field within the field settings for a data source table. For example:
- Choose Export Layout to export the document template layout for editing in the corresponding application (Word or Excel) depending on the chosen document format.
- When you are done creating the layout of the document, choose Import Layout to import the created/edited layout. This will overwrite the existing layout.
- (optionally) You can validate the template to ensure that there are no configuration issues.
Demo data
Qvaba Flexible Documents provides a set of pre-configured demo document templates that can be used out-of-the-box. By default, the demo data is not available.
To add demo document templates to your Business Central solution:
- In Business Central with the Qvaba Flexible Documents app installed, choose the icon, enter Document Template List, and then choose the related link.
- In the Document Template List window, choose Insert Demo Data. This action imported the configuration package with the demo data, applies it, and then adds the demo templates to the list.
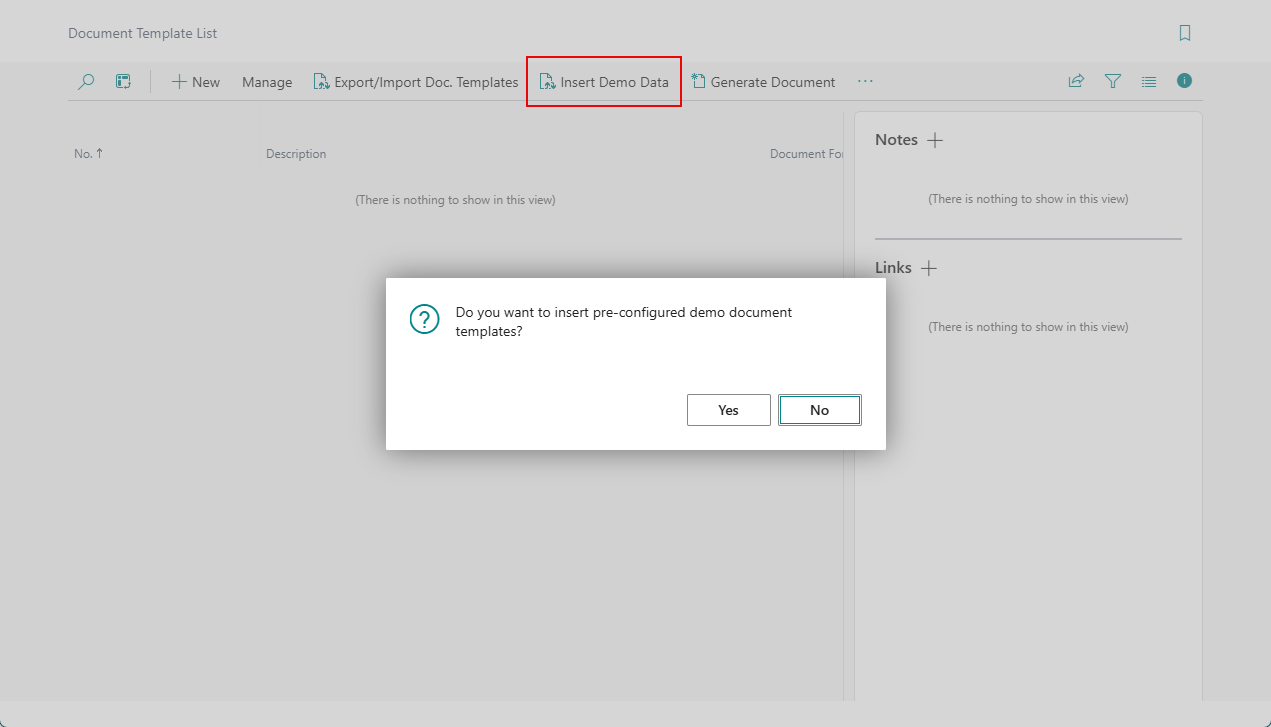
- Choose Yes on the confirmation message that appears.
A set of pre-configured templates for the following standard entities will be added to the list:
- FInancial documents:
- Sales Order
- Sales Invoice
- Sales Credit Memo
- Posted Sales Invoice
- Posted Sales Credit Memo
- Purchase Order
- Purchase Invoice
- Purchase Credit Memo
- Posted Purchase Invoice
- Posted Purchase Credit Memo
- Other pages:
- Customer Card