Setting filters by column value
Filters can be used along with other view personalization tools to change the way data is shown on a page. You can set filters on grid records in multiple ways:
- Filter expressions: You can filter records on a grid page by defining various filter expressions for values in a column. You can set filters on more than one column and specify one or two expressions within a column. Filter can be grouped for even more advanced filter combinations.
- Quick filter field value: You can quickly set a filter by a single field value. This is the same as setting the corresponding filter expression, but easier and quicker.
- Facet filters: You can use facet filters if such filters were configured for the page. Facet filters can help you quickly and easily find information on potentially large data sets. However, facet filters are not saved in a personalized view.
- Promoted filters: These filters are are pre-configured filters that can be added to any portal page as part of a layout block (of any type) or within a field set element. Promoted filters can be useful when you want to add filters that are used often to a certain page. Once promoted filters are configured, they are available on the page as soon as you open it.
Filter expressions
Filter expressions allow setting advanced filters. You can use filter groups to create to create sophisticated filter combinations.
|
For this feature to be available on a grid page, it must be added to the grid page, and the role that you belong to must have permissions to use this ability on that page. |
To set a filter using a filter expression
- Open a grid page where you want filter records.
- Select the
 icon on the action toolbar or in the service menu (in the top left corner of the grid page) depending on the action settings. The icon indicates that at present there are no filters set on the page.
 Note
NoteThe command caption and icon are customizable and can be different in your case.

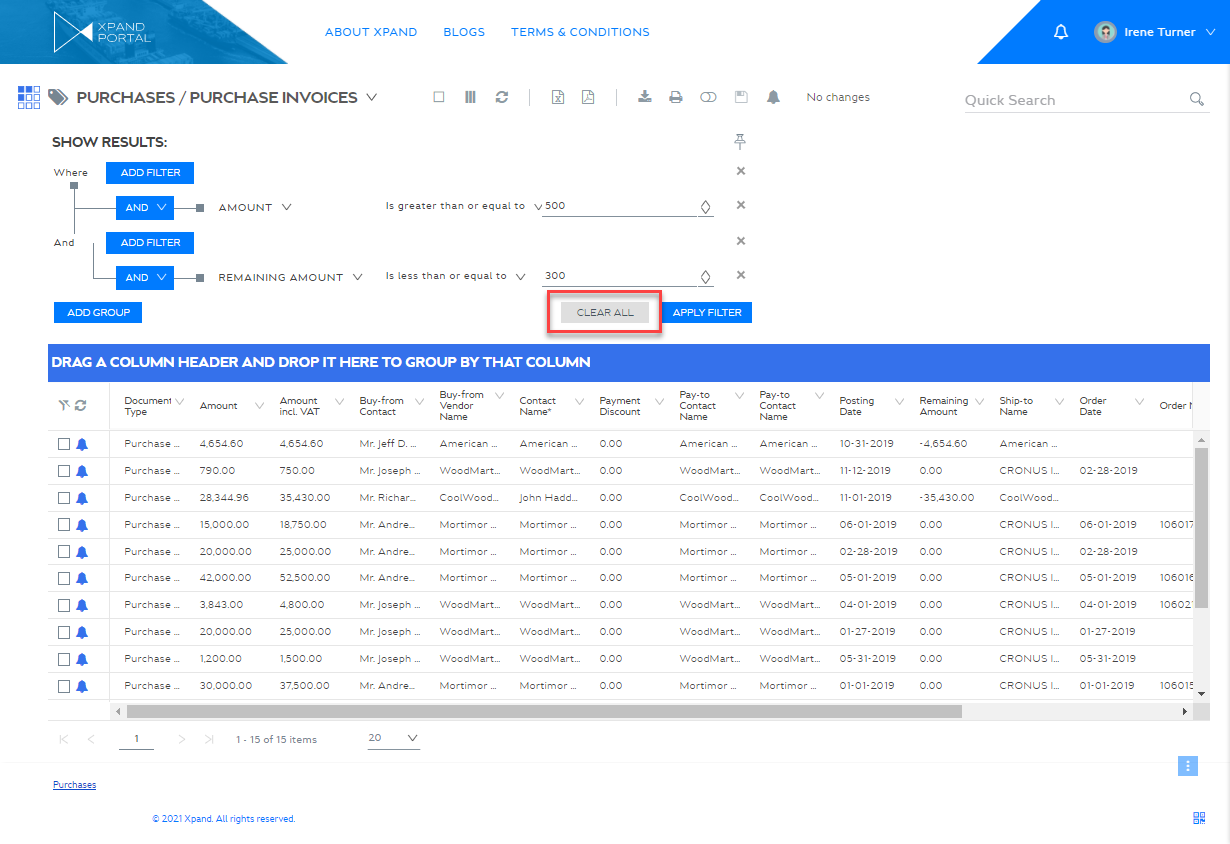
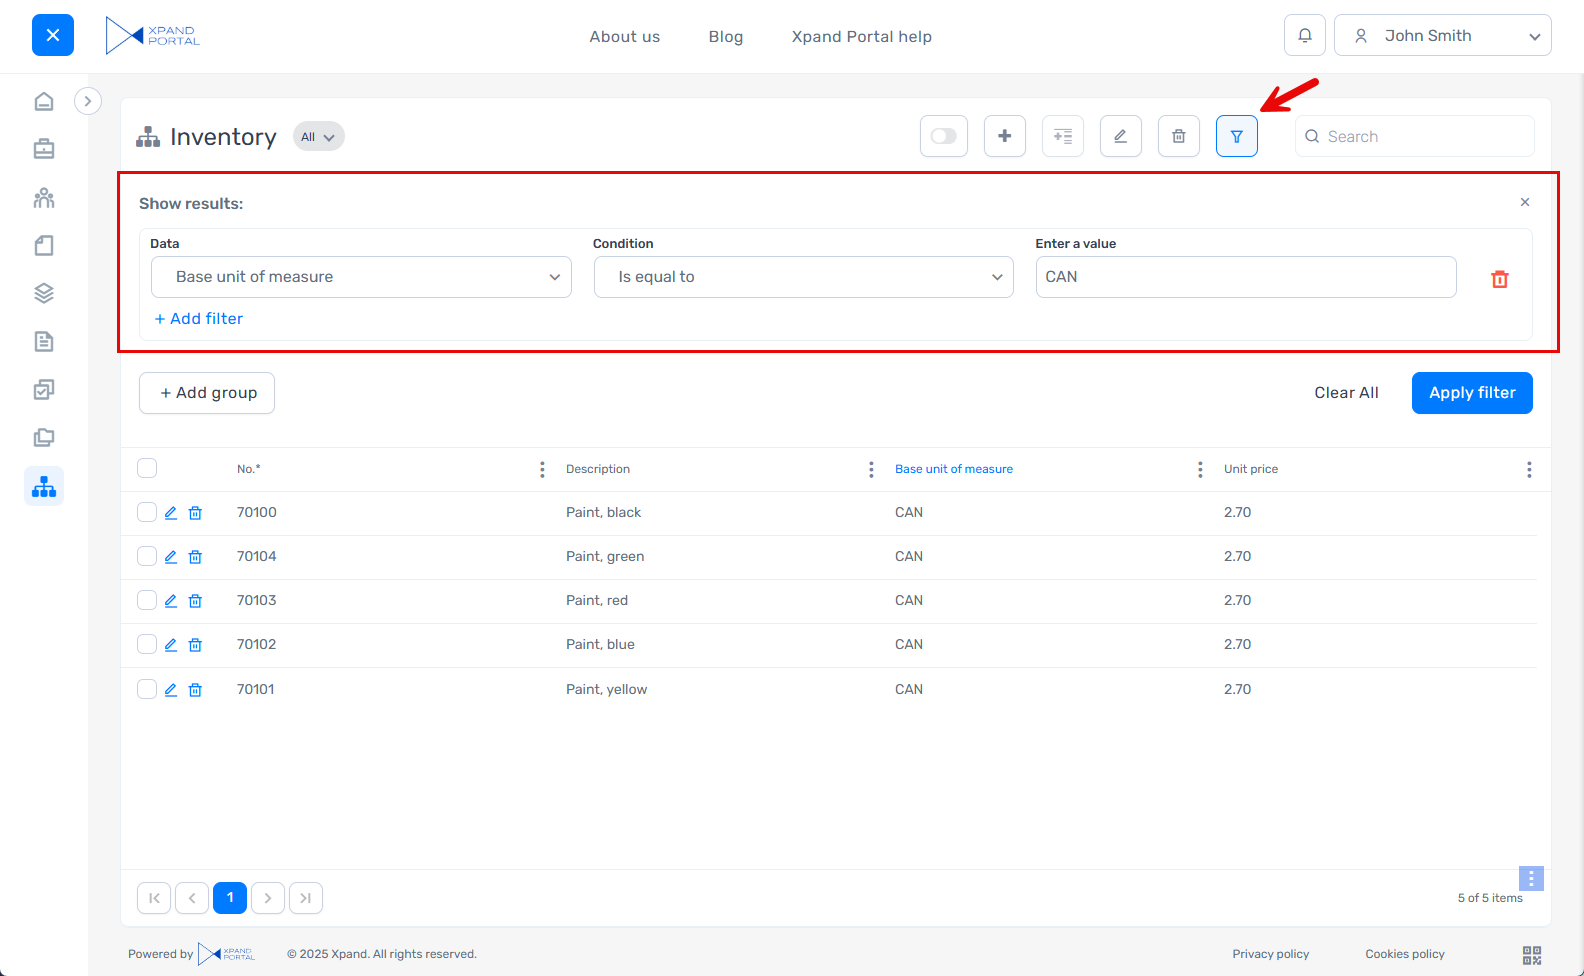
- In the Show results dialog window, set the first condition for the filter:
- Under Data, select the column the value of which will be used to filter records.
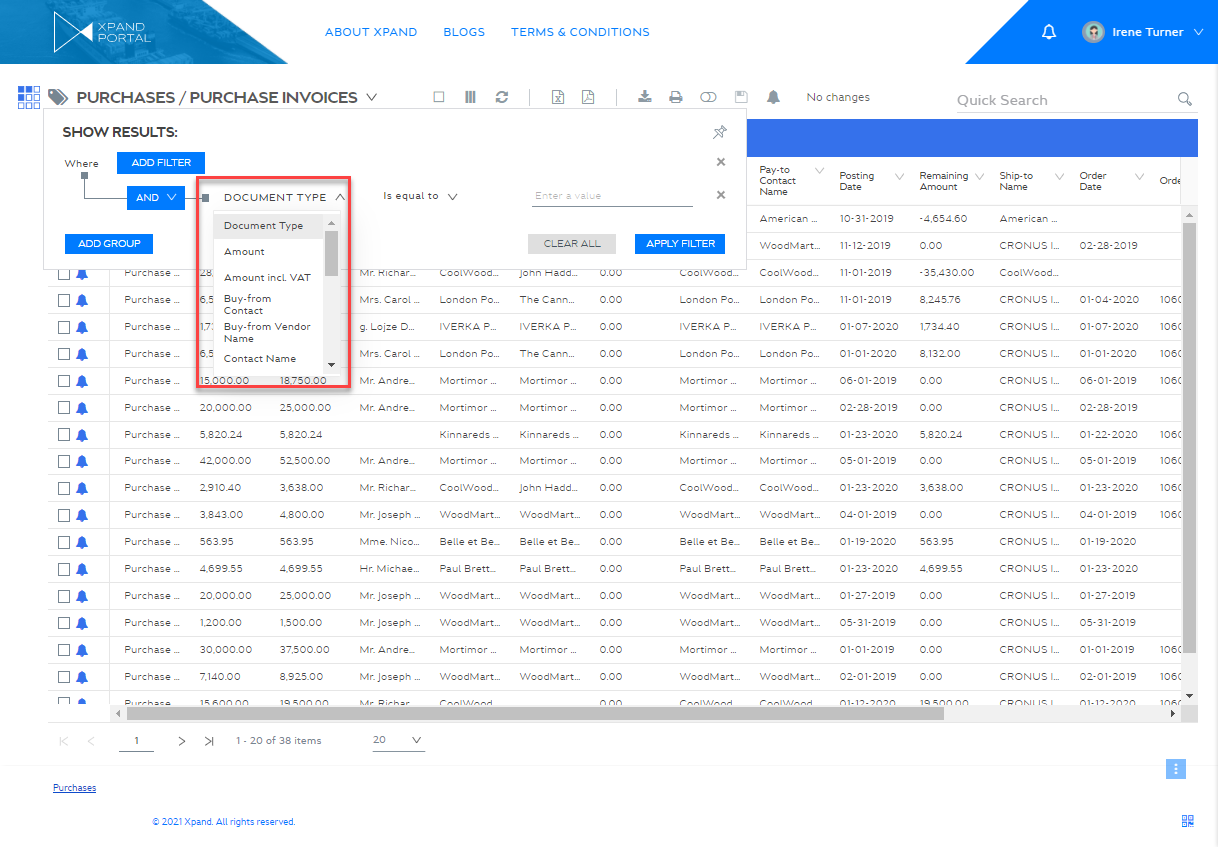
- Under Condition, select the filter expression. You can use the following expressions:
- For columns with numeric value:
- Is equal to - The column value in a record must be equal to the value that you specify to meet the condition.
- Is not equal to - The column value in a record must not be equal to the value that you specify to meet the condition.
- Is greater than or equal to - The column value in a record must be greater than or equal to the value that you specify to meet the condition.
- Is greater than - The column value in a record must be greater than the value that you specify to meet the condition.
- Is less or equal to - The column value in a record must be less than or equal to the value that you specify to meet the condition.
- Is less than - The column value in a record must be less than the value that you specify to meet the condition.
- Is null - The column value in a record must be zero to meet the condition.
- Is not null - The column value in a record must not be zero to meet the condition.
- For columns with text value:
- Is equal to - The column value in a record must be equal to the value that you specify to meet the condition.
- Is not equal to - The column value in a record must not be equal to the value that you specify to meet the condition.
- Starts with - The column value in a record must start with the value that you specify to meet the condition.
- Contains - The column value in a record must contain the value that you specify to meet the condition.
- Does not contain - The column value in a record must not contain the value that you specify to meet the condition.
- Ends with - The column value in a record must end with the value that you specify to meet the condition.
- Is empty - The column value in a record must be empty to meet the condition.
- Is not empty - The column value in a record must not be empty to meet the condition.
- For columns: with date value
- Today - The column date in a record must be equal to today's date.
- Current Week - The column date in a record must be within the current week.
- Current Month - The column date in a record must be within the current month.
- Is equal to - The column date in a record must be equal to the date that you specify to meet the condition.
- Is not equal to - The column date in a record must not be equal to the date that you specify to meet the condition.
- Is after or equal to - The column date in a record must be later than or equal to the date that you specify to meet the condition.
- Is after - The column date in a record must be later than the date that you specify to meet the condition.
- Is before or equal to - The column date in a record must be earlier than or equal to the date that you specify to meet the condition.
- Is before - The column date in a record must be earlier than the date that you specify to meet the condition.
- Is empty- The column value in a record must be empty to meet the condition.
- Is not empty- The column value in a record must not be empty to meet the condition.
Note
To be able to set the filter by Today, Current Week, or Current Month expression, after selecting the column with date value, select Advanced.
 Tip
TipIn addition to setting filters directly in the front end, the portal admin can add filters in the page settings in the backoffice, on the Data source tab, under Filters. In this case, the filter will be applied every time a page is opened.
- For columns with numeric value:
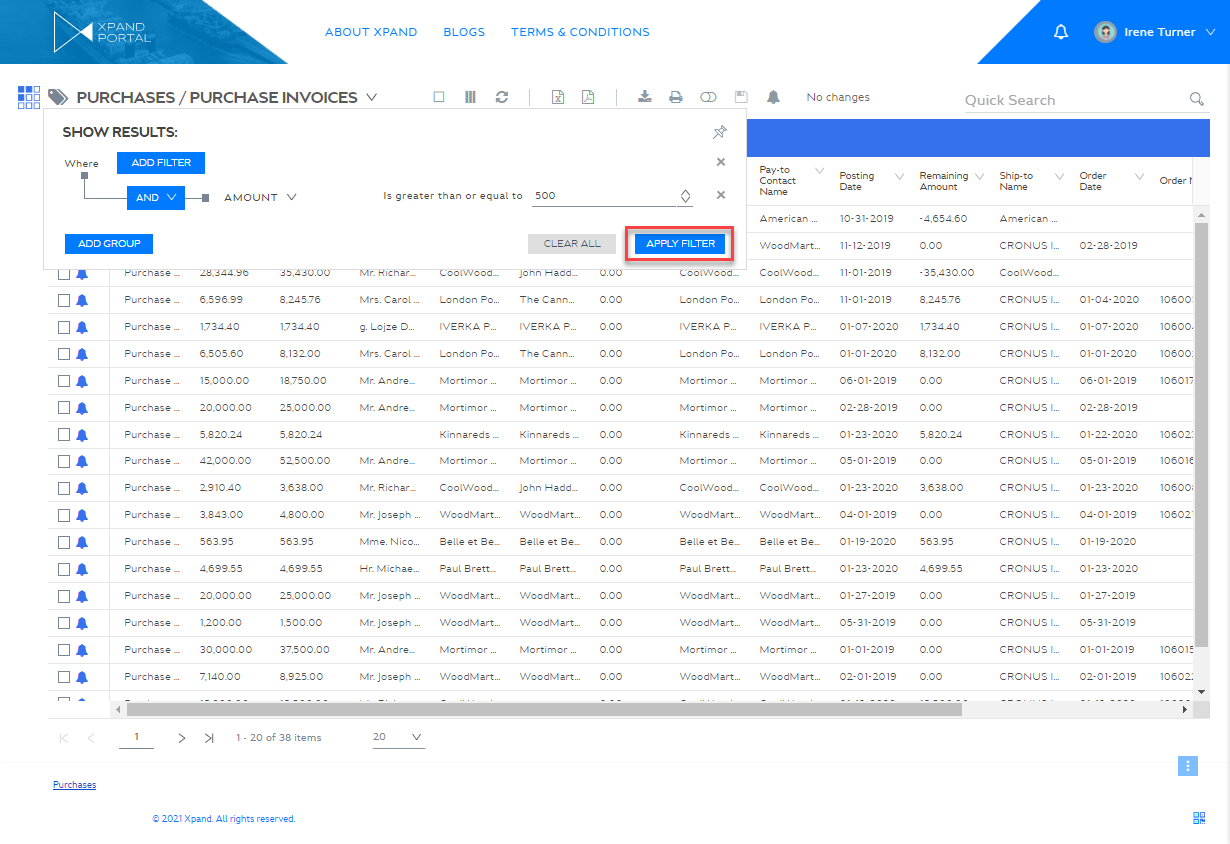
- Under Data, select the column the value of which will be used to filter records.
- Under Enter a value, set the value that the selected field must have.
- To set another condition, select Add filter.
- Optionally, specify the second condition that must be met. You can use the same expressions as with the first filter. For each additional filter, you can also select its type:
- And - Use this type to find records in the data source that meet the criteria in both the current clause and the previous clause.
- Or - Use this type to find records in the data source that meet the criteria in either the current clause or the previous clause.
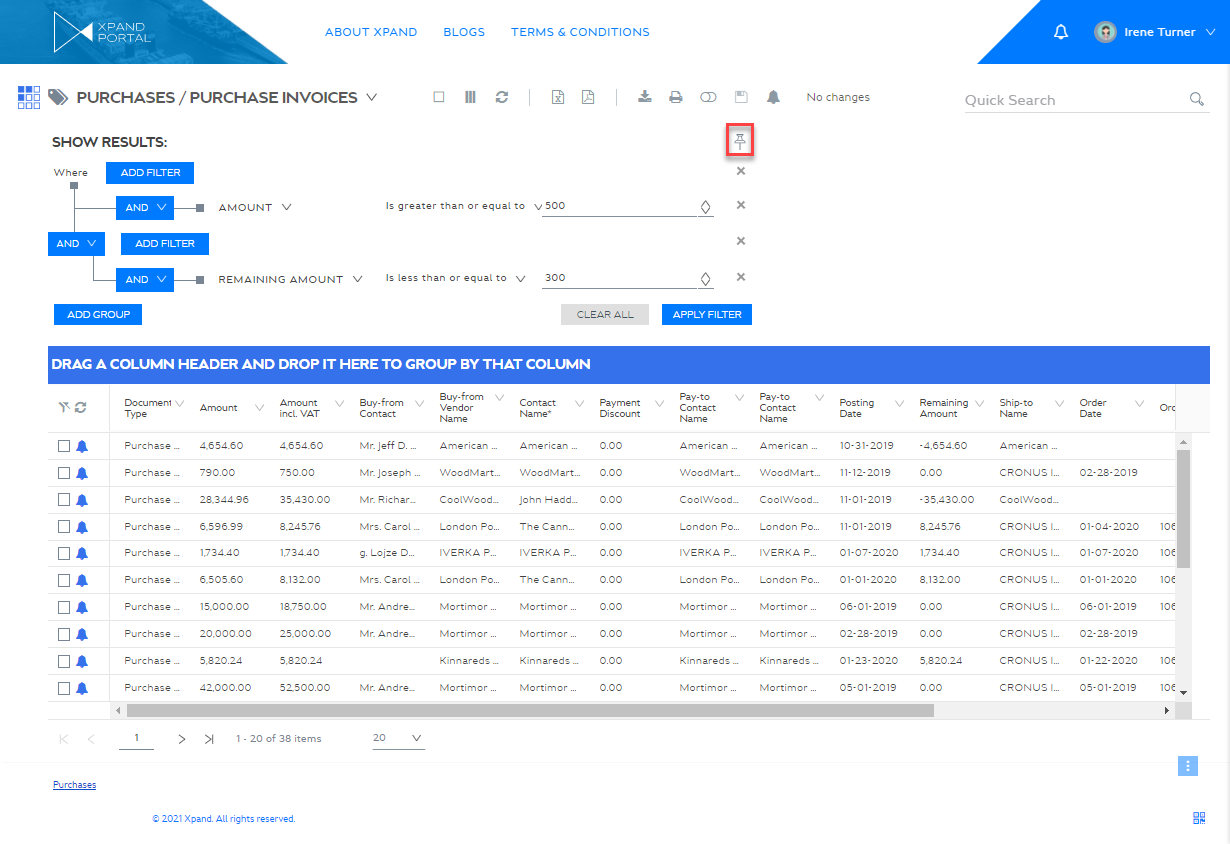
- To add a group of filters, select Add group. Adding filters in filter groups, allows you to set sophisticated filter combinations. Within a filter group, you can set multiple filters and filter conditions, independent of the other filter group.
- Set more filters if necessary.
- Select Apply filter.
To hide the filter pane, select the ![]() icon, or select the
icon, or select the ![]() icon.
icon.
If the Pinned by default setting is enabled for the Filter command in the backoffice, the filter pane will be opened by default when you open the page, but you can always hide it if necessary.
To clear a filter
- Select the
 icon on the grid toolbar. The icon indicates that at present there are filters set on the page.
NoteThe command caption and icon are customizable and can be different in your case.
Depending on settings, the
icon can be also located on the grid toolbar - Select Clear All to clear all filters or select the
 icon next to the specific filter that you want to clear.
|
The set filters along with other personalization-related changes will be reset to its default state as soon as you leave the page, but you can save the view to be able to open the page with your personalization in place if necessary. |
Quick filter
The quick filter is an easy way to quickly filter records by a specific field value. This is the same as setting a filter expressions to filter records where a certain field is equal to a certain value. However, using a quick filter is quicker and you don't have to use the filters pane.
|
The quick filtering is available only when the Filter action is added to the page for your member group. |
To set a quick filter
- Open a grid page where you want filter records.
- Select and hold (or right-click) any field value, and then select FILTER BY: 'VALUE', where VALUE is the value of the selected field, to filter all records by this value.
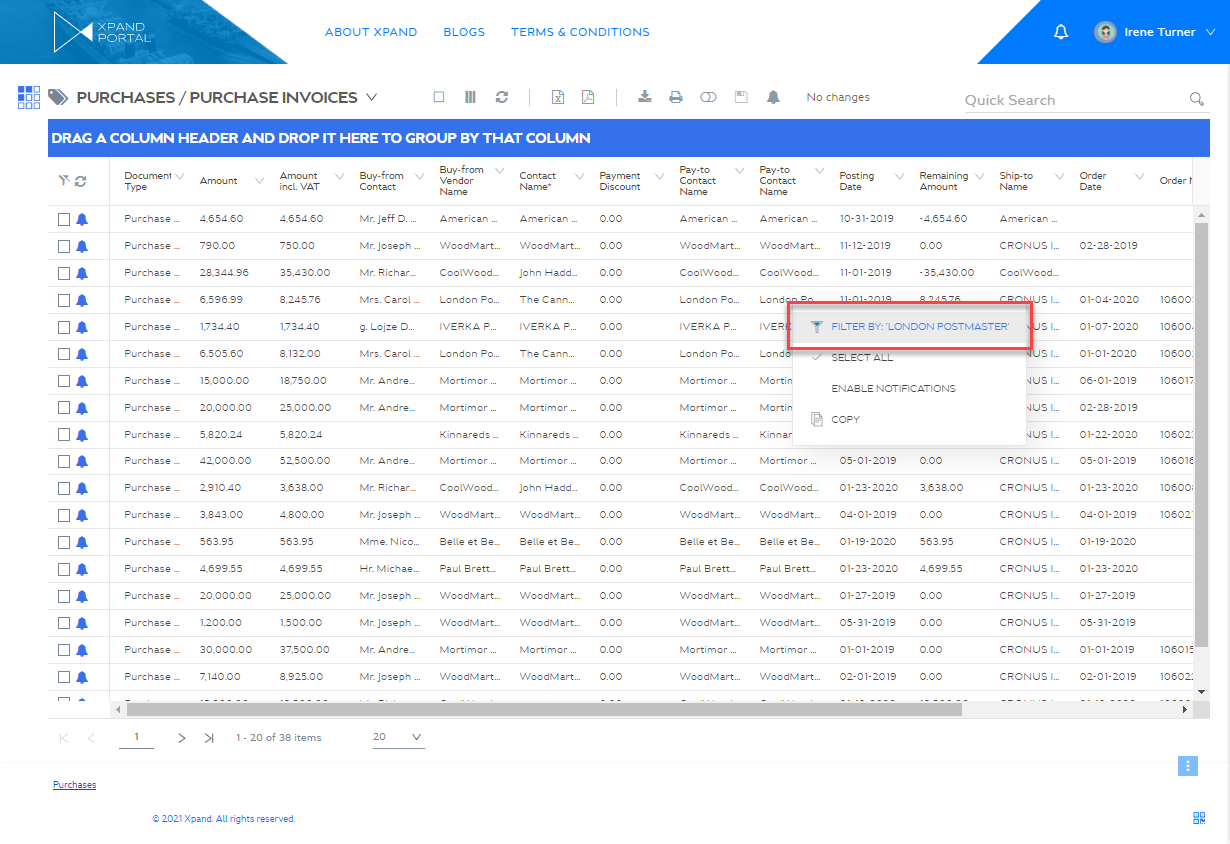
Only records where this field is set to this value will be shown.
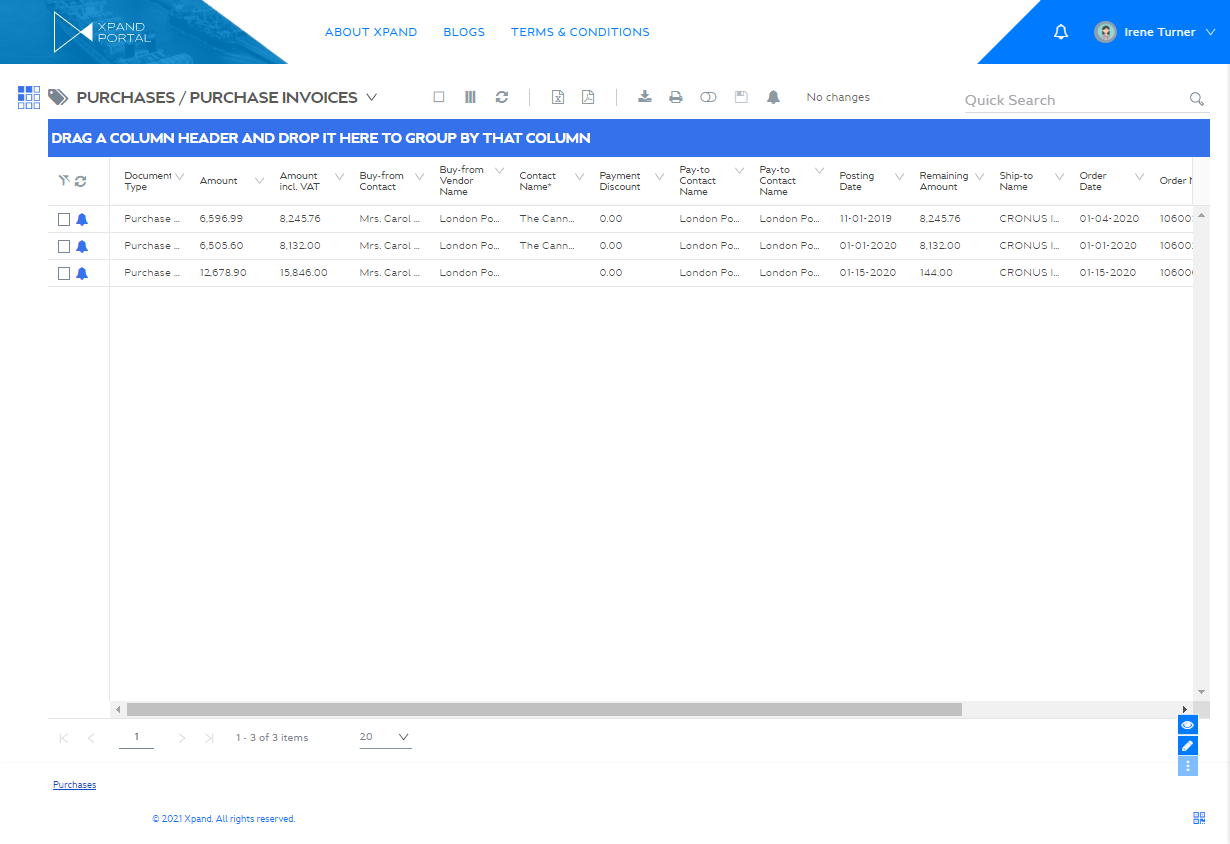
The corresponding filter expression is automatically applied.
A quick filter is cleared in the same way as a filter expression:
To clear a quick filter
- Select the icon on the grid toolbar. The icon indicates that at present there are filters set on the page.
NoteThe command caption and icon are customizable and can be different in your case.
- Select Clear All to clear or filters or select the icon next to the filter that you want to clear.
Facet filters
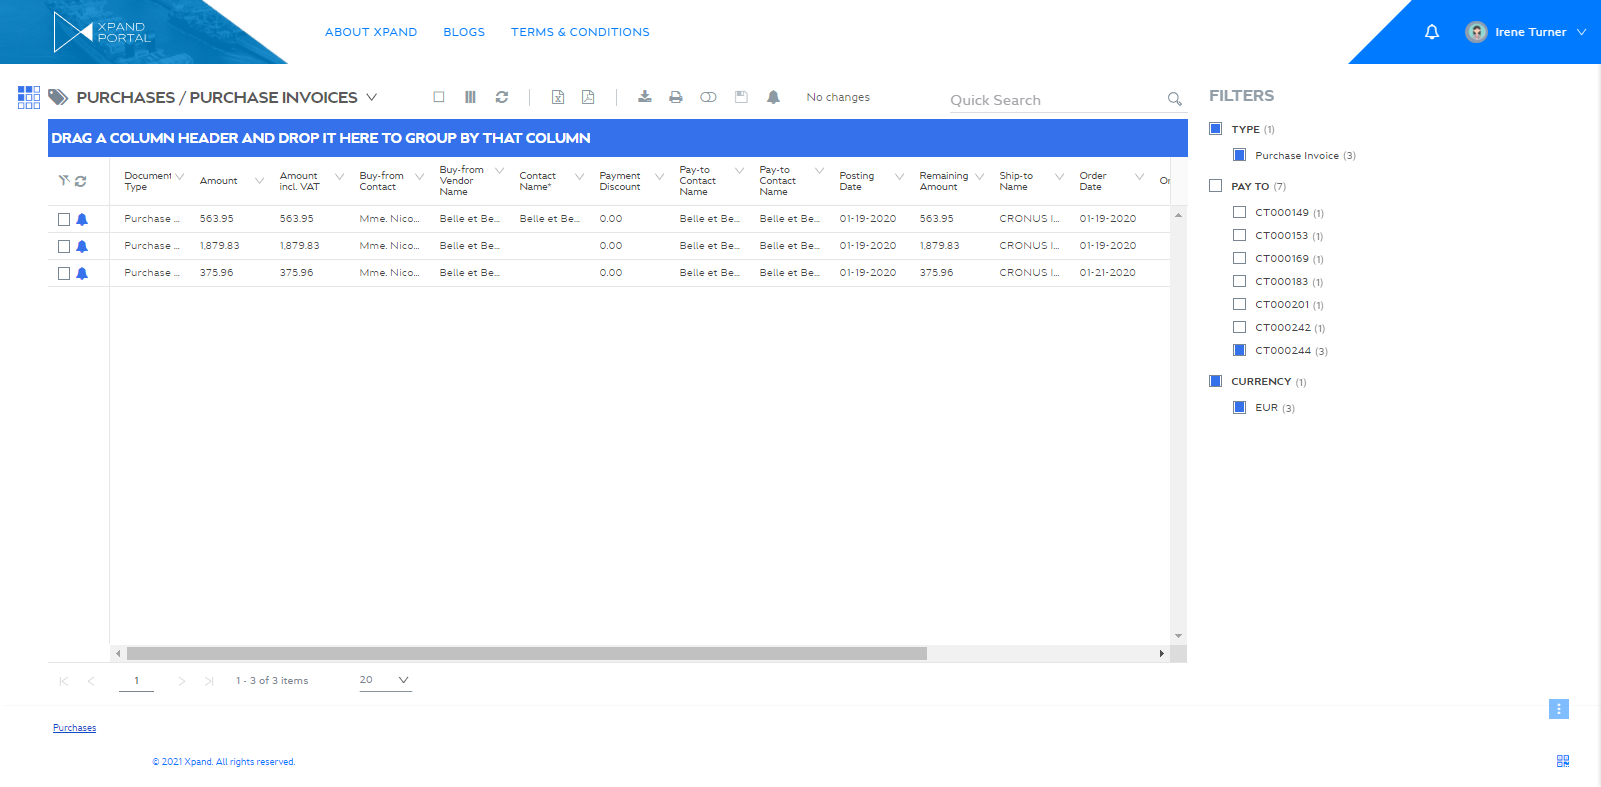
Facet filters can help you quickly and easily find information on potentially large data sets. Facet filters can be shown in two different ways:
- List view - In this view, each field with its values, by which you can set filters, is shown on top of each other. In this case, other filter options will by ruled out in parallel field nodes as soon as you start to apply filters by selecting field values.
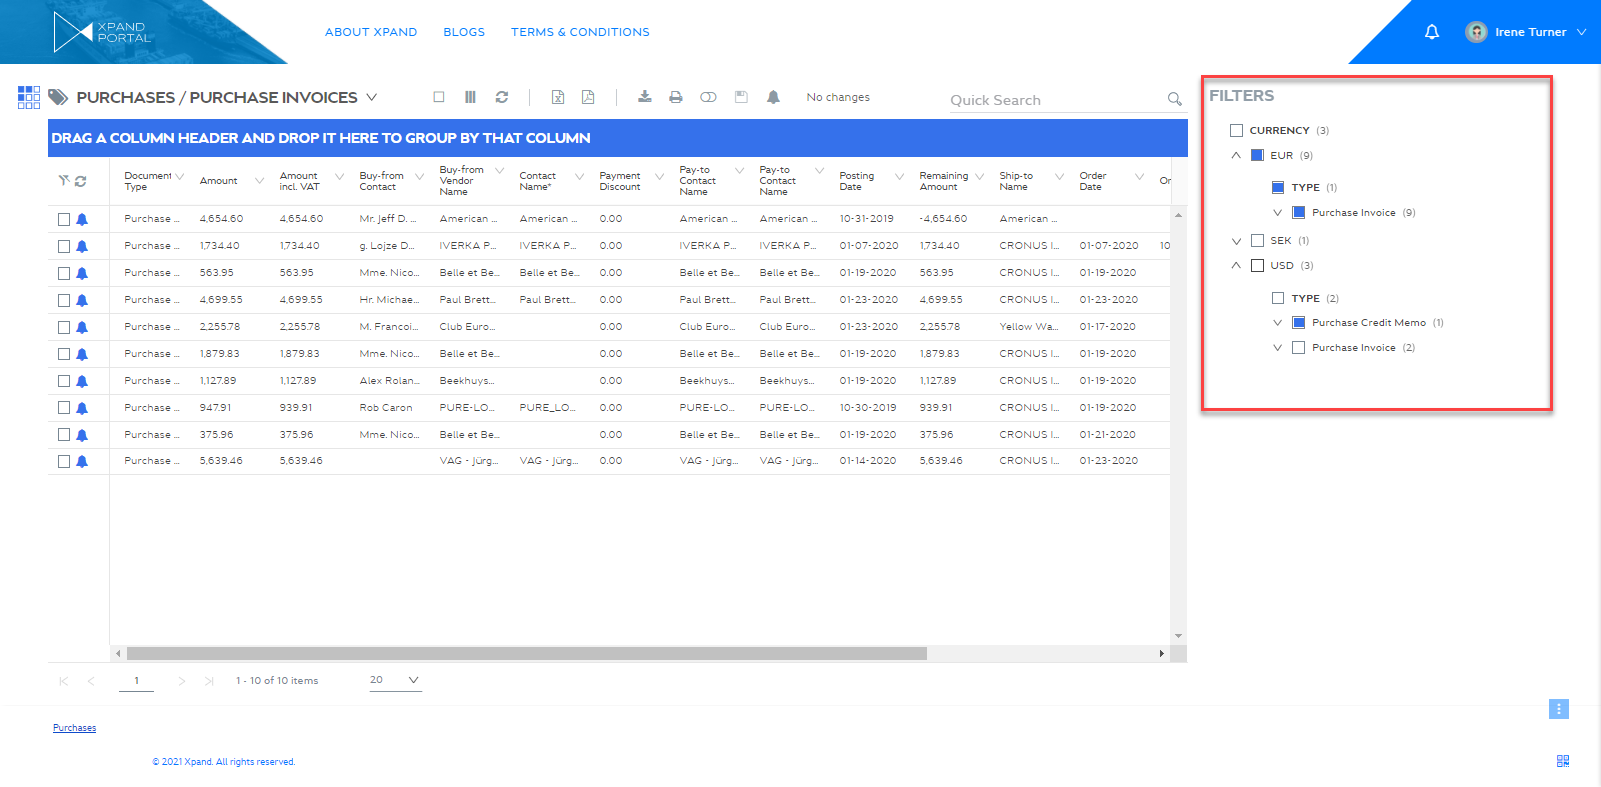
- Tree view - In this view, initially only one field is shown with its values, by which you can set filters, and all additional fields with their values are shown when you expand a field value. In this case, child filter options will be already filtered by the parent filter node.
|
For this feature to be available on a grid page, it must be configured for this page beforehand. Be aware that applied facet filters will not be saved in a saved personalized view. |
To set facet filters
- Open a grid page where you want filter records. The grid page must have facet filters configured for it.
- Set filters on the pane with facet filters:
- List view: Select the check box next to a field value. Select more check box to narrow down the results even further. With each selected check boxes, unavailable options are ruled out.
- Tree view: Select the check box next to a field value. Expand the filter and set additional check boxes if available to narrow down the results even further. The unavailable options in the child filters are ruled out.
- List view: Select the check box next to a field value. Select more check box to narrow down the results even further. With each selected check boxes, unavailable options are ruled out.
- To clear facet filters, clear the check boxes next to the values that were selected or refresh the page.
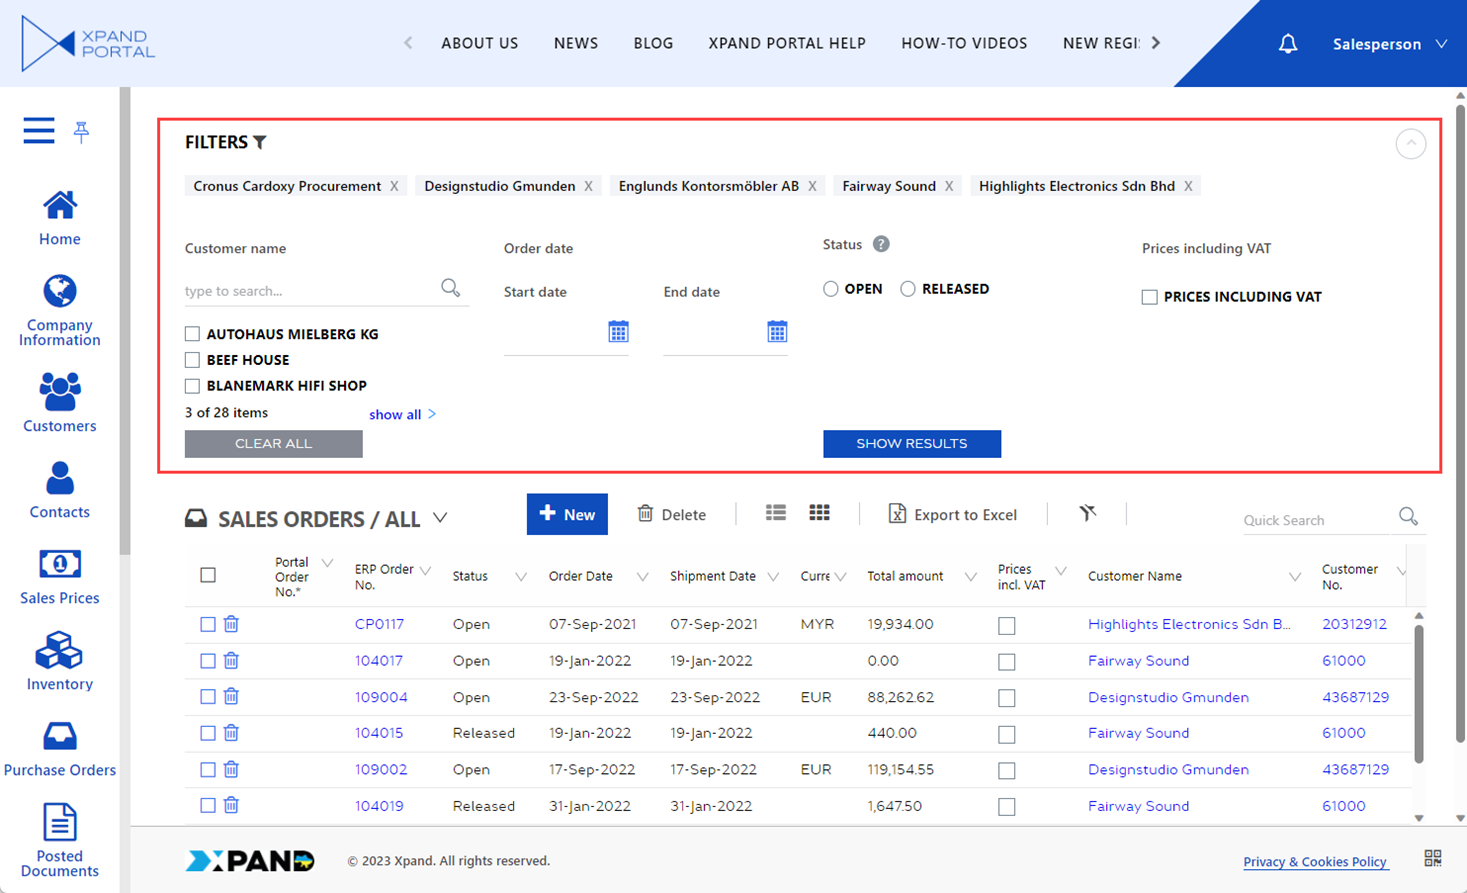
Promoted filters
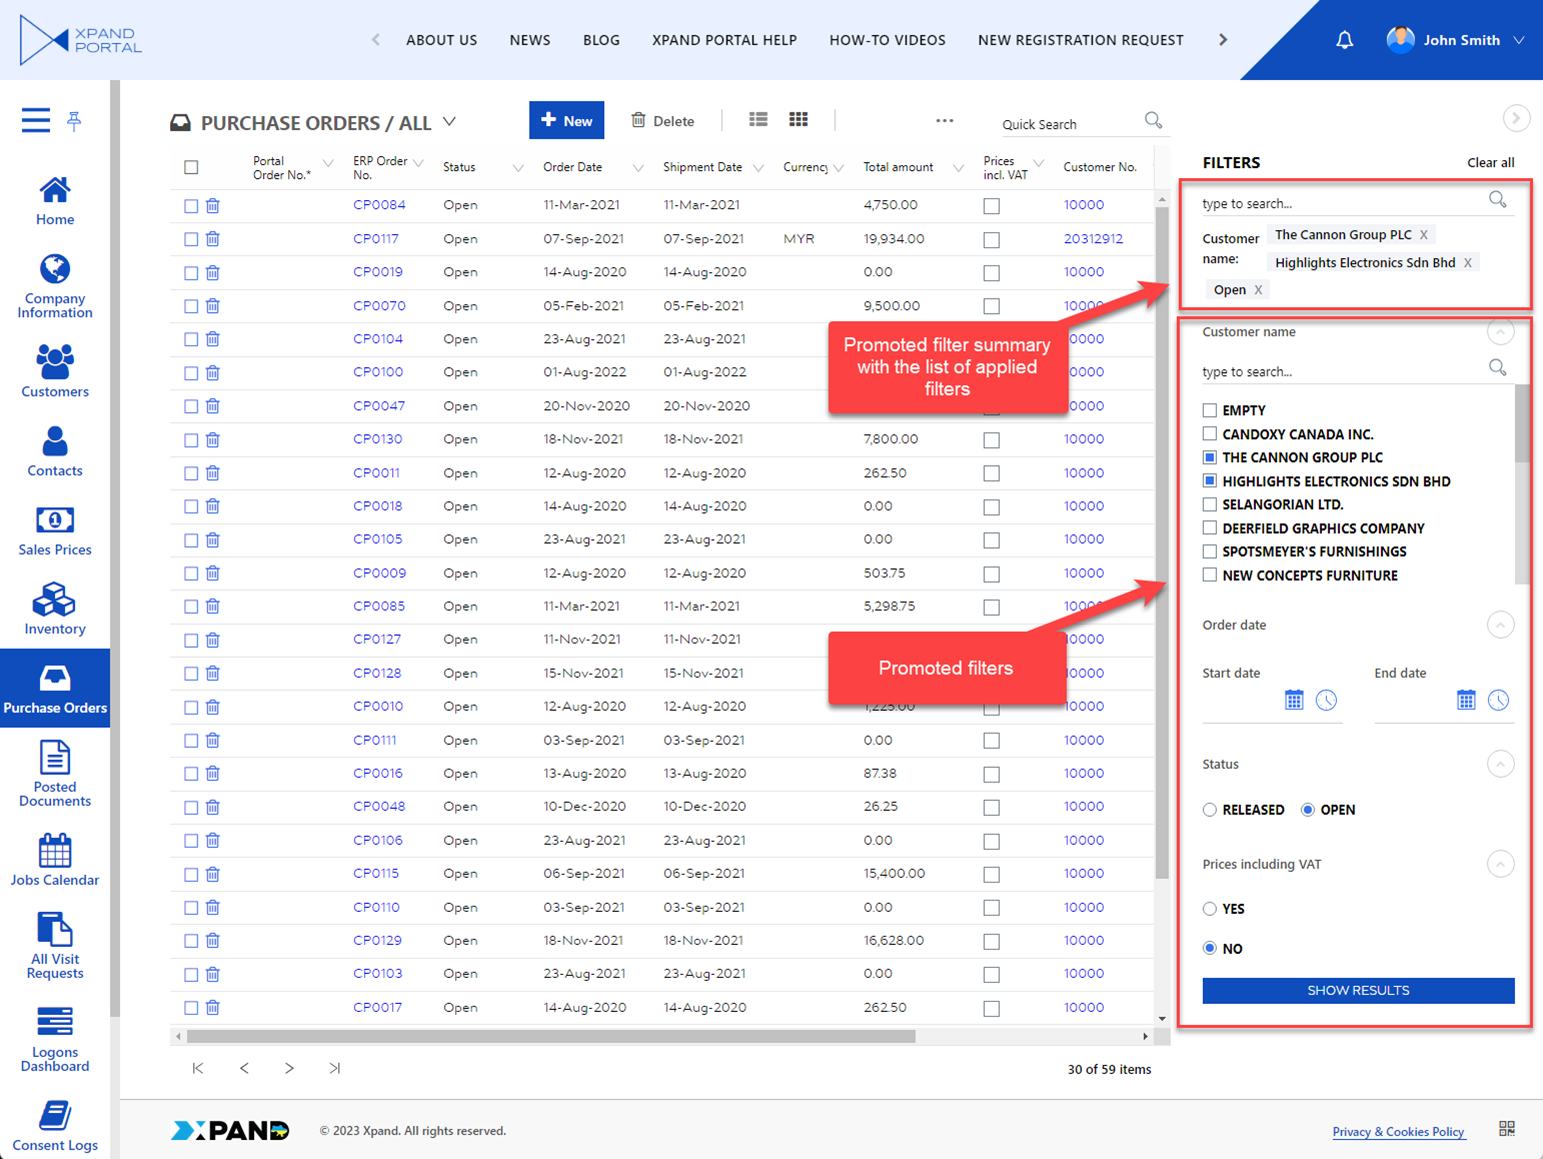
Promoted filters are pre-configured in the backoffice and are available on the page as soon as you open it. These filters are useful when you use certain filters very often and want them to always be available on the page. Which fields are included in promoted filters and how they look (including the layout, button, captions, etc.) depends on the promoted filter configuration. Various data types are supported, such as text, date-time, lookup, single-choice options, and multiple-choice options.
Promoted filters are added in a layout block, therefore they can be in various places on the page.
|
Promoted filters include a summary block where you can see filters that have been applied. This summary block is configured separately. |
An example of promoted filter configuration as a side layout block on a grid page.
An example of promoted filter configuration as a top layout block on a grid page.