Portal entities
Whenever you create new portal pages or edit existing ones in CMS, and your portal is integrated with Microsoft Dynamics 365 Business Central, you can use entities from Microsoft Dynamics 365 Business Central as the source of data for portal pages. In this case, records on a grid page will be retrieved from a table or multiple tables of Microsoft Dynamics 365 Business Central, and data in such records can be synchronized between Microsoft Dynamics 365 Business Central and Xpand Portal.
To be able to use Microsoft Dynamics 365 Business Central entities as a source of data for the portal, you must set up them as portal entities in the Portal Entities window. After you have created and configured a portal entity in Microsoft Dynamics 365 Business Central, you export it to the portal, either manually or automatically with the help of a job queue, to make it available for selection as a data source on the CMS side of the portal. Any subsequent export and/or import of that entity will synchronize data for it between the two systems if there is anything to synchronize.
To set up a portal entity
- In Microsoft Dynamics 365 Business Central, choose the
 icon, enter Portal Entities, and then select the related link.
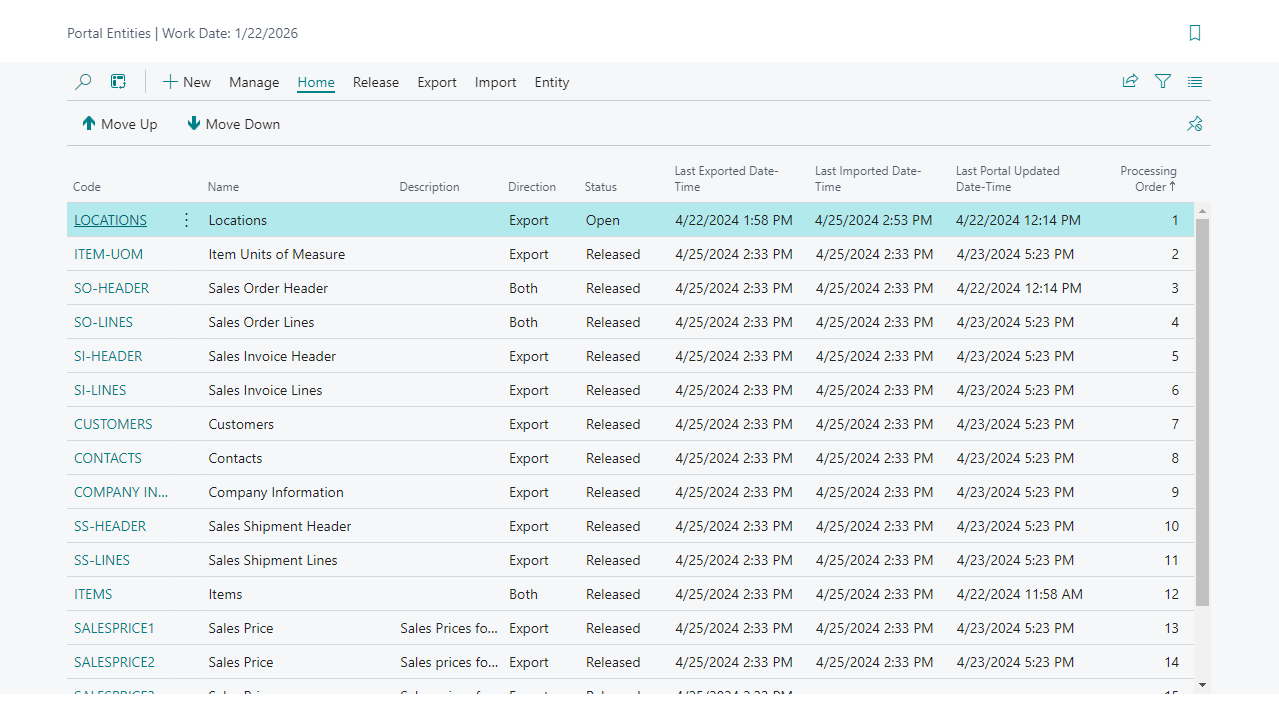
- In the Portal Entities window, choose New to create a new entity or choose a code of an existing entity to edit it.

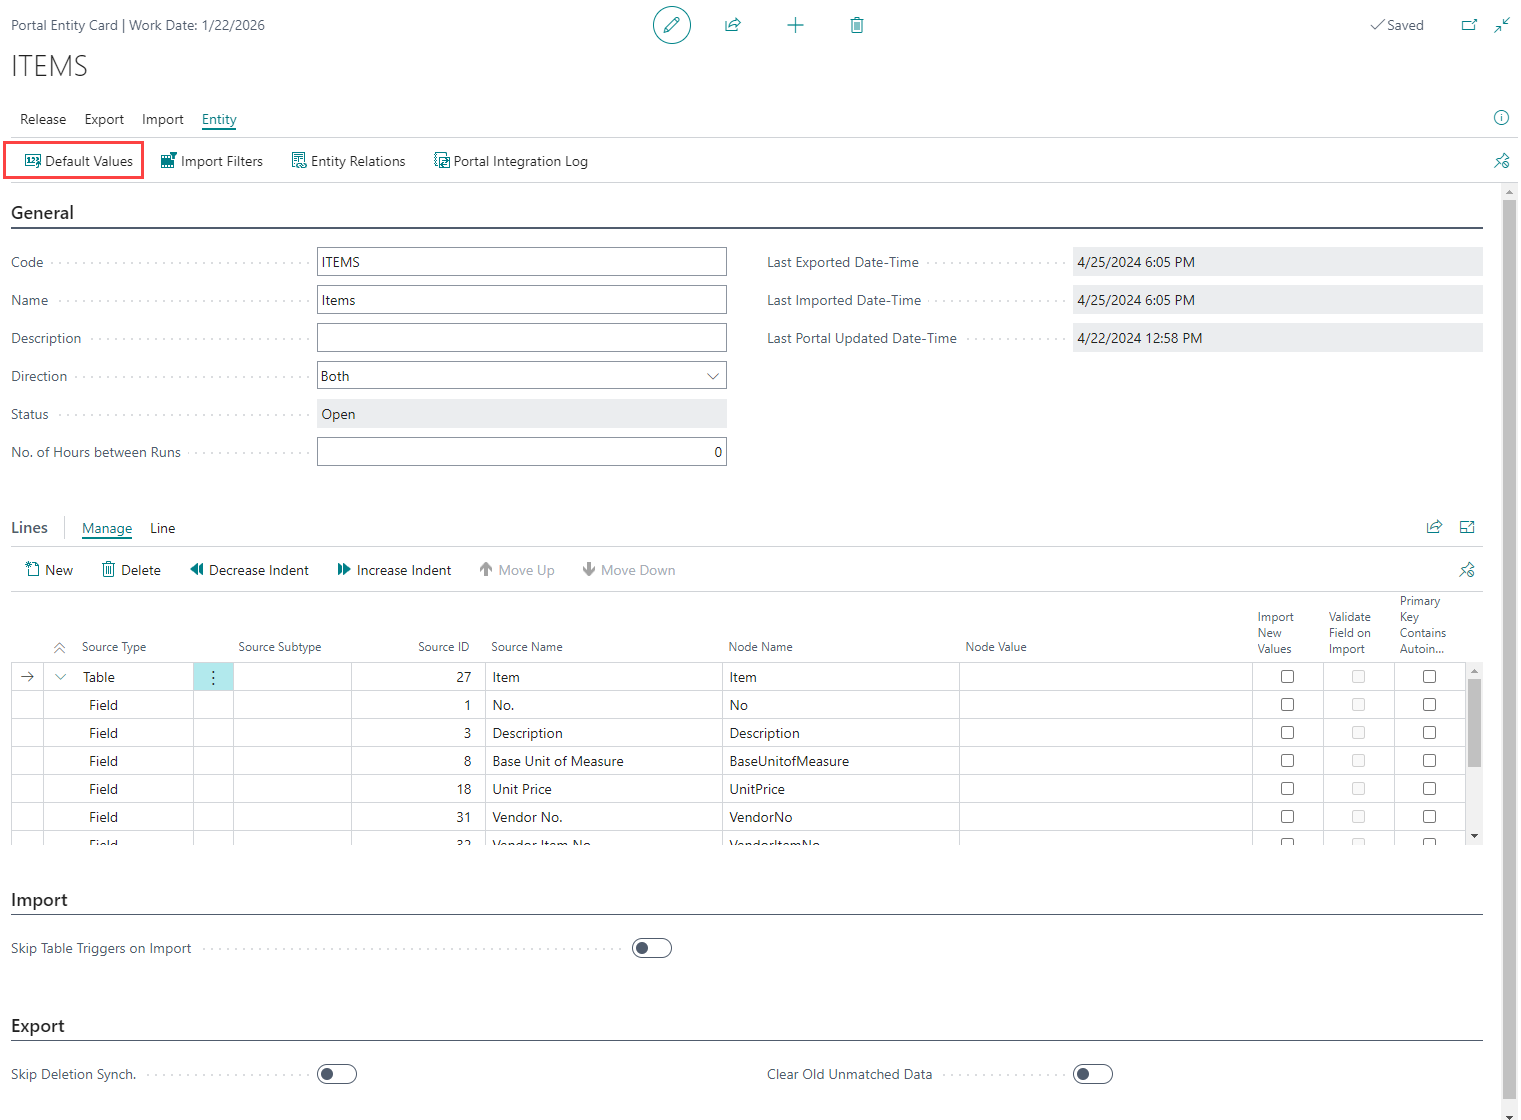
- In the Portal Entity Card window, on the General FastTab, fill in the general information about the portal entity:
- Code: Specifies the code that will be used to identify this portal entity.
- Name: Specifies the name of the portal entity. When you create a portal entity that will be merged with another portal entity on entity export/import, ensure that this name coincides with the name of the portal entity you want to merge it with.
- Description: Specifies a description of the portal entity.
- Direction: Specifies in which direction data for this entity is going to be transferred during data synchronization:
- Export: For entities of this type, data can only be exported from Microsoft Dynamics 365 Business Central into Xpand Portal. You set up portal entities with this type in case you only want to allow portal members to view data from this portal entity on the portal, but not edit it or import edited values into Microsoft Dynamics 365 Business Central.
- Import: For entities of this type, data can only be imported from Xpand Portal into Microsoft Dynamics 365 Business Central. You set up portal entities with this type if you want to provide the possibility for portal members to create new records, which will be then imported into Microsoft Dynamics 365 Business Central.
- Both: For entities of this type, data can be both exported from Microsoft Dynamics 365 Business Central to Xpand Portal as well as imported from Xpand Portal to Microsoft Dynamics 365 Business Central. You set up portal entities with this type if you want to allow portal members to both view existing data for this entity, retrieved from Microsoft Dynamics 365 Business Central, and provide the ability to edit it or create new records, which then can be imported into Microsoft Dynamics 365 Business Central to keep data synchronized between two systems.
- No. of Hours between Runs - Specifies the minimum number of hours that are to elapse between synchronization runs of this portal entity. The value cannot be less than one hour.
The following fields are filled in automatically:
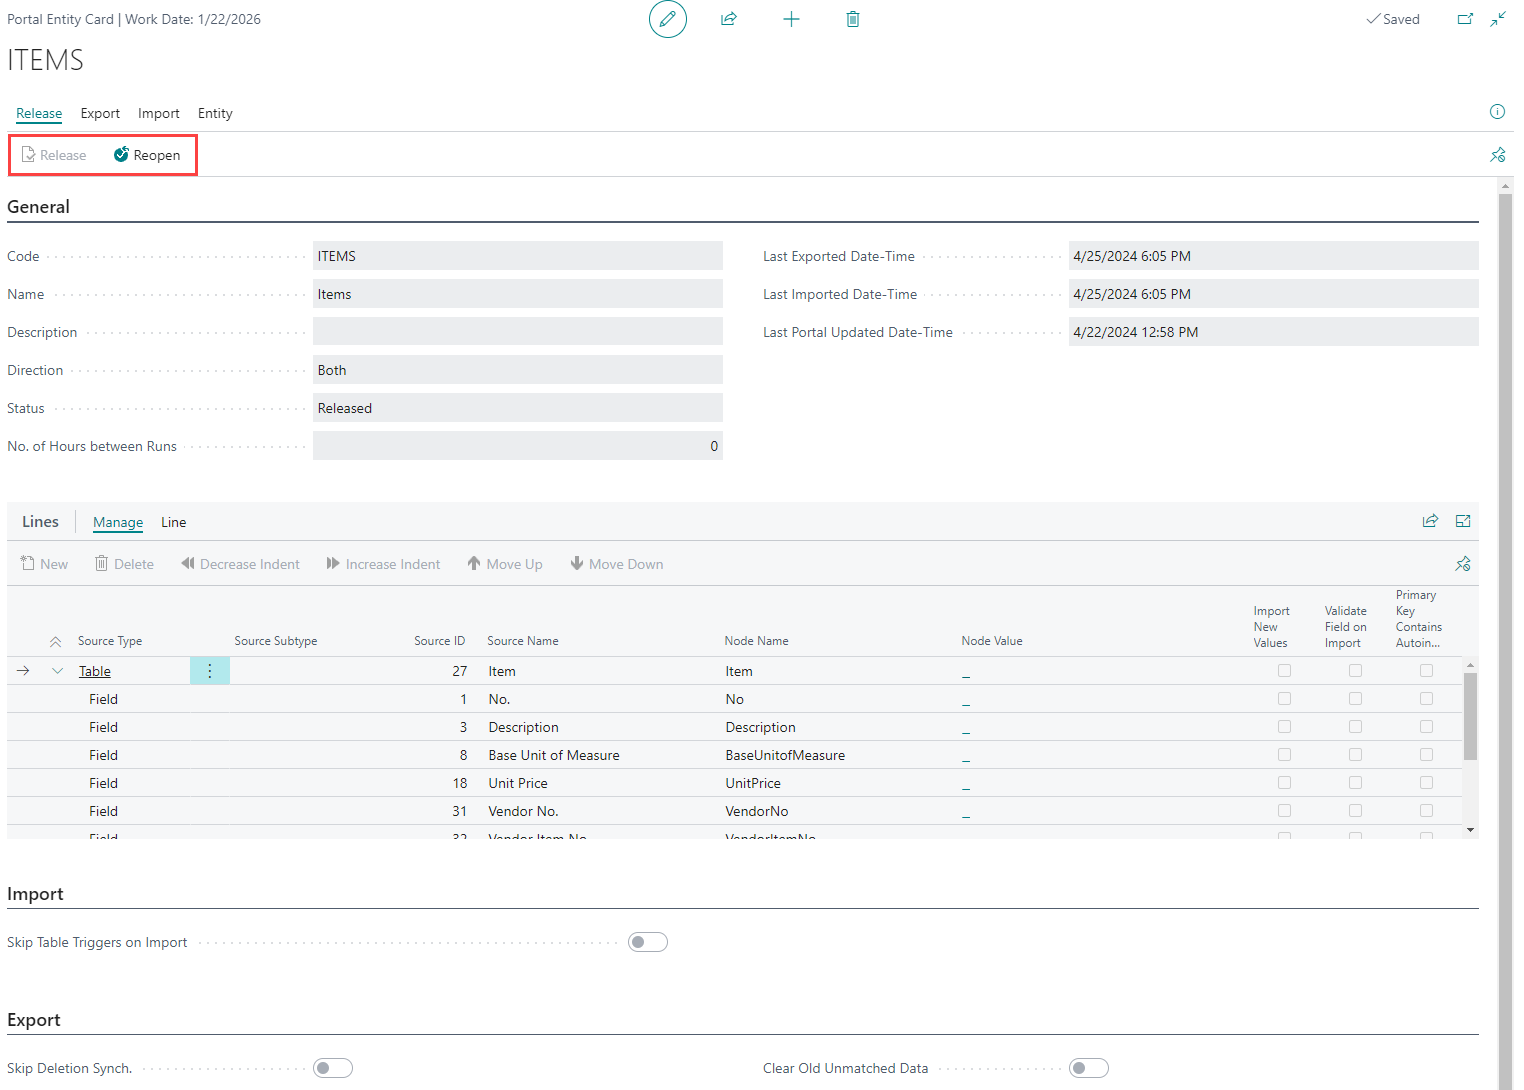
- Status: Specifies the status of the entity that regulates whether this entity will take part in data synchronization when you export or import data. A portal entity may have the following statuses:
- Open: With this status, the entity does not take part in data transfer/synchronization. This status is set when you create a portal entity or reopen an already released entity using the Reopen action.
- Released: With this status, the entity does take part in data transfer/synchronization. This status is set when you release a portal entity using the Release action.
- Last Exported Date-Time: Specifies the date and time when this entity or its data was last exported from Microsoft Dynamics 365 Business Central to Xpand Portal.
- Last Imported Date-Time: Specifies the date and time when data for this entity was last imported from Xpand Portal into Microsoft Dynamics 365 Business Central.
- Last Portal Updated Date-Time: Specifies the date and time when data for this entity was last changed on the Xpand Portal side.
- On the Lines FastTab, create lines that represent Microsoft Dynamics 365 Business Central tables and fields from those tables that will be used as a data source for this portal entity. A portal entity can be based on more than one Business Central table to create portal pages with more complex records.
- Create a line for a table and fill in the fields as described below:
- Source Type: Specifies the type of data source. For a table line, choose Table.
- Table - This type is used for table line where you specify a table from Business Central that will be used a data source table for this portal entity.
- Field - This type is used for field line where you specify a field from the parent table that will be used a data source for a field within this portal entity.
- Constant - This type is used to send a constant value. The portal entity will have a separate field, the name of which you specify in the Node Name field, with a constant value that you specify in the Node Value field. This may be useful, for example, when you send merged entities, to help portal members identify the source of data.
- Expression - This type is used to send data from Business Central to Xpand Portal on the basis of an expression that you configure by choosing Expression on the Manage tab for a line with the Expression source type.
- Source Subtype: Specifies the subtype of data source. A subtype may be a file. You can use this subtype if you want to send files or links to files that have been added to the Business Central entity using the standard Links functionality (when you choose Links on a Business Central page and specify a link to a file or document). If you want to send linked files with the entity, you need to create at least two lines: one line with the Table source type and table 2000000068 (Record Link) as source table, and a child line with the Field source type and File source subtype, and field 3 (URL1). You can add more URL field lines if necessary. Additionally, for lines with the File source subtype, you can select the Sync. with Documents check box if you want to send physical files as opposed to link to files.
- Source ID: Specifies the ID of the data source. In case of a table line, it is the ID of a table.
- Source Name: Specifies the name of the data source. In case of a table line, it is the name of the selected table. This field is filled in automatically after the Source ID field is filled in.
- Node Name: Specifies the name of the node that will be used to identify this portal entity data source line within this portal entity. The node name must not have any special characters or spaces.
- Node Value: Specifies the value of the node if necessary.
- Import New Values: Specifies whether new values for this data source will be imported from Xpand Portal into Business Central updated portal entity import (data synchronization). If you select this check box for a line with type Table, the check box will be selected for its field lines, except the line for the primary key field.
- Validate Field on Import: Specifies whether the value of a field will be validated upon entity import (data synchronization). This means that if an update during data import from Xpand Portal triggers related updates in BC, the related updated will be synchronized back to the portal during next data export from BC to Xpand Portal on condition that the affected related fields are part of an entity that is synchronized. This check box can be selected only for a field line with the Import New Values check box selected. Skip this check box on the table line.
- Primary Key Contains Autoincrement - This check box must be selected for the Document Attachment and Record Link tables for synchronization of document attachments and links to work properly.
It allows automatic synchronization of added documents or linking with a job queue. - Convert Link to File - Specifies that a link to a file that can be sent from Microsoft Dynamics NAV to Xpand Portal with this portal entity will be converted into a file.
- Source Type: Specifies the type of data source. For a table line, choose Table.
- Create a line for a field from the specified table and fill in the fields as described below:
- Source Type: Specifies the type of data source. For a field line, select Field.
- Table - This type is used for table line where you specify a table from Business Central that will be used a data source table for this portal entity.
- Field - This type is used for field line where you specify a field from the parent table that will be used a data source for a field within this portal entity.
- Constant - This type is used to send a constant value. The portal entity will have a separate field, the name of which you specify in the Node Name field, with a constant value that you specify in the Node Value field. This may be useful, for example, when you send merged entities, to help portal members identify the source of data.
- Expression - This type is used to send data from Business Central to Xpand Portal on the basis of an expression that you configure by selecting Expression on the Manage tab for a line with the Expression source type.
- Source Subtype: Specifies the subtype of data source. A subtype may be a file. You can use this subtype if you want to send files or links to files that have been added to the Business Central entity using the standard Links functionality (when you select Links on a Business Central page and specify a link to a file or document). If you want to send linked files with the entity, you need to create at least two lines: one line with the Table source type and table 2000000068 (Record Link) as a source table, and a child line with the Field source type and File source subtype, and field 3 (URL1). You can add more URL field lines if necessary. Additionally, for lines with the File source subtype, you can select the Convert Link to File check box if you want to send physical files as opposed to link to files.
- Source ID: Specifies the ID of the data source. In the case of a field line, it is the ID of a field.
- Source Name: Specifies the name of the data source. In case of a field line, it is the name of the selected field. This field is filled in automatically after the Source ID field is filled in.
- Node Name: Specifies the name of the node that will be used to identify this portal entity data source line within this portal entity. The node name must not have any special characters or spaces. When you create a portal entity that will be merged with another portal entity on entity export/import, ensure that the node names for field lines coincide for the same fields.
- Node Value: Specifies the value of the node if necessary.
- Import New Values: Specifies whether new values for this data source will be imported from Xpand Portal into Business Central updated portal entity import (data synchronization). This check box can be selected for any field except the primary key field.
- Validate Field on Import: Specifies whether the value of a field will be validated upon entity import (data synchronization). This means that if an update during data import from Xpand Portal triggers related updates in BC, the related updated will be synchronized back to the portal during the next data export from BC to Xpand Portal on condition that the affected related fields are part of an entity that is synchronized. This check box can be selected only for a field line with the Import New Values check box selected.
- Primary Key Contains Autoincrement: Specifies if the table specified on the line contains autoincrement. This check box must be selected for the Document Attachment and Record Link tables for synchronization of document attachments and links to work properly.
It allows automatic synchronization of added documents or linking with a job queue. - Convert Link to File - Specifies that a link to a file that can be sent from Microsoft Dynamics NAV to Xpand Portal with this portal entity will be converted into a file.
- Source Type: Specifies the type of data source. For a field line, select Field.
- Repeat step b) to add more fields that will be available as data source for this entity. You can also add field lines with a constant value or expression.
- Select the line with the Table source type, and then, choose Line > Related Information > Table Relations to set up relations to other table(s) if necessary. This step is optional for the base/parent table (in this case, it may be useful, for example, if you want to set a condition for filtering data) and mandatory for any embedded tables – in this case, each embedded table must at least have a table relation to the parent table and be indented to the right (use the Increase Indent action on the Manage tab to indent the line to the right).
- Field No.: Specifies the number of a field from the table (for which you are setting up table relation) that you want to link to another table or by which you want to create a condition for filtering data that will be taken from this table.
- Field Name: Specifies the name of a field from the table that you want to link to another table or by which you want to create filtering condition. This field is filled in automatically when the Field No. field is filled in.
- Filter Type: Specifies the type of filter by which records that are synchronized will be filtered.
- Parent Table Relation: Records are filtered by the related parent table.
- Setup Table Relation: Records are filtered by the chosen setup table.
- Constant Filter: Records are filtered by a constant value.
- Related-to Table ID: Specifies the ID of a table to which you want to link current portal entity table line in this portal entity. This table is filled in automatically with the ID of parent portal entity table (in relation to the table line, for which you are setting up table relation). This field cannot be filled in for the base/parent table in a portal entity.
- Related-to Table Name: Specifies the name of a table to which you want to link current portal entity table line in this portal entity. This field is filled in automatically with the name of parent portal entity table (in relation to the table line, for which you are setting up table relation).
- Related-to Field No.: Specifies the number of a field in the parent table, to which you want to link the current portal entity table line (specified in the Related-to Table ID field). The value of this field will be compared with the value in the Field No. field to identify the data to retrieve from the given table.
- Related-to Field Name: Specifies the name of a field specified in the Related-to Field No. field. This field is filled in automatically.
- Logical Operator: Specifies the logical operator which you can use to compare the data in the fields specified in the Table No. field and in the Related-to Table No. field. Alternatively, you can compare the value in the Table No. field with a constant value to specify a condition for taking data. In the case, you not need to specify a field from the parent table. Select one of the following operators:
- = - Select this operator when the condition for retrieving data is that the value in the Table No. field and in the Related-to Table No. field must be the same.
- <> - Select this operator when the condition for retrieving data is that the value in the Table No. field must not be the same as the value specified in the Constant Value field.
- < - Select this operator when the condition for retrieving data is that the value in the Table No. field must be less than the value specified in the Constant Value field.
- >- Select this operator when the condition for retrieving data is that the value in the Table No. field must be bigger than the value specified in the Constant Value field.
- Constant Value: Specifies a constant value with which you can compare the value in the Table No. field to identify the data to retrieve from the table for which you are setting up a relation.
- Optionally, repeat steps a) through d) to add another table and its field(s) as data source. Additional embedded tables are indented to the right in relation to the parent table (use the Increase Indent action on the Manage tab to indent the line to the right). This may be useful, for example when your entity consists of a header (one table) and lines (another table), or, for example, if you want additional information to be available in this portal entity as data source, which is not directly available in the base/parent table. The linking of related tables is performed with the help of table relations as well as in CMS when creating pages.
 Important
In addition to permissions that can be set up in CMS to manage access to portal data and functions, Xpand Portal also provides the ability to manage access to portal records, the data source of which is Business Central tables, by contact number: on a page with such a portal entity, portal members will have access only to records that have a related contact number that coincides with one of the related contact IDs specified for that portal member or only to records that have contact-related information through which a link to the related contact number can be identified. This contact number can be either directly or indirectly available in the source Business Central table. Therefore, when configuring the source table(s) with fields as data source for a portal entity, analyze the availability of contact information in the source table or related tables if you want to be able to limit access to data from this portal entity by contact number. Ensure that you specify the Contact No. field (or other field where the contact number is specified) if it is directly available in the table or add related tables through which the contact number can be accessed and set up table related. For more information, see Using direct and indirect contact information as a data filter.
- Create a line for a table and fill in the fields as described below:
- On the Import FastTab, configure the following options for this portal entity:
-
Skip Insertion Trigger - Specifies that the actions from the onInsert trigger are skipped, which means that if the insertion changes that are imported from Xpand Portal are events that trigger further actions in the system, these additional actions will not be performed during import. For example, insertion of a header should also automatically suggest a document number, this document number will not be suggested if this setting is enabled.
-
Skip Deletion Trigger - Specifies that the actions from the onDelete trigger are skipped, which means that if the deletion changes that are imported from Xpand Portal are events that trigger further actions in the system, these additional actions will not be performed during import. For example, deletion of a header should also trigger deletion of the related lines, these related lines will not be deleted if this setting is enabled.
-
Skip Modification Trigger - Specifies that the actions from the onModify trigger are skipped, which means that if the modification changes that are imported from Xpand Portal are events that trigger further actions in the system, these additional actions will not be performed during import. For example, modification of a header should also trigger recalculation of data on the related lines, data on these related lines will not recalculated if this setting is enabled.
-
- On the Export FastTab, configure the following options for this portal entity:
-
Skip Deletion Synch. - Specifies that the operation of record deletion is not synchronized with the portal on export.
-
Skip Insertion Synch. - Specifies that the operation of record insertion is not synchronized with the portal on export.
-
Skip Modification Synch. - Specifies that the operation of record modification is not synchronized with the portal on export.
-
Clear Old Unmatched Data - Specifies that previously synchronized records on the portal that no longer match the current filters in table relations will be deleted during synchronization. This may happen if you update filters in table relations or make changes in the corresponding BC records in the fields that are used in table relations.
-
Max. No. of Records per XML - Specifies the maximum number of records that can be exported in a single XML file. If the number of exported records exceeds this number, another XML file is created. By default, 1000 is used. You may need to lower this number in case you encounter errors related to data import on the portal side.
 Note
NoteThe Max. No. of Records per XML setting is also available on the portal integration setup. The setting on the entity card has higher priority allowing you to set up this separately for each entity.
-
- If it's a portal entity with the Import or Both type, you may want to set up default values that will be filled in automatically in some fields. For example, you can set up to fill in the No. field using the number series setup. To configure default value for import:
- In the Portal Entity Card window, choose Entity > Default Values.
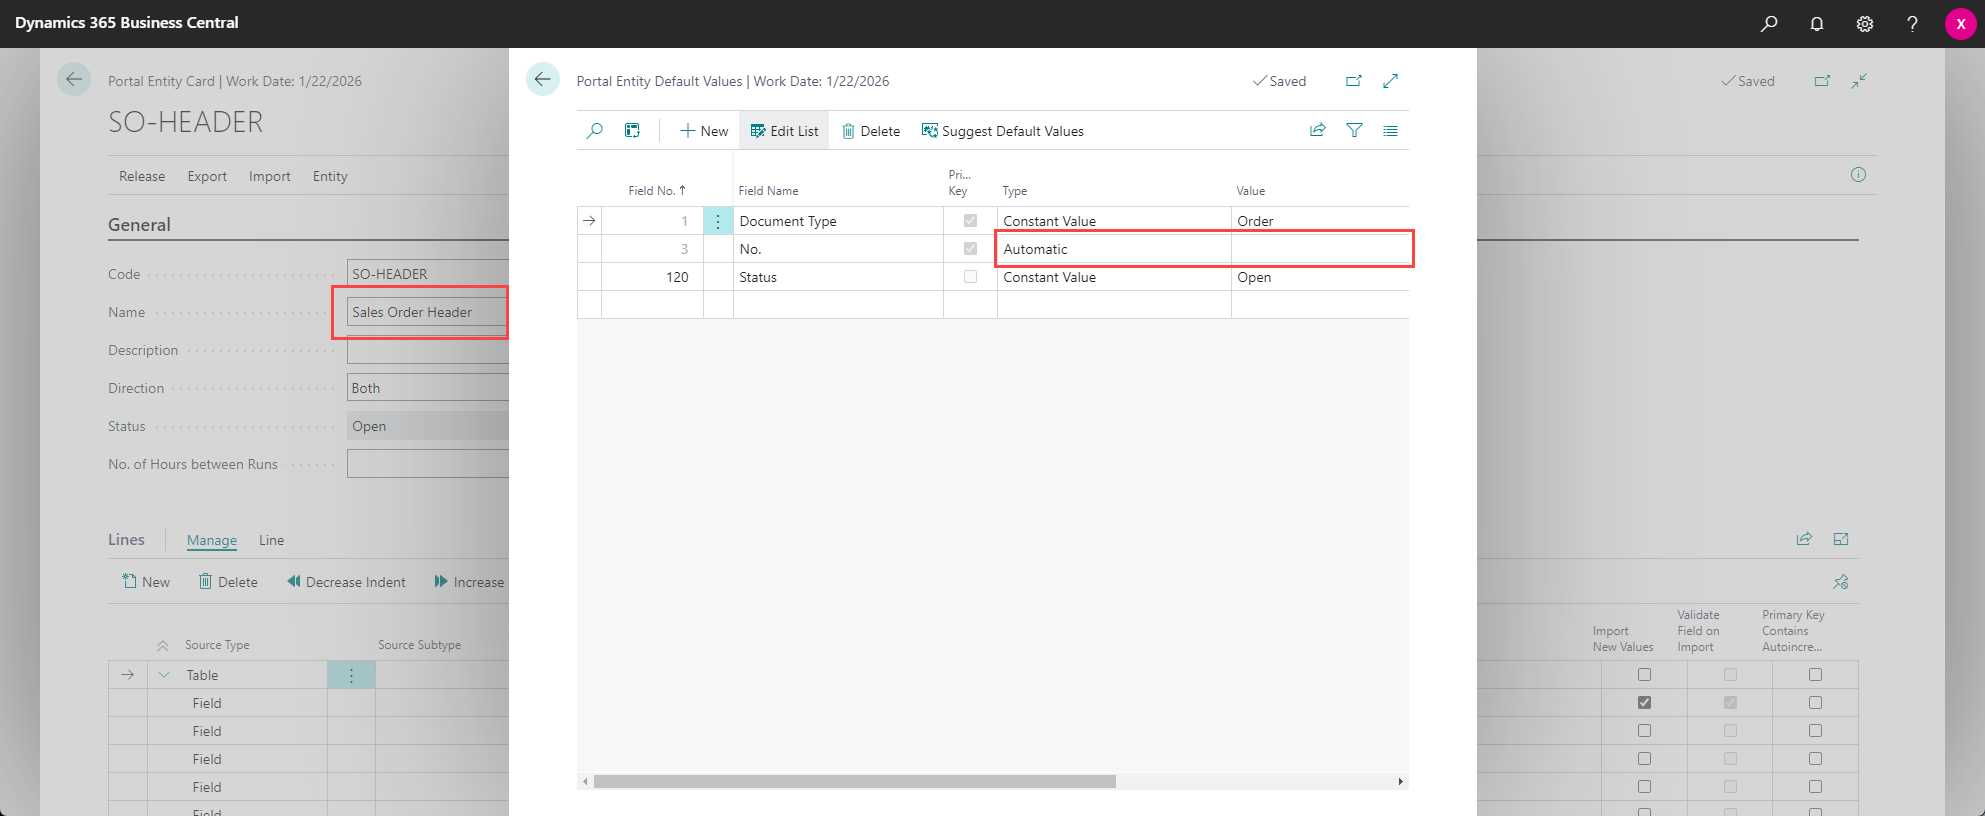
- In the Portal Entity Default Values window, in the Field No. field, select the number of the field from the table of this entity, for which you want to configure default values on import.
- In the Type field, specify how this value will be filled in:
- Constant Value: With this type, the default value will be the constant value that you type in the Value field on this setup line.
- Number Series: With this type, the default value will be filled in with next number in the number series according to the number series setup that you select in the in the Value field on this setup line.
- Increment: With this type, the default value will be filled in with the next value in a series, increased by the amount that you specify in the Value field on this setup line. This type can be used only for primary key and for fields with the Integer value type.
- Field: With this type, the default value will be taken from another field within this entity that you specify in the Value field on this setup line.
- Automatic: With this type, Business Central will verify whether the field can be left empty, and if not, the default value will be filled in automatically from the corresponding setup (this can be any related setup, number series, etc.) depending on the analysis performed by Business Central. In this case, you don't need to specify any default value in the Value field.
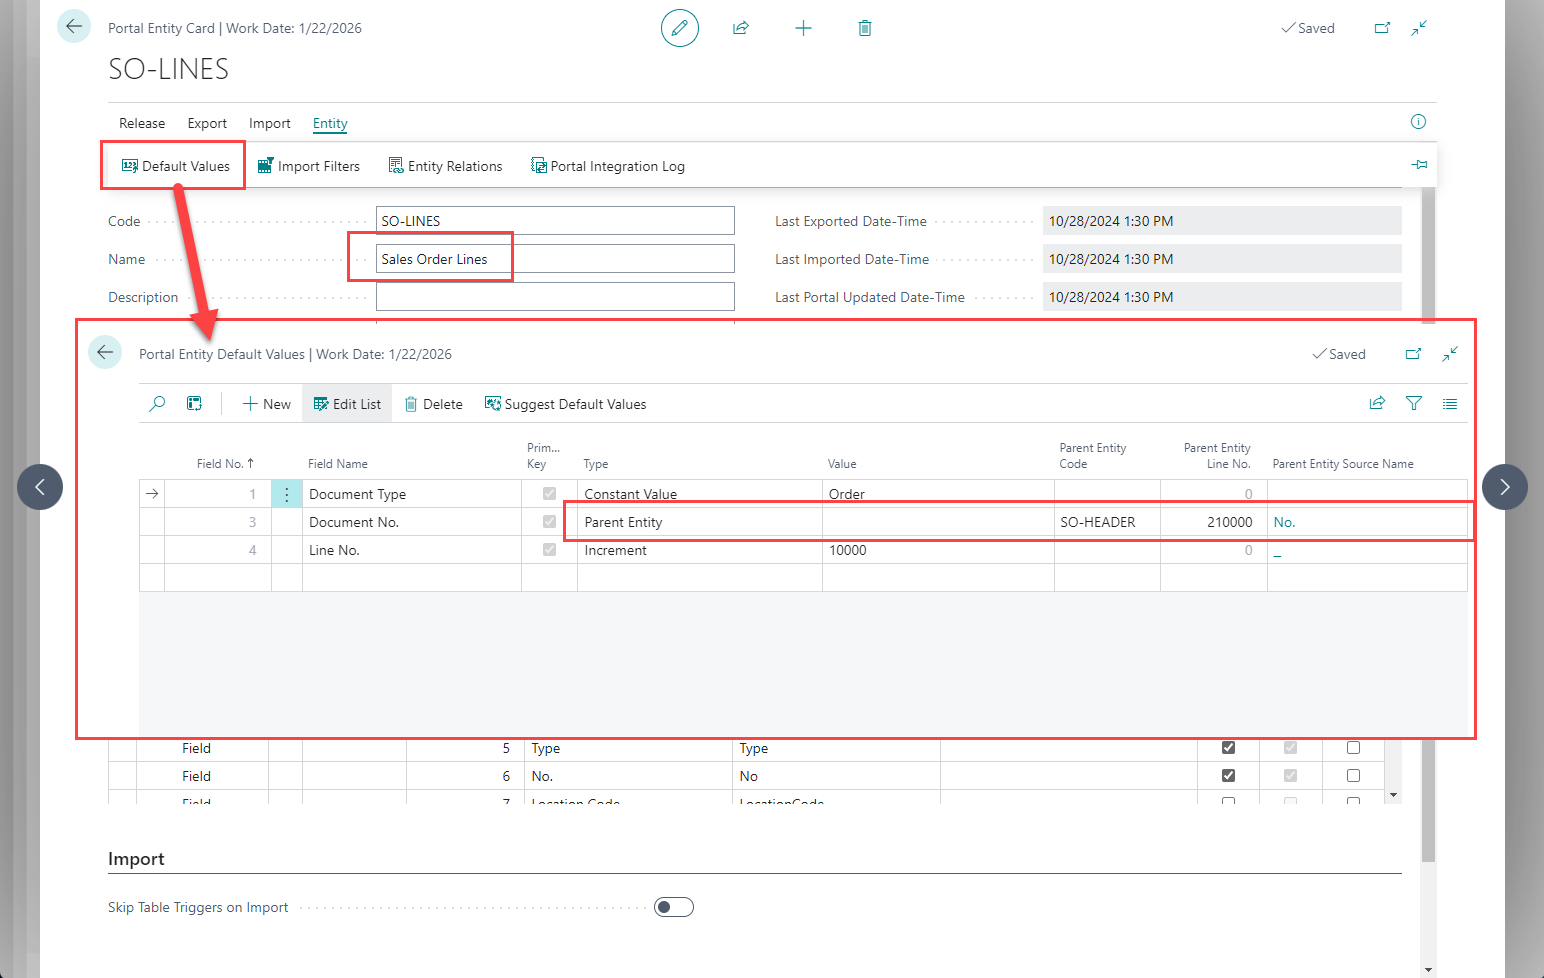
- Parent Entity: With this type, the default value will be filled in from a field on a parent entity. In this case, you need to specify the parent entity code and a field on that parent entity from which the value will be taken.
- In the Value field, specify the default value depending on the chosen type.
- If the Type field was set to Parent Entity, specify the parent entity and a field to take the default value from (otherwise, skip this step):
- Parent Entity Code: Specifies the code of a parent entity that contains a field from which the default value will be taken on import.
- Parent Entity Line No.: Specifies the number of a line on the chosen parent entity that corresponds to the field from which the default value will be taken on import.
- Parent Entity Source Name: Specifies the name of the chosen field from which the default value will be taken on import. This name is filled in automatically when the parent entity and line number are specified.
- Repeat steps b) through e) to set up default import values for other fields if necessary.
Note
Optionally, you can select Suggest Default Values in the Portal Entity Default Values window to have Business Central suggest predefined default values for primary key fields if any. This will replace the currently set up default values.
- In the Portal Entity Card window, choose Entity > Default Values.
- Optionally, select Entity > Import Filters to set up filters that will be applied during data import if you want to limit the data that can be imported with this portal entity.
- Optionally, select Entity > Entity Relations to set up relations between entities to synchronize related data such as FlowFields.
- Choose the Release action if you want this entity to be available for export and/or import. if you need to make changes to an already released portal entity, choose Reopen to reopen it and make it editable.
After a portal entity is created and released, it is ready to be exported to Xpand Portal. The portal entity structure and its data are exported and imported automatically if you set up job queue entries for exporting and importing portal entities. In case, you want to immediately export or import an entity, you can do it manually. When exporting manually, you can choose to export only the entity structure without data. If it is import into BC, only data for an existing portal entity can be imported.