Account Registration page
The Account Registration page is a portal page where portal members can register themselves on the portal using the Sign up link on the login page.
|
This page is normally shipped as a data package along with the solution, so it is probably already available on your portal. |
To create an Account Registration page for your portal
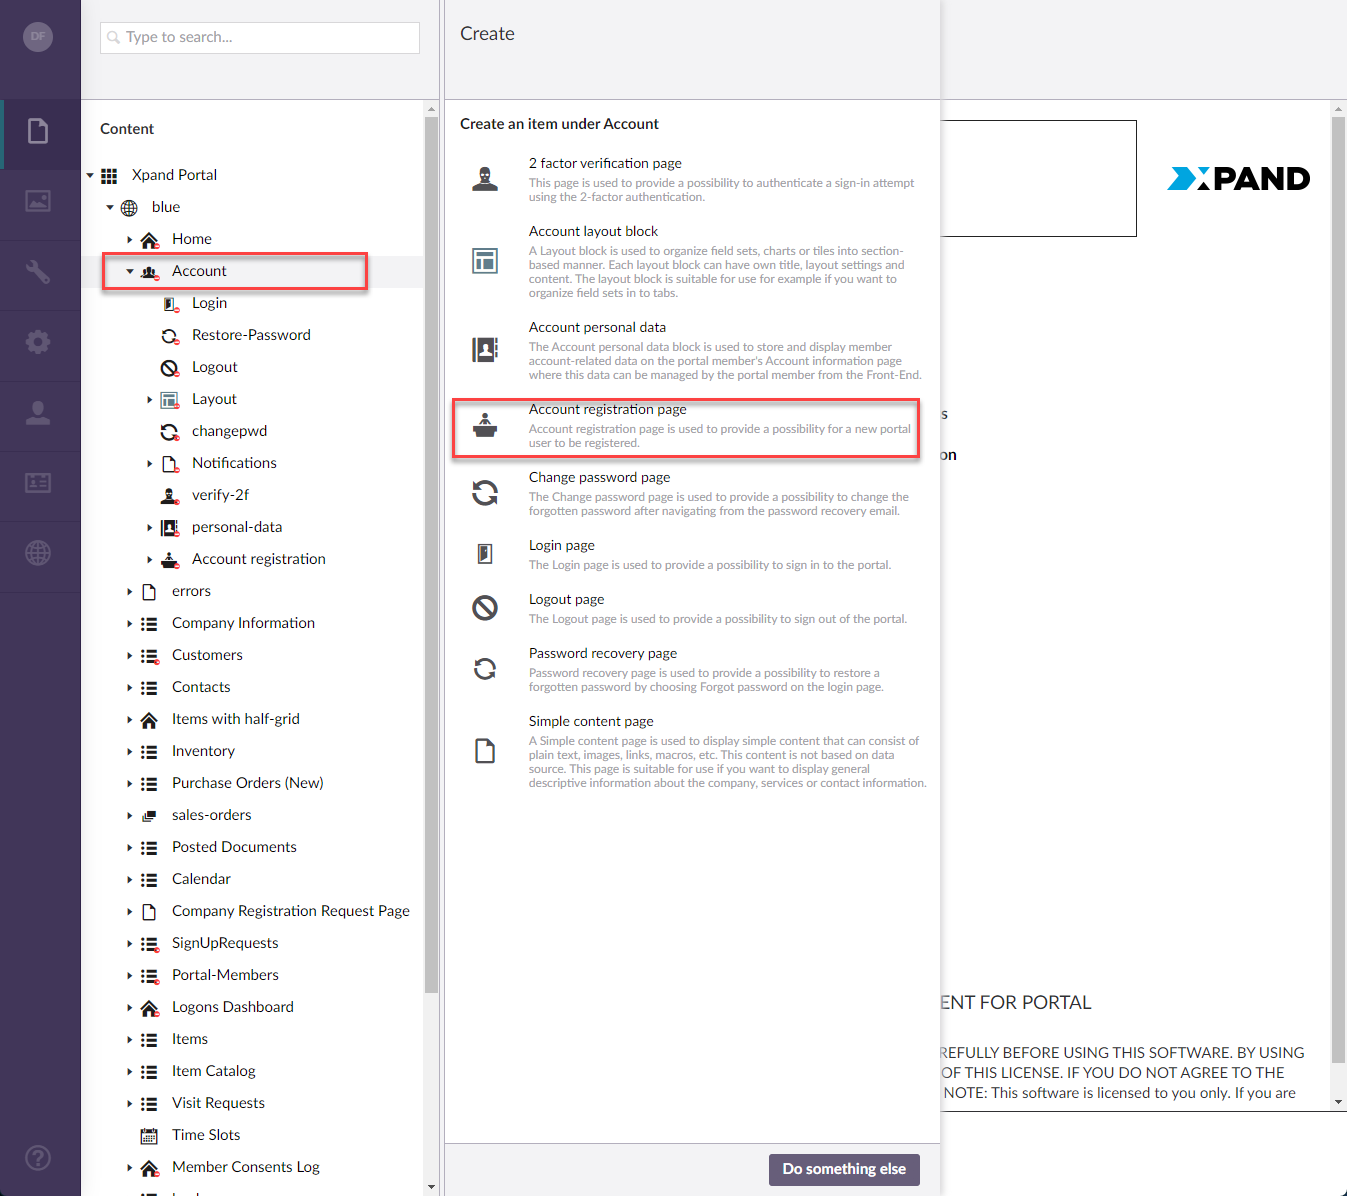
- In the backoffice, go to Content.
- Select the
 icon next to the node with the
  icon (or select and hold (or right-click) the node, and then select Create).
 Note
NoteThe
icon identifies the My Account page. The name of the page, which is also displayed as the node name, is customizable and can be different in your case. - In the Create pane, select
 Account Registration page.
- On the header, type the name of the page, which will also be displayed as the node name in the site localization tree.
- On the General tab, configure the settings as described below.
Basic
- Titles - Specifies the settings where you can configure the title of various elements on this page.
- Title - Specifies the title of this page.
- Subtitle - Specifies the subtitle that will be displayed in the header of this page. You can, for example, type a motto here or any other text that you want to be displayed on the login page.
- Browser tab title - Specifies the title of the web browser tab that will be displayed when the this page is opened and the member point to the browser tab.
- Hide breadcrumb - Use this switch to hide or make visible again the page breadcrumb trail on the page. A breadcrumb trail is used as a navigational aid to help portal members keep track and maintain awareness of their locations within the portal.
Menu
- Menu item title -Specifies the title of the menu item, which will be displayed in the navigation pane for this page.
- Menu item icon - Specifies the icon of the menu item for this page. Select the square and browse to the icon in the portal media library. Adding an icon is optional. You can leave this setting empty (in this case, the default icon, chosen by the development team, will be used) or choose an icon from one of the available icon libraries.
- Menu item color - Specifies the color of the menu item for this page.
- Divider after menu item - Specifies whether a split line will be displayed after this menu item. A divider can be added only on the first menu level.
- Hide menu item for - Specifies whether the menu item for this page will be hidden, and for which member groups. Only members that were added to the members groups that you select here will have this menu item available in their navigation pane. If you leave this checkbox cleared, the menu item will be visible to all member groups.
Advanced
- Responsive behavior - Specifies the settings that define how this page part or UI element responds to different viewport widths by adjusting its width and visibility at each responsive breakpoint.
- Content-from page - Specifies the page the content of which will be displayed instead of the content of this page when this page is opened via a direct link. The URL in the address bar will remain that of the original page.
- Redirect-to page - Specifies the page that will be displayed instead of this page when this page is opened via a direct link. The URL in the address bar will be that of the target page.
- Module assignment & protection - Specifies the settings that allow you to assign the current content element to an internal module (may be useful, for example, when you want to exclude it from counting towards the customer license) as well as restrict certain operations with it.
- Titles - Specifies the settings where you can configure the title of various elements on this page.
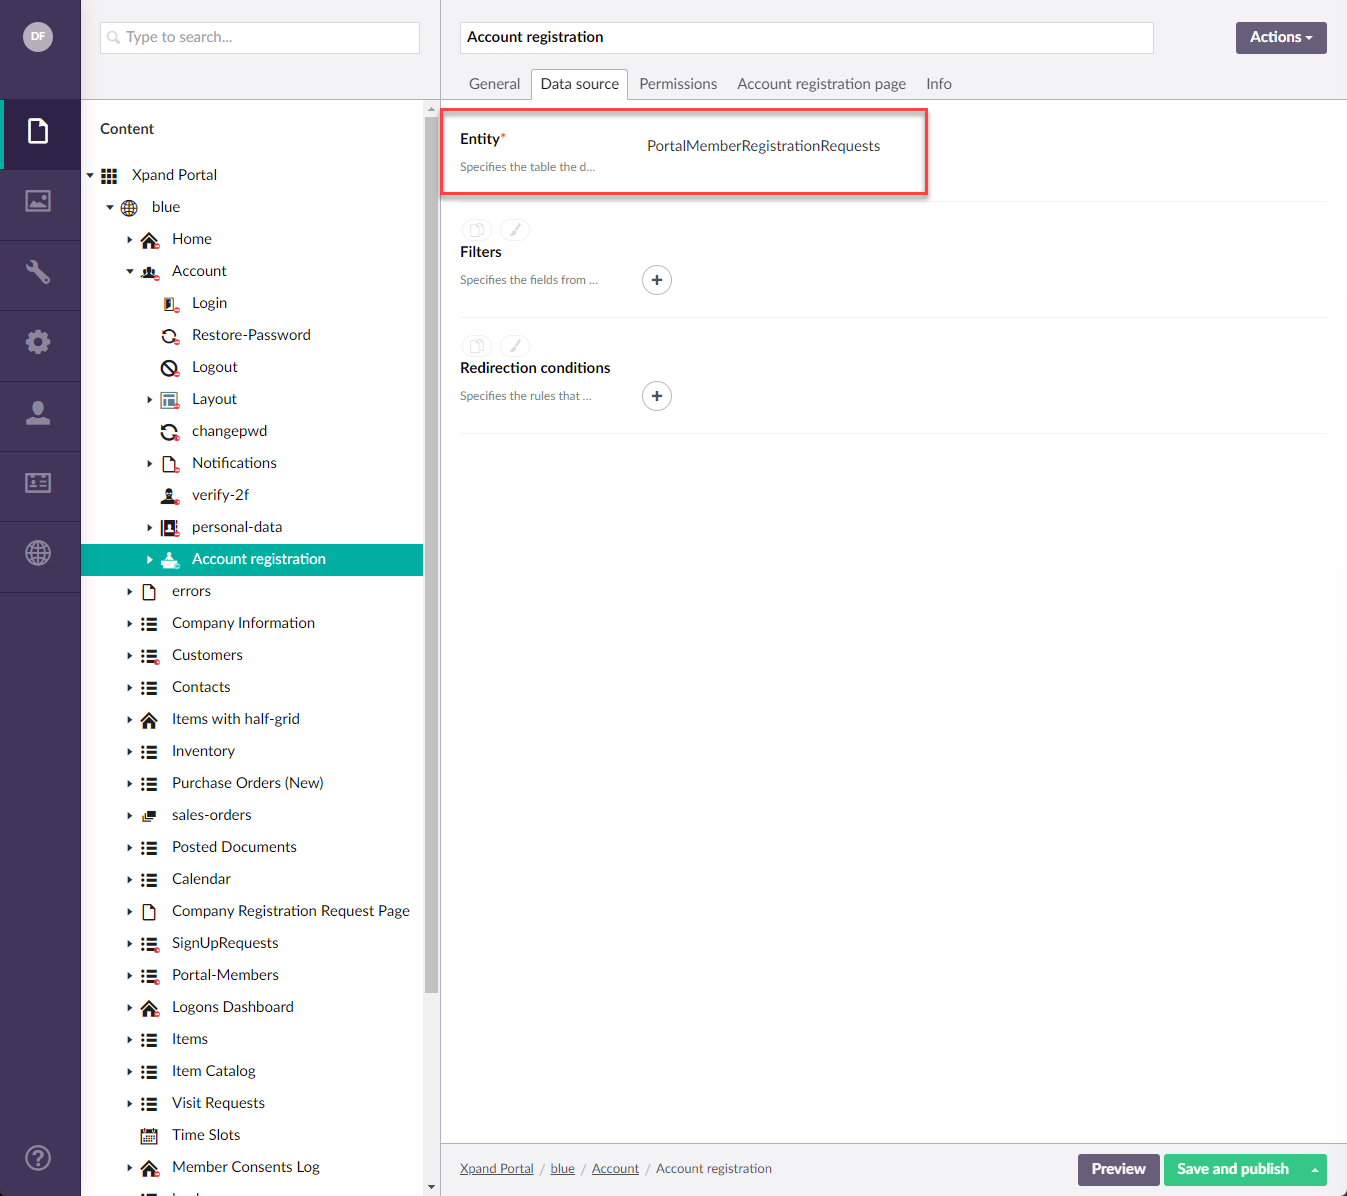
- On the Data source tab, in the Entity field, select the PortalMemberRegistrationRequests entity.
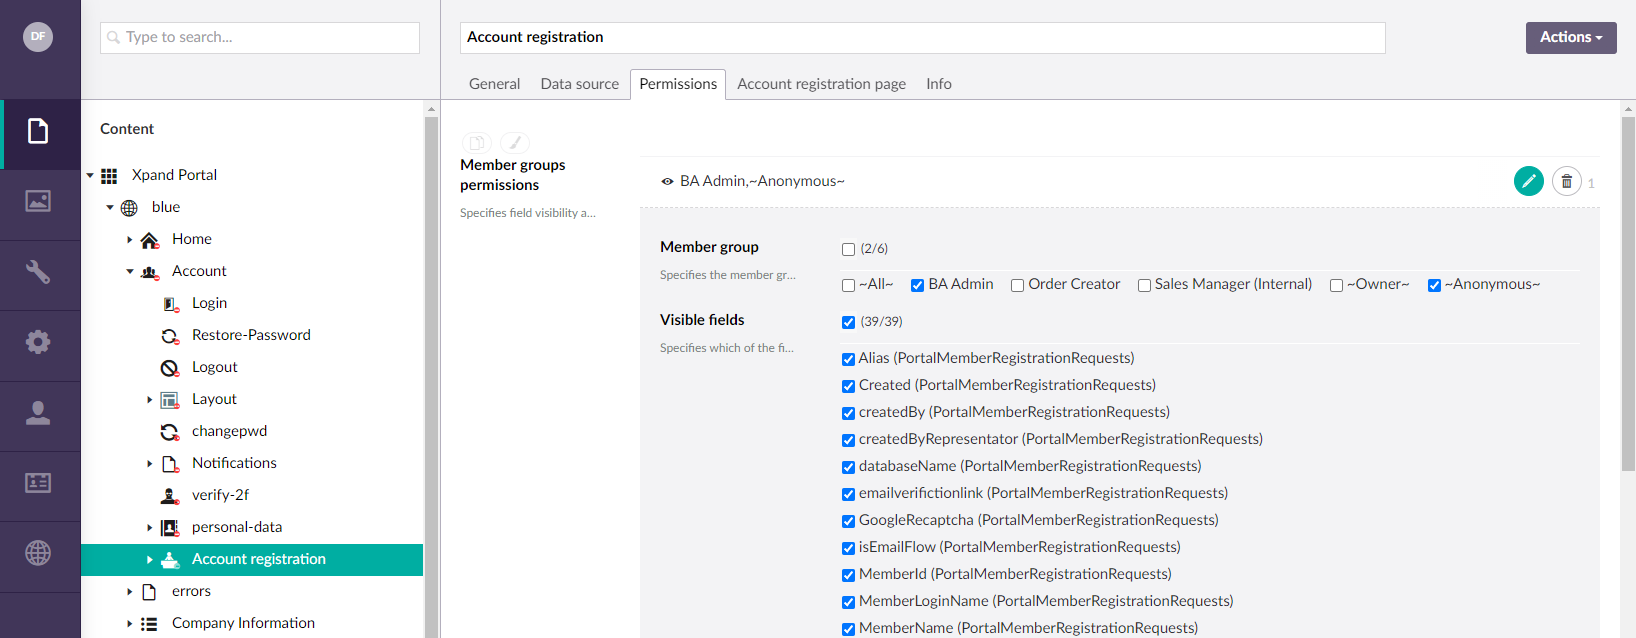
- On the Permissions tab, configure member group permissions for this page. These permissions define visibility of fields, action (same as actions on a detail page) and JavaScript events that will be available on the page for members depending on the member group(s) they belong to. You can create several permissions sets for these page settings tailored to specific member groups according to your business needs. A portal member will have access to a page feature only if this member is assigned to a member group for which this feature is enabled and allowed.
Note
For the Account Registration page, we recommend granting access to this page for the Anonymous role (so that new portal visitors could send a member registration request) as well as admin roles.
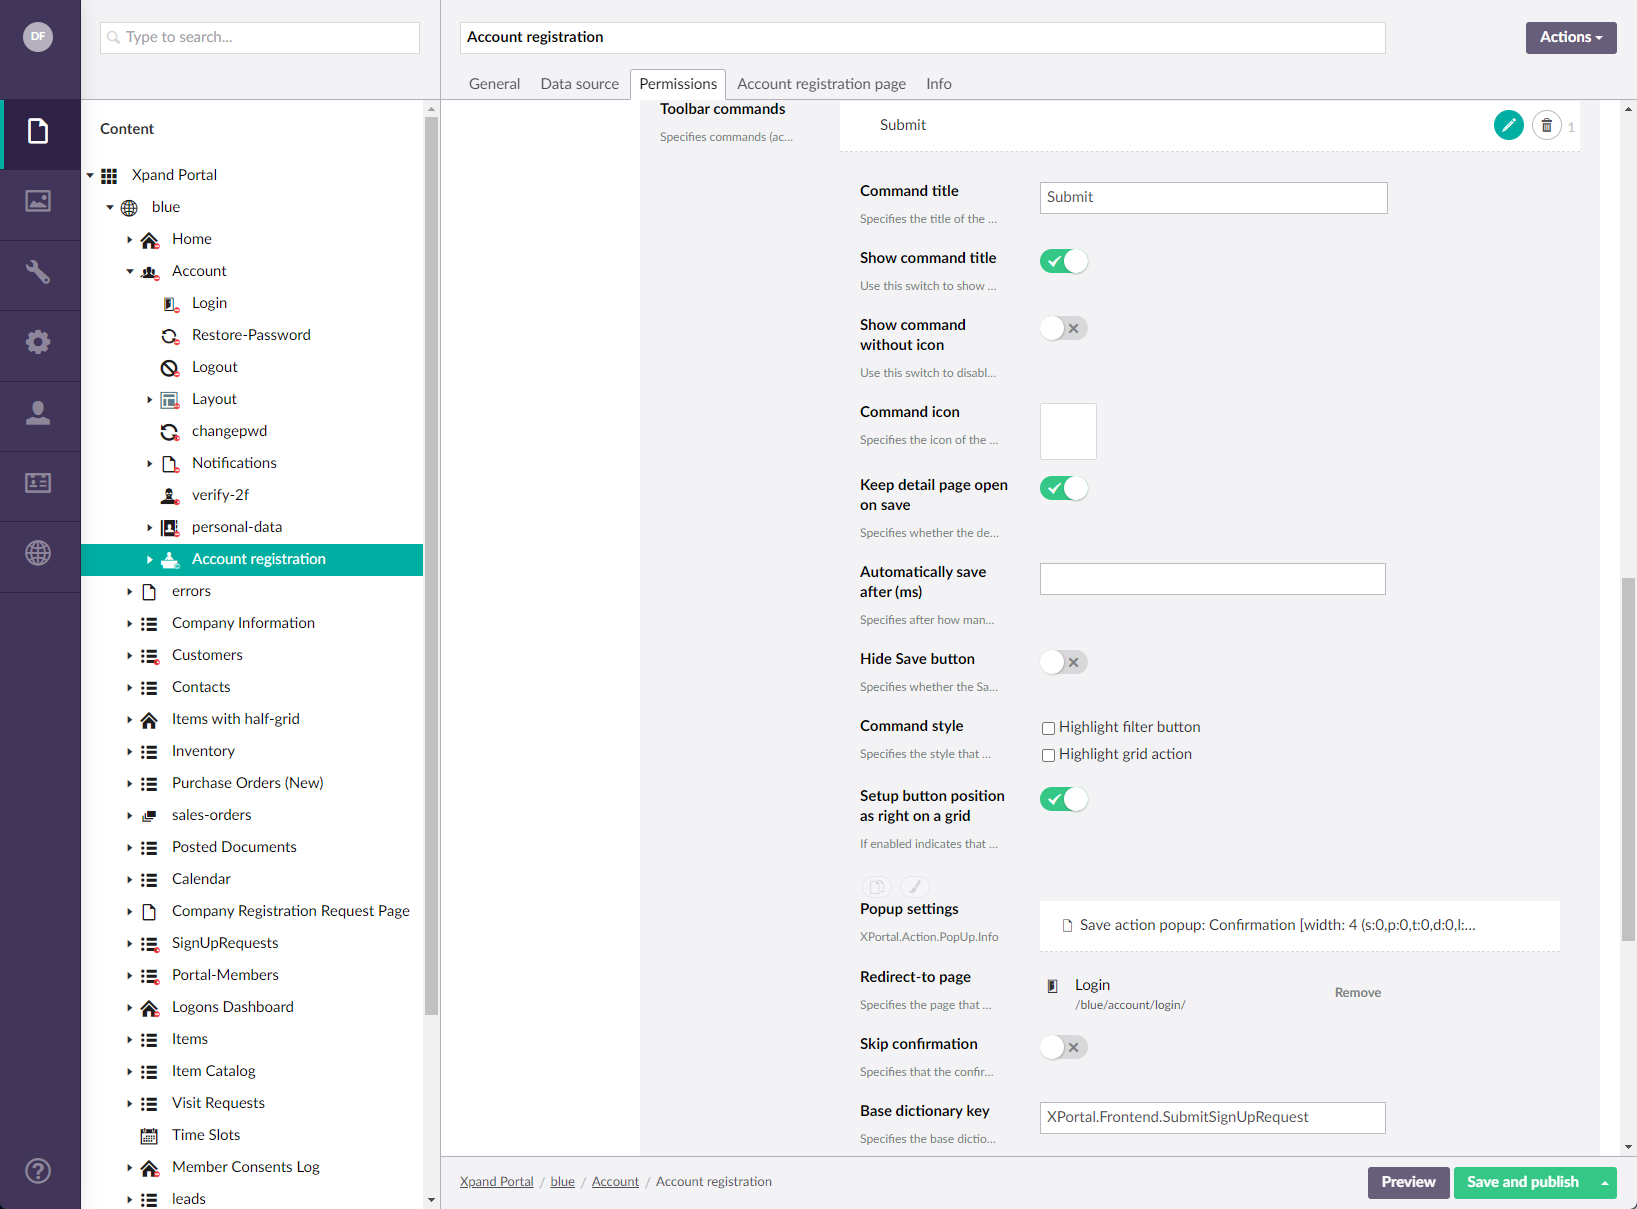
- Within a permission set, under Toolbar commands, configure at least the Sign up action that visitors will use to submit their member registration requests. For this purpose, you can use the Save action with the following settings (action settings not mentioned below can be configured according to your preferences):
- Command title = Sign up
- Show command title = Yes
- Message settings - Specifies the settings that allow you to configure messages that will be displayed when data is saved successfully or when data saving fails due to some reason. We recommend configuring a message for a successful save:
"Your Registration Request was submitted. Please check [[MemberUserEmail]] inbox and verify the email link.[[-all-]]
"
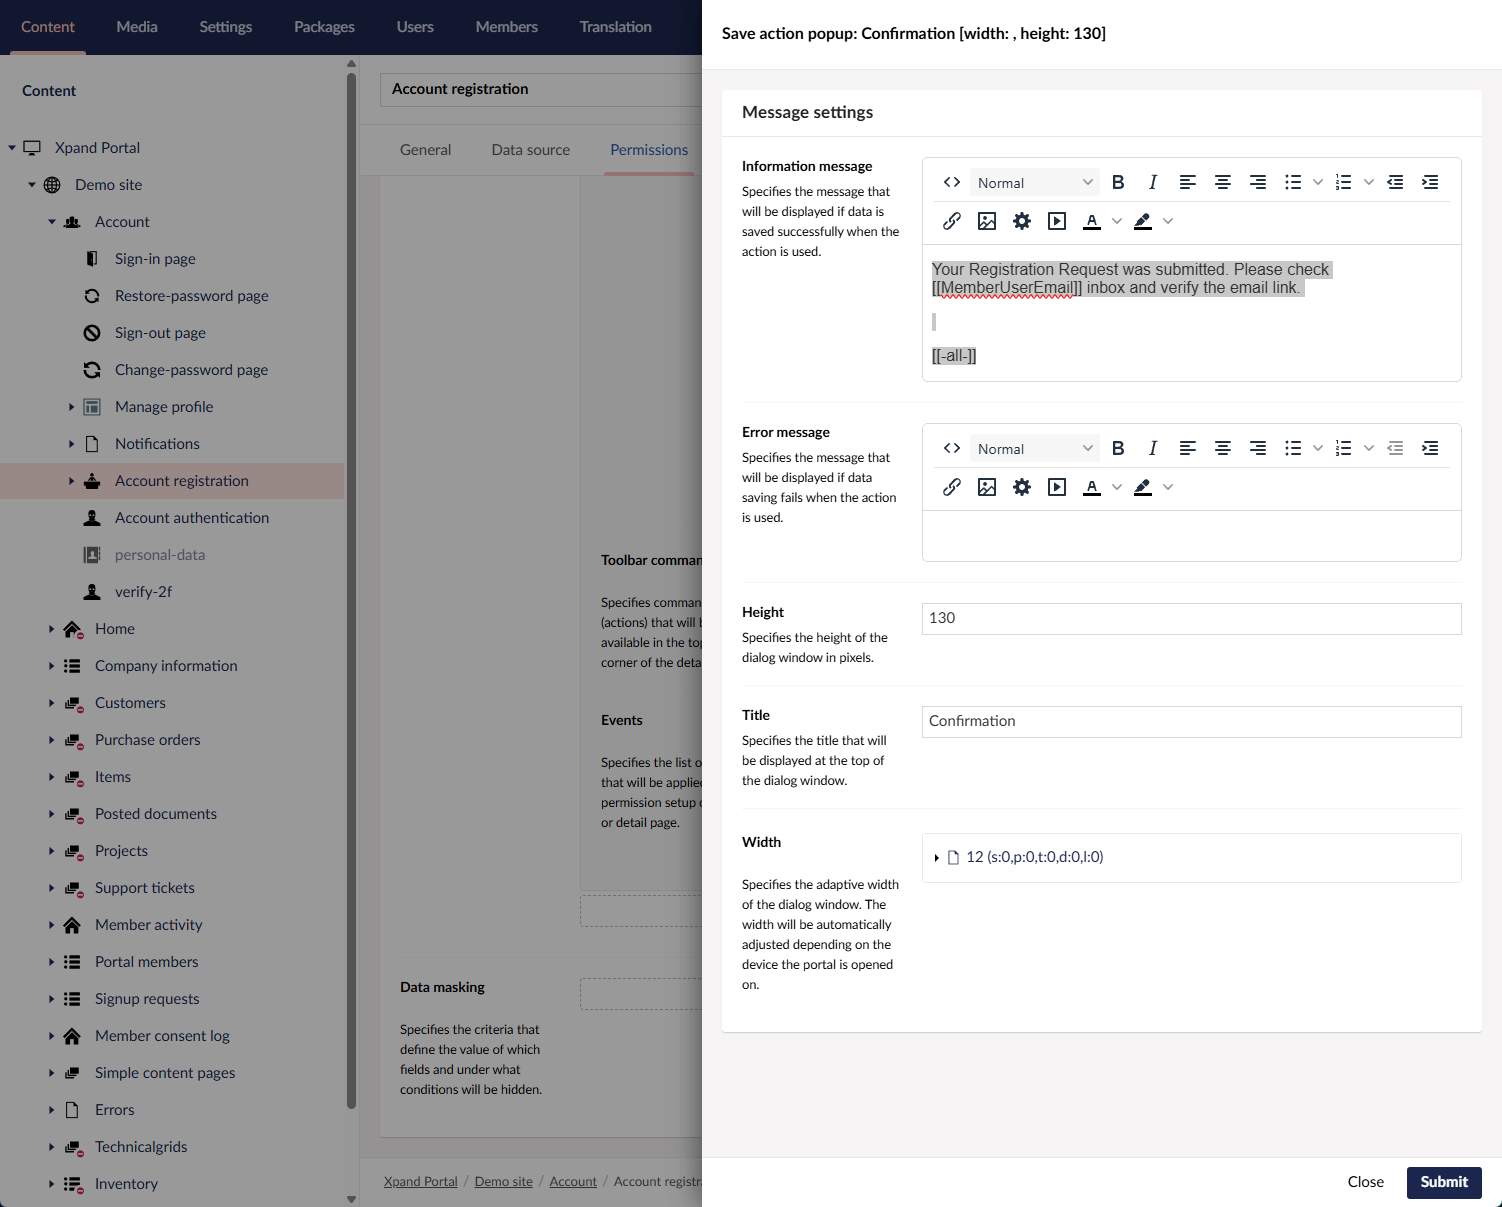
- Redirect-to page = (login page on your portal)
- Base dictionary key = XPortal.Frontend.SubmitSignUpRequest
- On the Account Registration page tab, configure the settings as described below:
- Enabled – Use this switch to enable or disable the ability of members to sign up (send a registration request to create a member account on the portal using the Sign up link on the login page).
- Member registration request confirmation page - Specifies a page that is used to show a message that informs the portal admin that a member's request to sign up has been confirmed. For such a page, you can create a child simple content page with the following message in the Description field on the Content tab, and then specify that page here: "Dear admin, a new member account has been confirmed."
- Guest email confirmation page - Specifies a page that is used to show a message that informs a portal guest that their email has been confirmed. For such a page, you can create a child simple content page with the following message in the Description field on the Content tab, and then specify that page here: "Dear new member, your email has been confirmed successfully."
- New member verification email address template - Specifies the email template that will be used as a basis for the email, which contains the email confirmation link, which will be sent to a portal member to notify that portal member account has been created and email address confirmation is required. Select an email template from one of the email templates created in the site settings on the Settings tab. You can leave this field empty and create the body of the email manually.
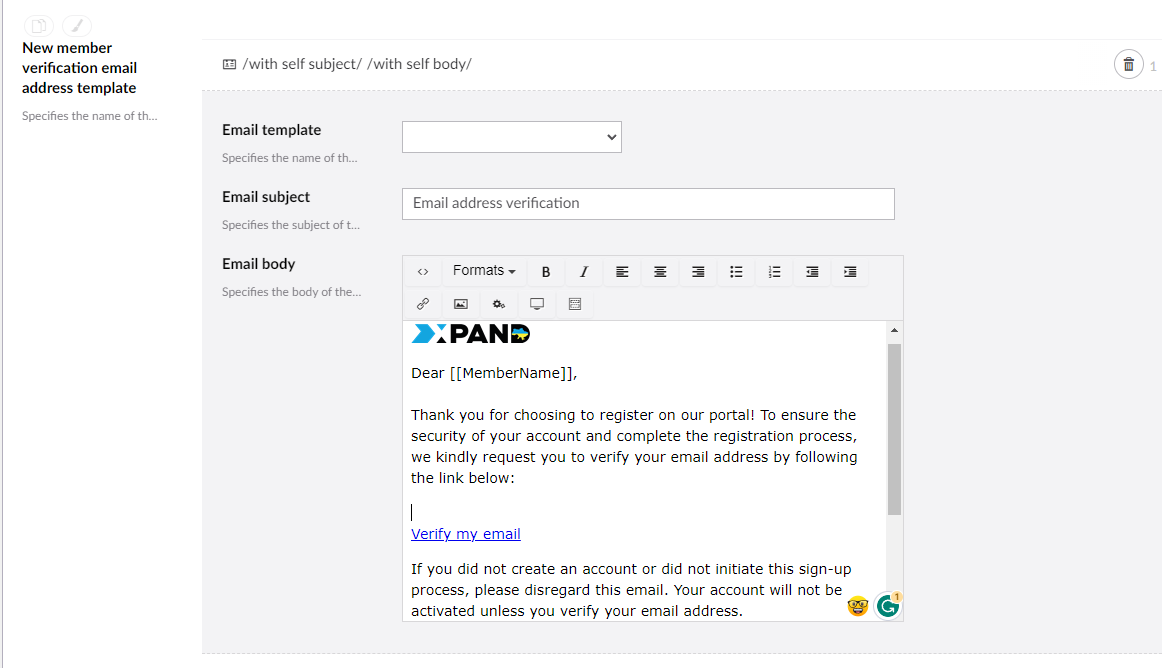
Example of the code of the email body:<p>Dear [[MemberName]],<br><br>Thank you for choosing to register on our portal! To ensure the security of your account and complete the registration process, we kindly request you to verify your email address by following the link below:<br><br><a href="##emailverifictionlink##">Verify my email</a><br><br></p> <div>If you did not create an account or did not initiate this sign-up process, please disregard this email. Your account will not be activated unless you verify your email address.</div> <div></div> <div>Please note that this is an automatic email, and we kindly ask you not to reply to it.</div> <div></div> <div>We look forward to seeing you on the portal!</div> <div></div> <div>Best regards!</div> - Member registration request approval email template - Specifies the email template that will be used as a basis for the email, which will be sent to the administrator when a new sign up request is created. The email should contain a link to approve the request. Select an email template from one of the email templates created in the site settings on the Settings tab. You can leave this field empty and create the body of the email manually.
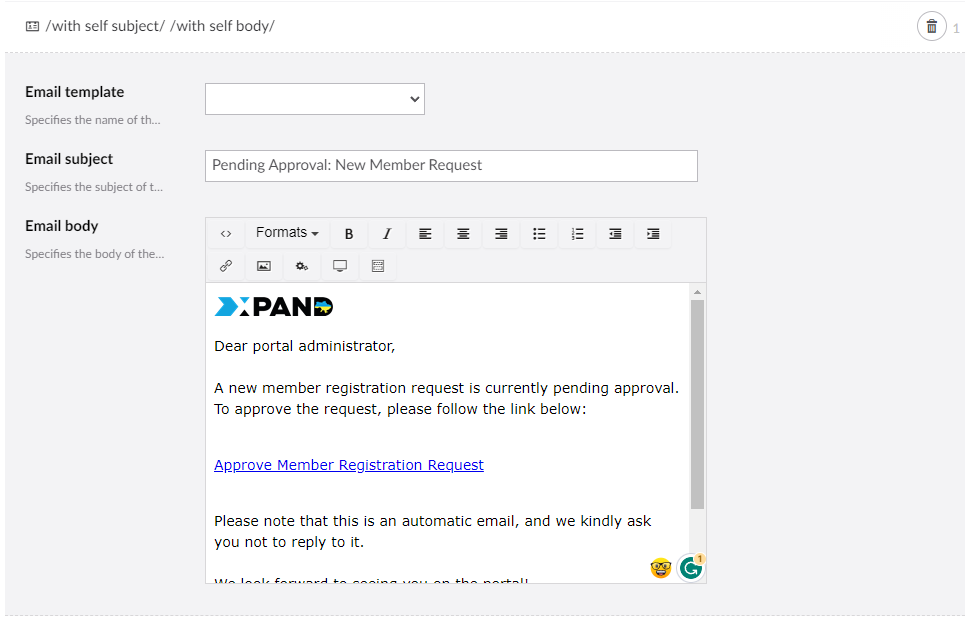
Example of code of the email body:<div>Dear portal administrator,</div> <div></div> <div>A new member registration request is currently pending approval. To approve the request, please follow the link below:</div> <div></div> <p><a href="##site.url##demo/signup-requests/registration-request-card/?id=[[UniqueId]]">Approve Member Registration Request</a><br> </p> <div>Please note that this is an automatic email, and we kindly ask you not to reply to it.</div> <div></div> <div>We look forward to seeing you on the portal!</div> <div></div> <div>Best regards,<br>Portal Team</div> - Member registration notification email - Specifies an email template that is used to inform a portal guest that their member registration request has been approved or rejected. Select an email template from one of the email templates created in the site settings on the Settings tab. You can leave this field empty and create the body of the email manually.
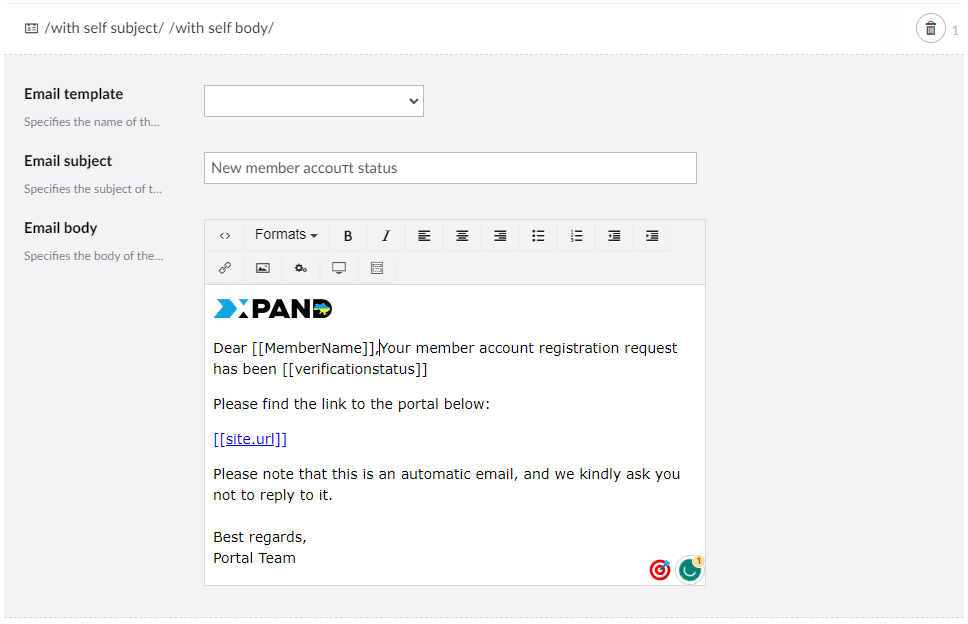
Example of code of the email body:<p>Dear [[MemberName]],</p> <p><br>Your member account registration request has been [[verificationstatus]].</p> <p> </p> <p>Please find the link to the portal below:</p> <p><a href="##site.url##"> [[site.url]]</a></p> <p> </p> <div>Please note that this is an automatic email, and we kindly ask you not to reply to it.</div> <div></div> <div>Best regards,</div> <div>Portal Team</div> - Invitation email template - Specifies the name of the email template that will be used as a basis for the email that will be sent to a portal member to notify him or her that their portal member account has been created. Select an email template from one of the email templates created in the site settings on the Settings tab. You can leave this field empty and create the body of the email manually.
- Email template – Specifies the email template that will be used for invitation emails. You can select a previously configured email, which is created in the site settings. Alternatively, you can create an email template here by filling the Email subject and Email body fields.
- Email subject – Specifies the subject of the email template that will be used to send invitation emails. Fill in this field only if you left the Email template field empty.
- Email body – Specifies the body of the email template that will be used to send invitation emails. Fill in this field only if you left the Email template field empty.
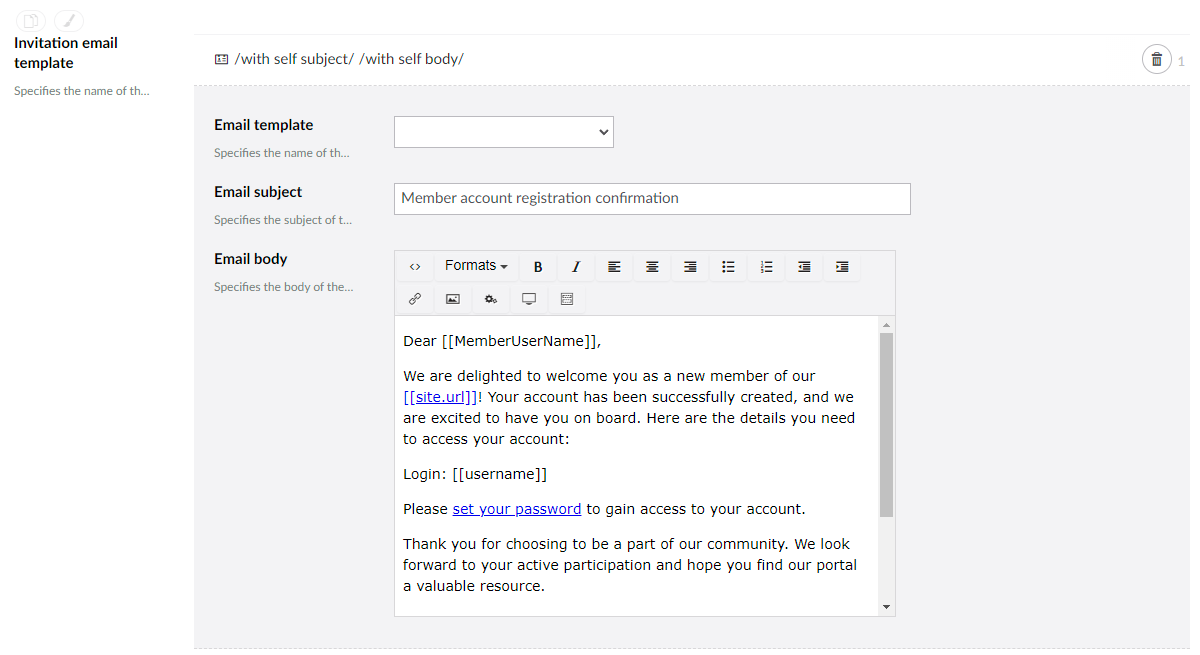
Example of code of the email body:<p>Dear [[membername]],</p> <p> </p> <p>We are delighted to welcome you as a new member of our <a href="##site.url##">[[site.url]]</a>! Your account has been successfully created, and we are excited to have you on board. Here are the details you need to access your account:</p> <p> </p> <p>Login: [[memberloginname]]</p> <p> </p> <p>Please <a href="#=url#" title="confirmation page">set your password</a> to gain access to your account.</p> <p> </p> <p>Thank you for choosing to be a part of our community. We look forward to your active participation and hope you find our portal a valuable resource.</p> <p> </p> <p>Best regards,</p> <p> </p> <p>The portal team</p>
- Member registration rejection message page - Specifies a page that is used to show a message that informs a portal guest that their member registration request has been rejected. For such a page, you can create a child simple content page with the following message in the Description field on the Content tab, and then specify that page here: "Dear admin, a new member account has been rejected."
- Sign-up approver emails - Specifies email(s) of the backoffice users who receive and approve sign-up requests from new members.
- Approval notification email template - Specifies an email template that is used to inform a portal guest that their sign-up request has been approved.
- Rejection notification email template - Specifies an email template that is used to inform a portal guest that their sign-up request has been rejected.
- Email verification link token validation message page - Specifies a page that is used to show a message that informs a portal guest that the token of an email verification link is already used, which means that their email has already been confirmed using that link. For such a page, you can create a child simple content page with the following message in the Description field on the Content tab, and then specify that page here: "Dear guest, your email has already been verified with this link."
- Email verification link token expiration message page - Specifies a page that is used to show a message that informs a portal guest that the token of an email verification link has already expired, which means that more time has passed than configured in the Email link lifetime setting before the verification attempt. For such a page, you can create a child simple content page with the following message in the Description field on the Content tab, and then specify that page here: "Dear guest, The link has already expired."
- Email link lifetime – Specifies how many minutes the link in the invitation email to update password will be active.

- Select Save and publish to save the changes and publish them on the front end. Optionally, if you were editing the page, you can select Save and preview to preview how the page will look like on the front end.
- Specify the created Account Registration page on the My account page in the Account registration page field.
Enable/disable the ability to sign up
Portal administrators can enable/disable the ability to sign up for portal visitors by toggling the Enabled switch on the Account registration page tab of the Account Registration page settings. When this switch is disabled, the sign-up link is not available on the sign-in page.
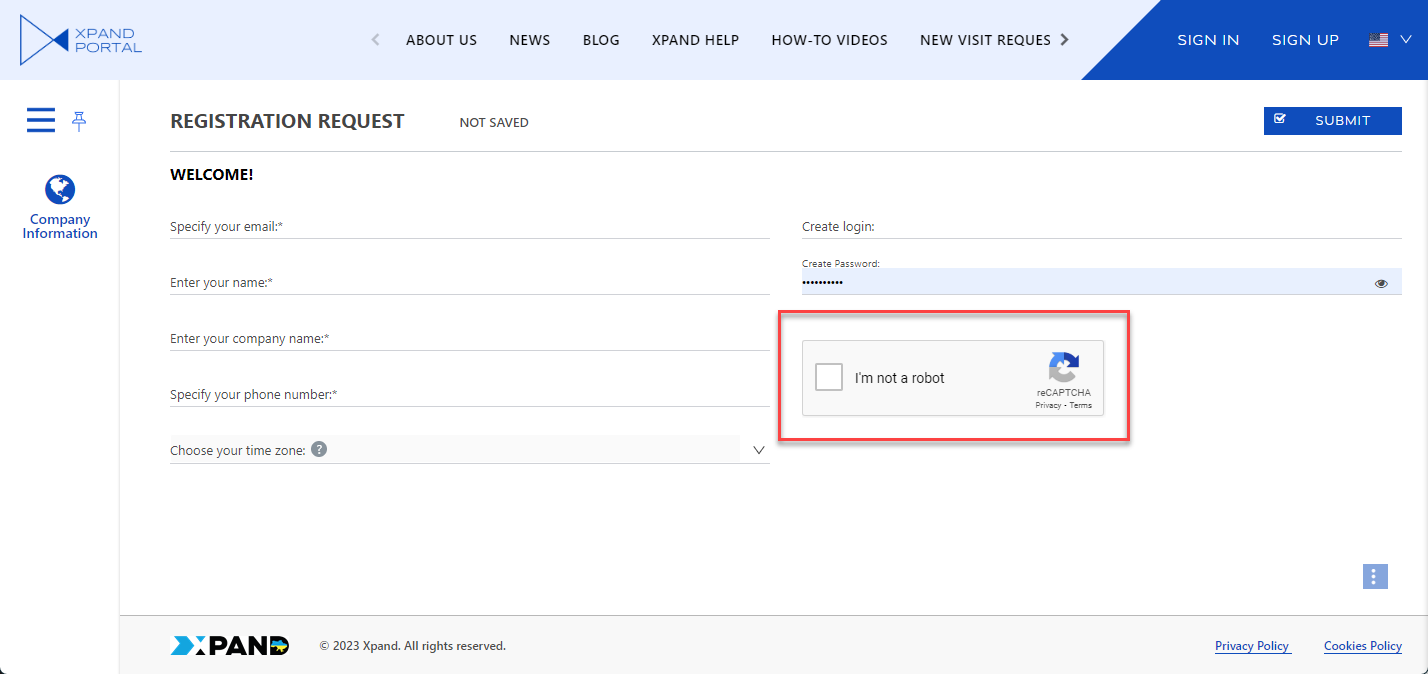
Set up Google reCAPTCHA
On the Account Registration page, we recommend configuring a field with reCAPTURE (which is a form of CAPTCHA (Complete Automated Public Turing test to tell Computers and Humans Apart)). This is a service by Google that aims to protect your website and forms from abuse including spam.
|
The portal domain where you use the Google reCAPTCHA feature must have an SSL certificate installed. |
To set up reCAPTCHA:
- Follow this guide to create a reCAPTCHA account and get your site key and secret key (you'll need them later during setup).
- Add a new field on the Account Registration page. In the Name setting, specify the GoogleRecaptcha field from the PortalMemberRegistrationRequests entity.
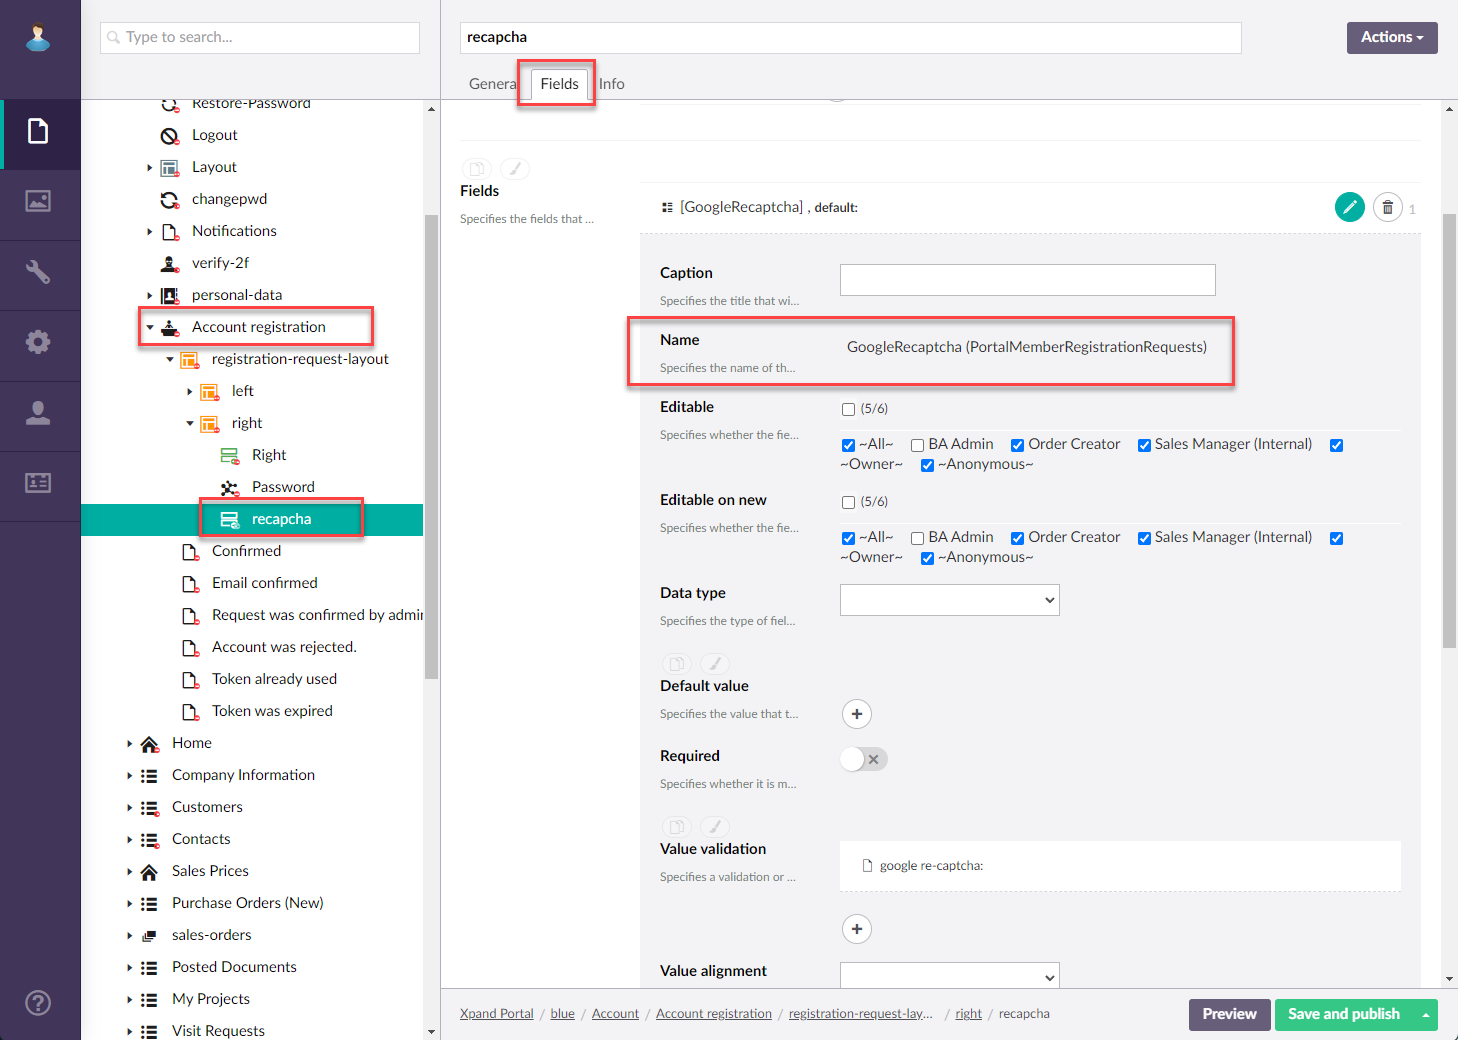
- In the Value validation setting, add a new validation, and then select Google reCAPTCHA. Configure validation settings:
- Enabled - Specifies that validation is enabled. Enable this switch for the reCAPTCHA field.
- Validation message - Specifies the message that will be displayed if the validation is not fulfilled. For example: reCAPTCHA validation failed. Please try again.
- Validation message title - Specifies the title that will be displayed on the validation message. For example: Google reCAPTCHA.
- Google reCAPTCHA version - Specifies the version of the Google reCAPTCHA that is used for this validation. Select the version for which the site key and secret key were obtained during reCAPTCHA account registration and which are specified in the site localization additional settings.

- Save and publish the changes.
- Go to the site settings and, on the General tab, in External services, add a setting with External service name = Google reCAPTCHA private key (secret key). In the Value field for this setting, specify the secret key that was generated when you were configuring your reCAPTCHA account.
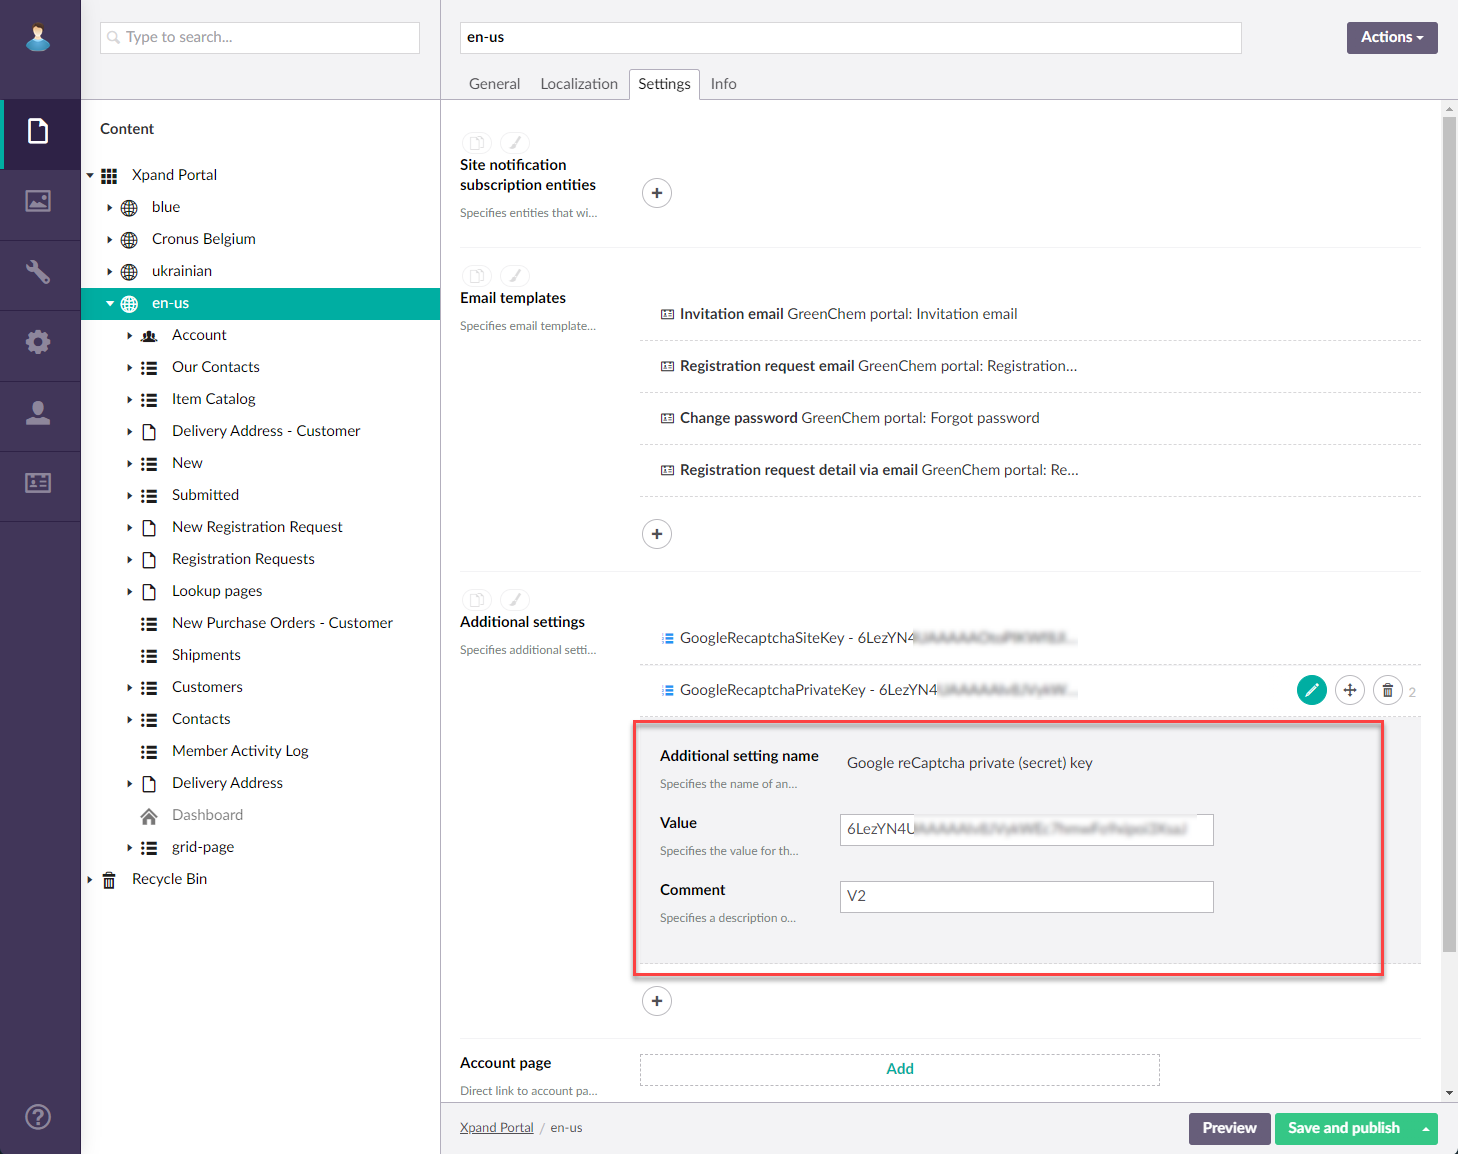
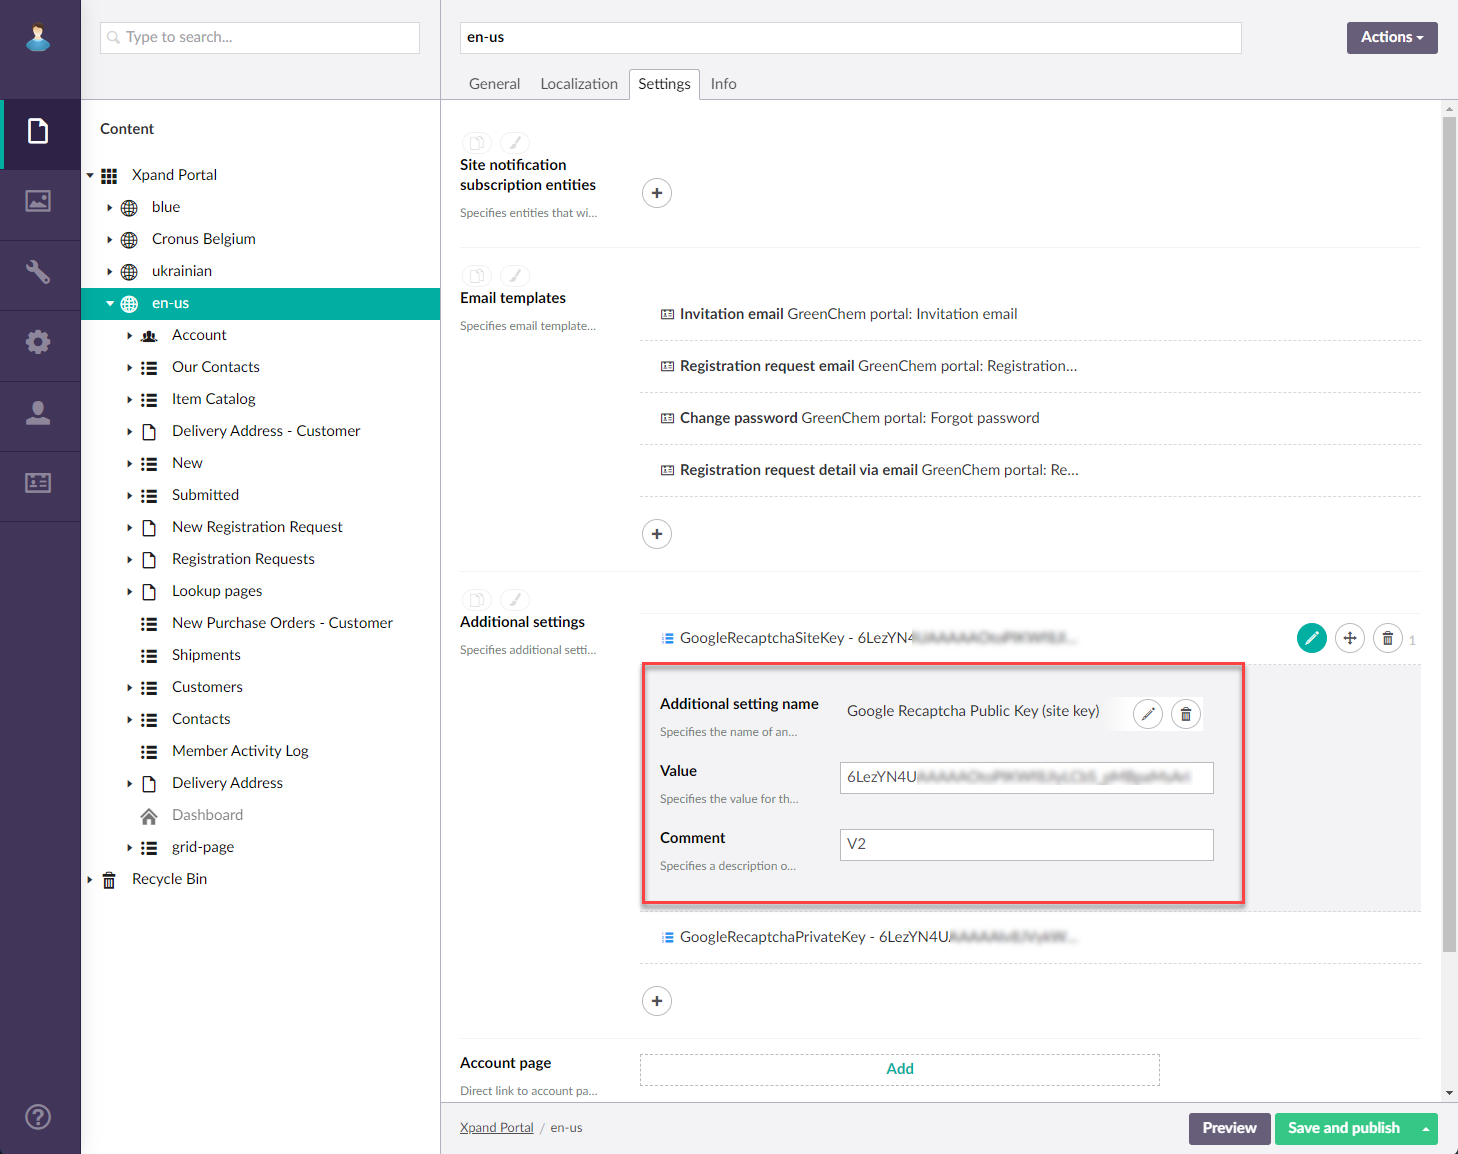
- In External services, add a setting with Additional setting name = Google reCAPTCHA public key (site key). In the Value field for this setting, specify the site key that was generated when you were configuring your reCAPTCHA account.
- Save and publish the changes.
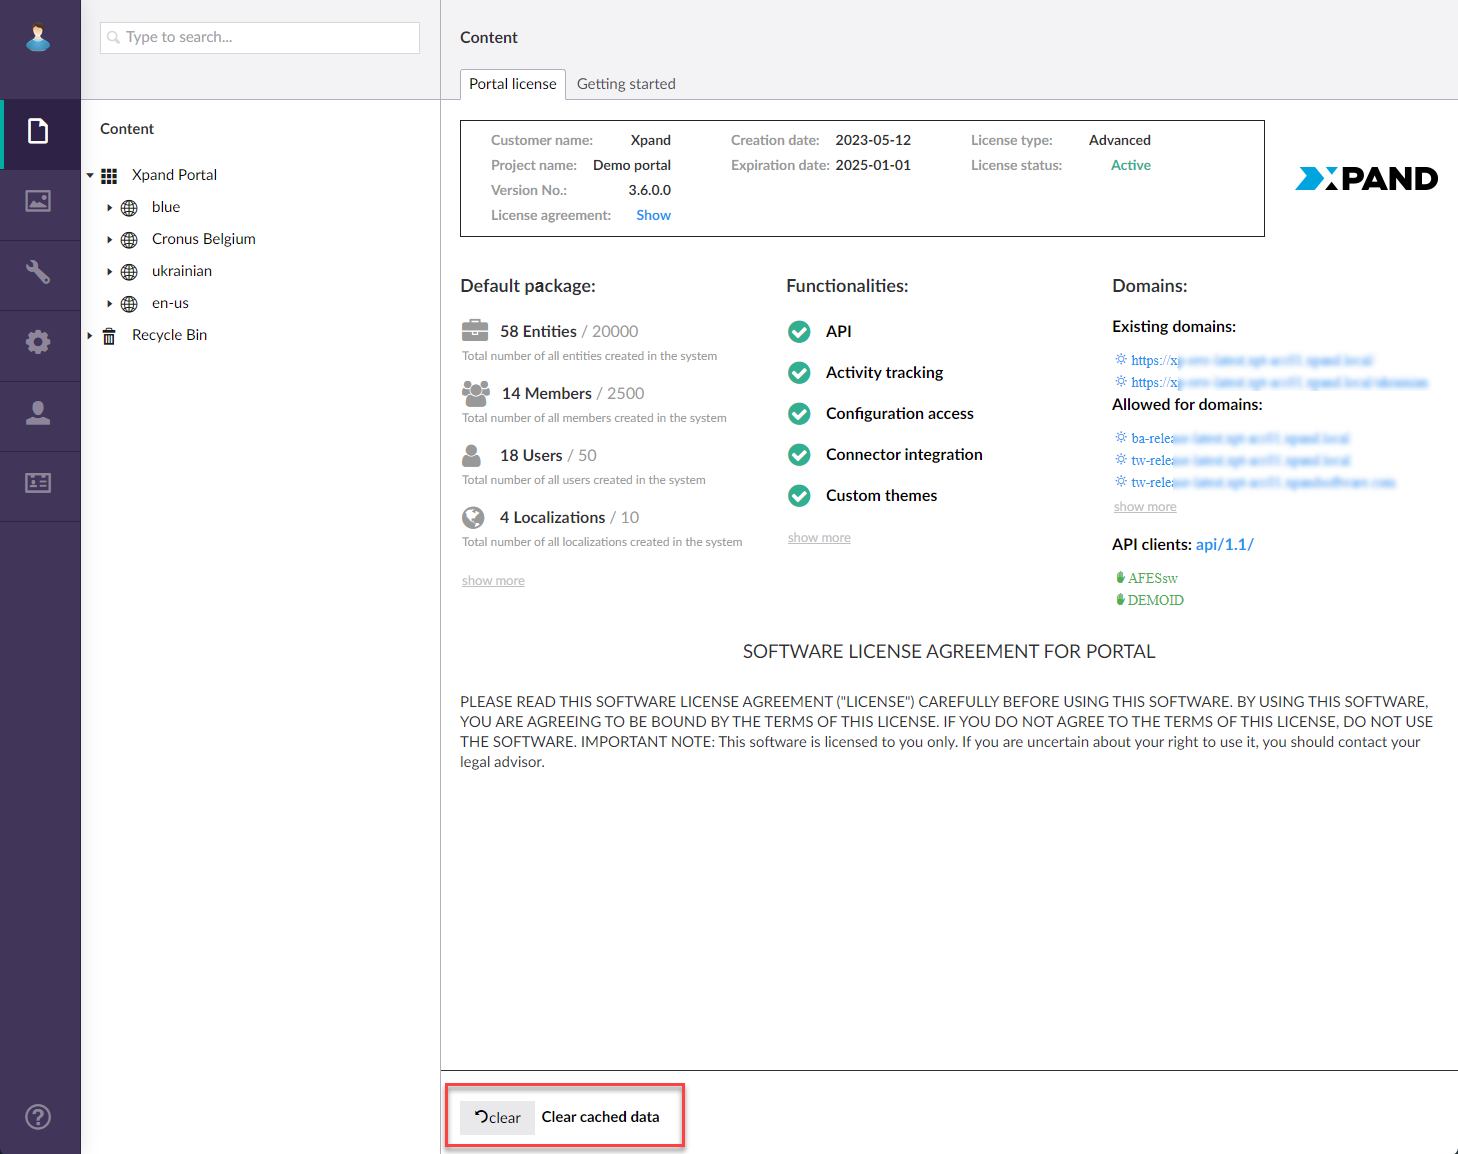
- Go to Content and select Clear cached data.