Creating site localizations
Xpand Portal supports multiple localizations. For each localization, you can have a different site of pages with different settings as well as localized captions.
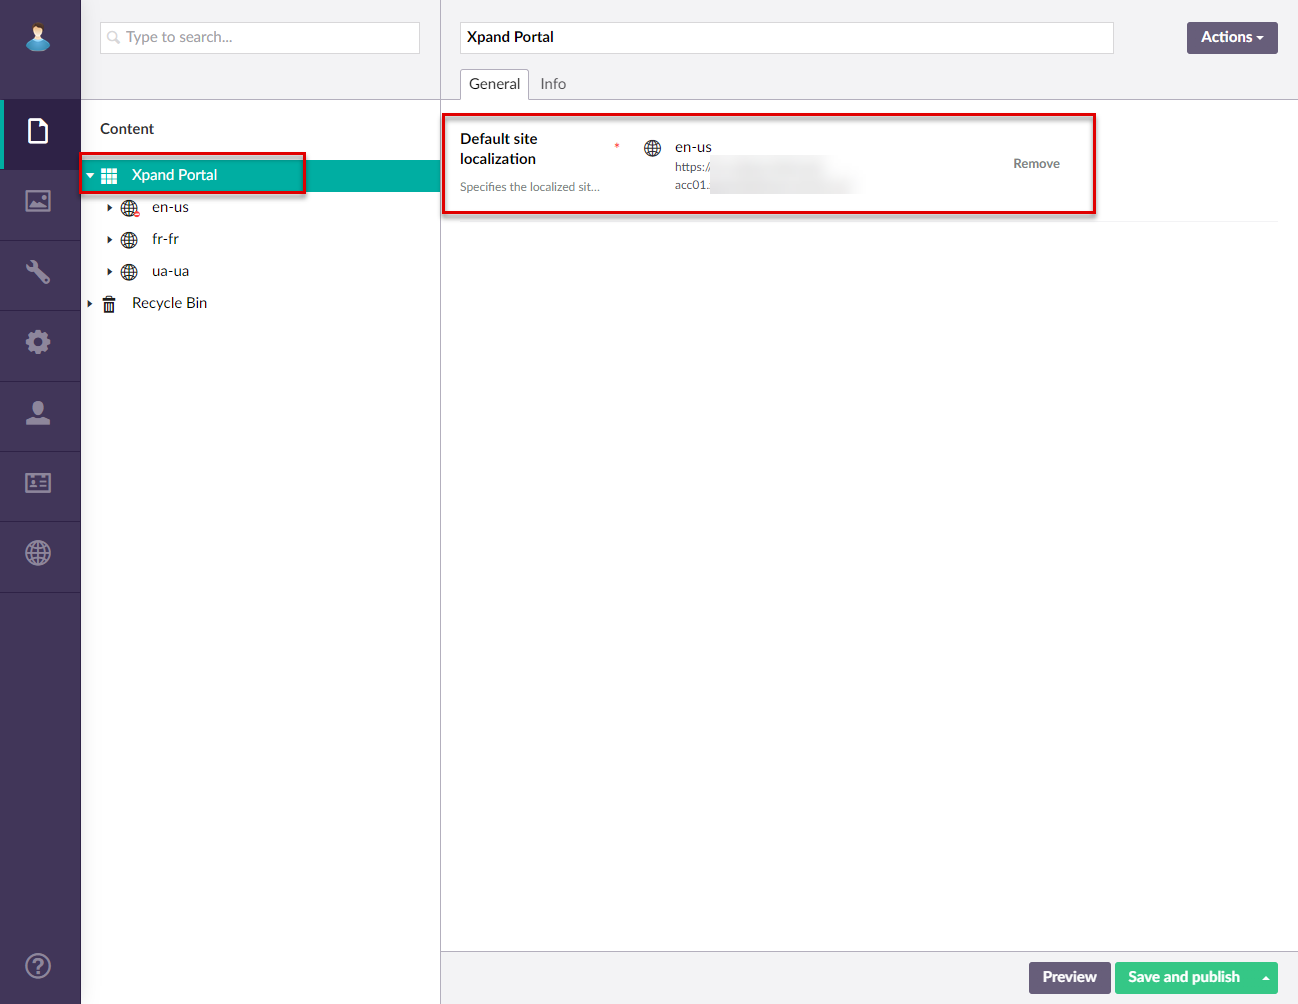
In CMS, the localization site is identified by the ![]() icon in the Contents area. If you have more than one localization, you can select which one will be used by default by selecting the
icon in the Contents area. If you have more than one localization, you can select which one will be used by default by selecting the ![]() root node, and then select a site localization in the Default site localization setting. Use the Remove button to remove the current one. The localization will be selectable from the member menu on the front end.
root node, and then select a site localization in the Default site localization setting. Use the Remove button to remove the current one. The localization will be selectable from the member menu on the front end.
A lot of site localization settings are common for all pages within that localization unless overruled by specific page settings.
To customize site localization, in CMS, go to Contents, and click the node of a required localization site ![]() .
.
To create a site localization page
- In CMS, go to Contents.
- Click the
 icon next to root node (or select and hold (right-click) the root node, and then select Create), and then select Site localization page.
 Note
NoteIf you want to customize an existing localization, click the node of a required localization site
 and skip steps 2 and 3.
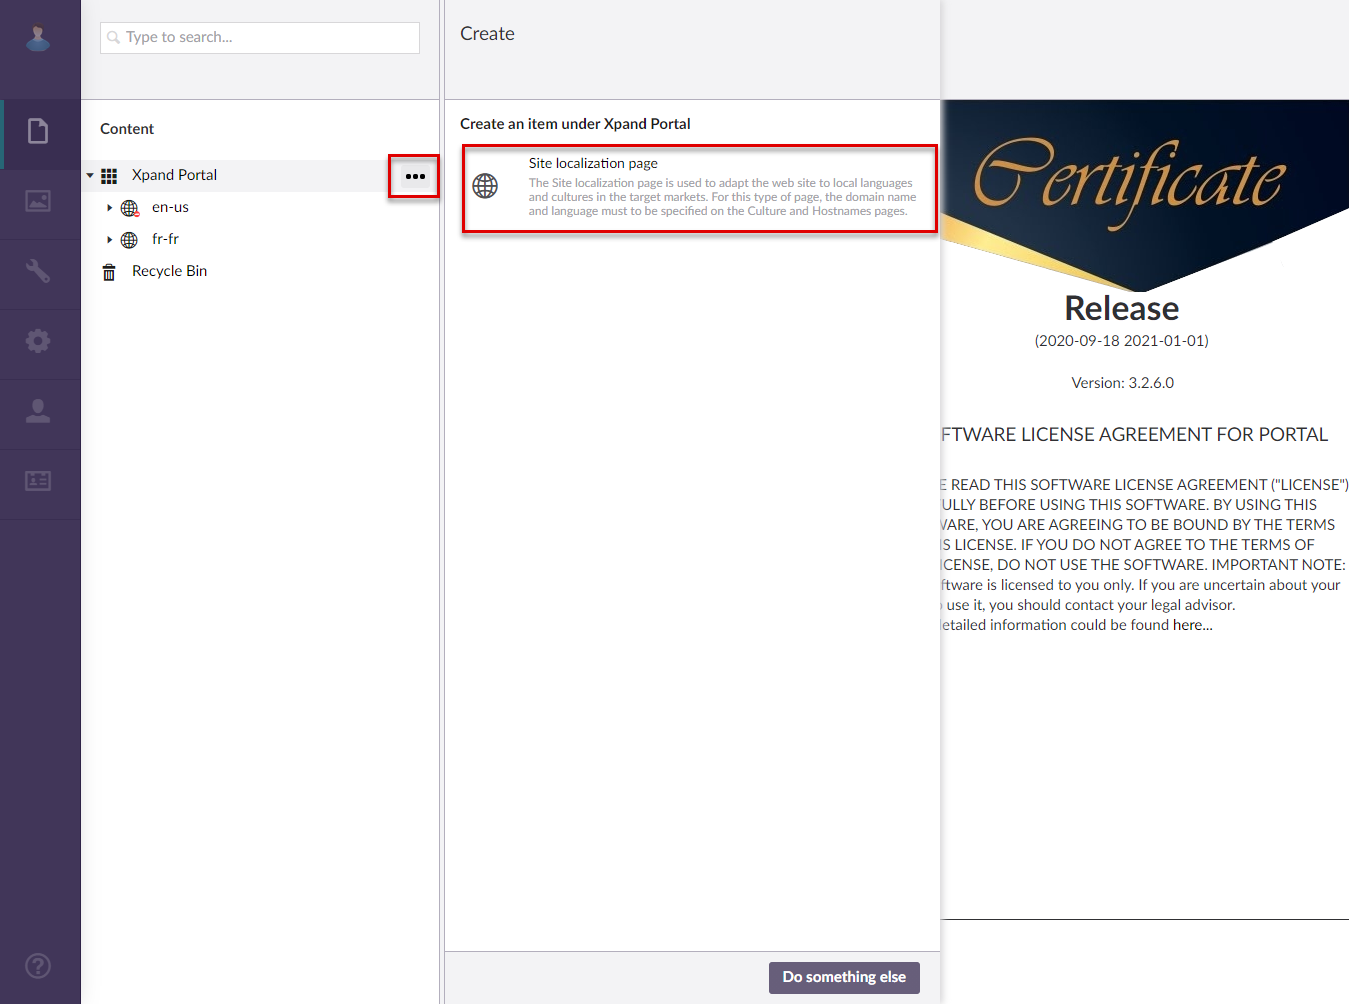
- At the top, type the name of the site localization node that will be used to identify it in the portal structure.
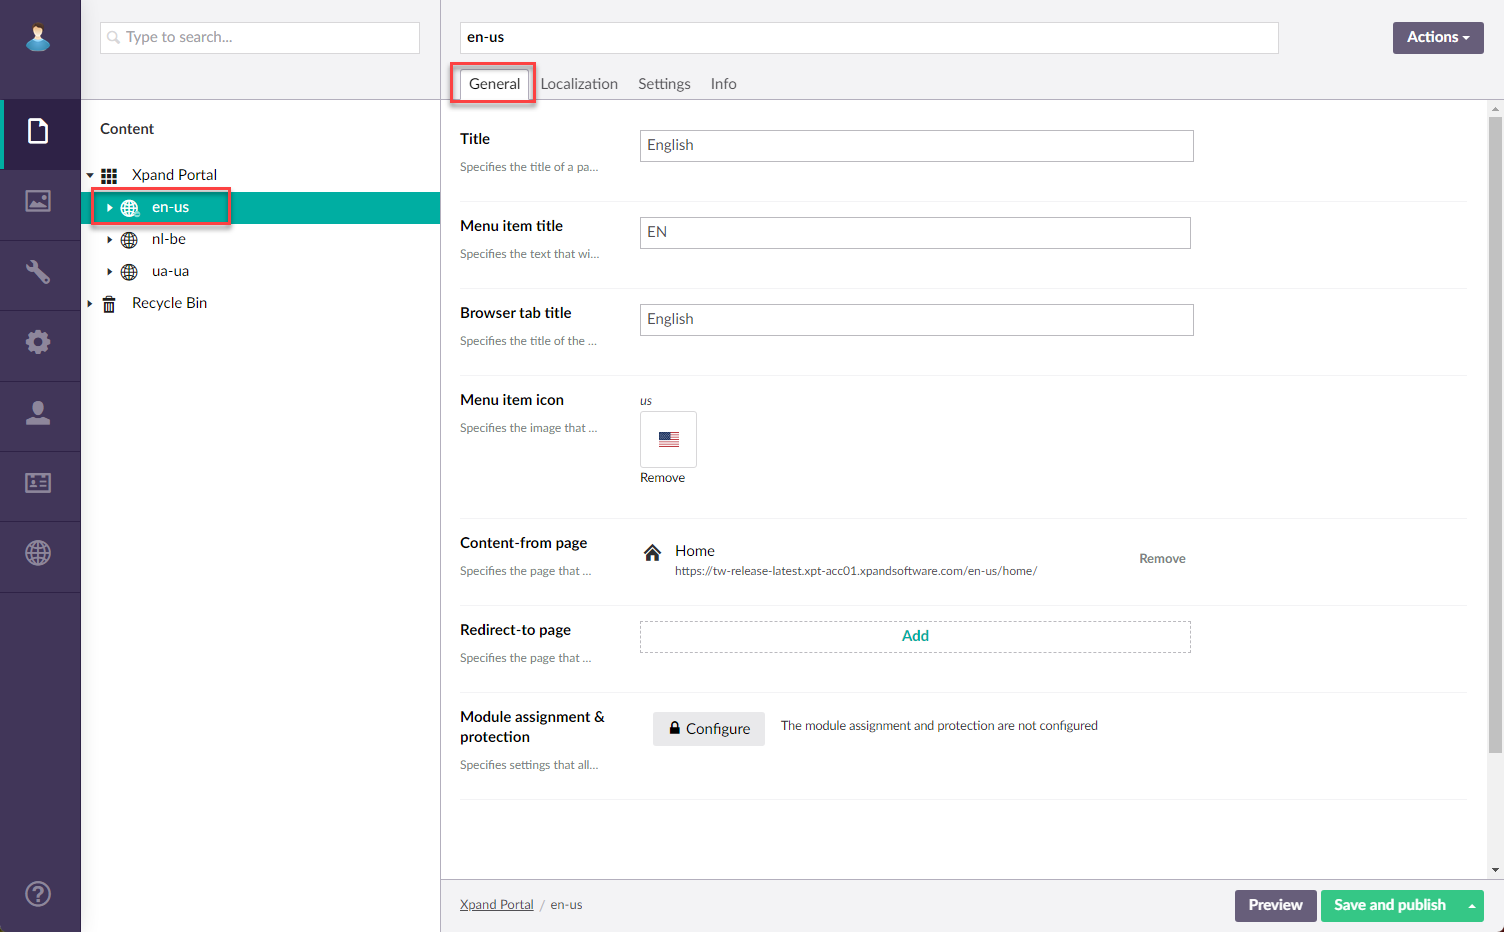
General tab
- On the General tab, configure the settings as described below:
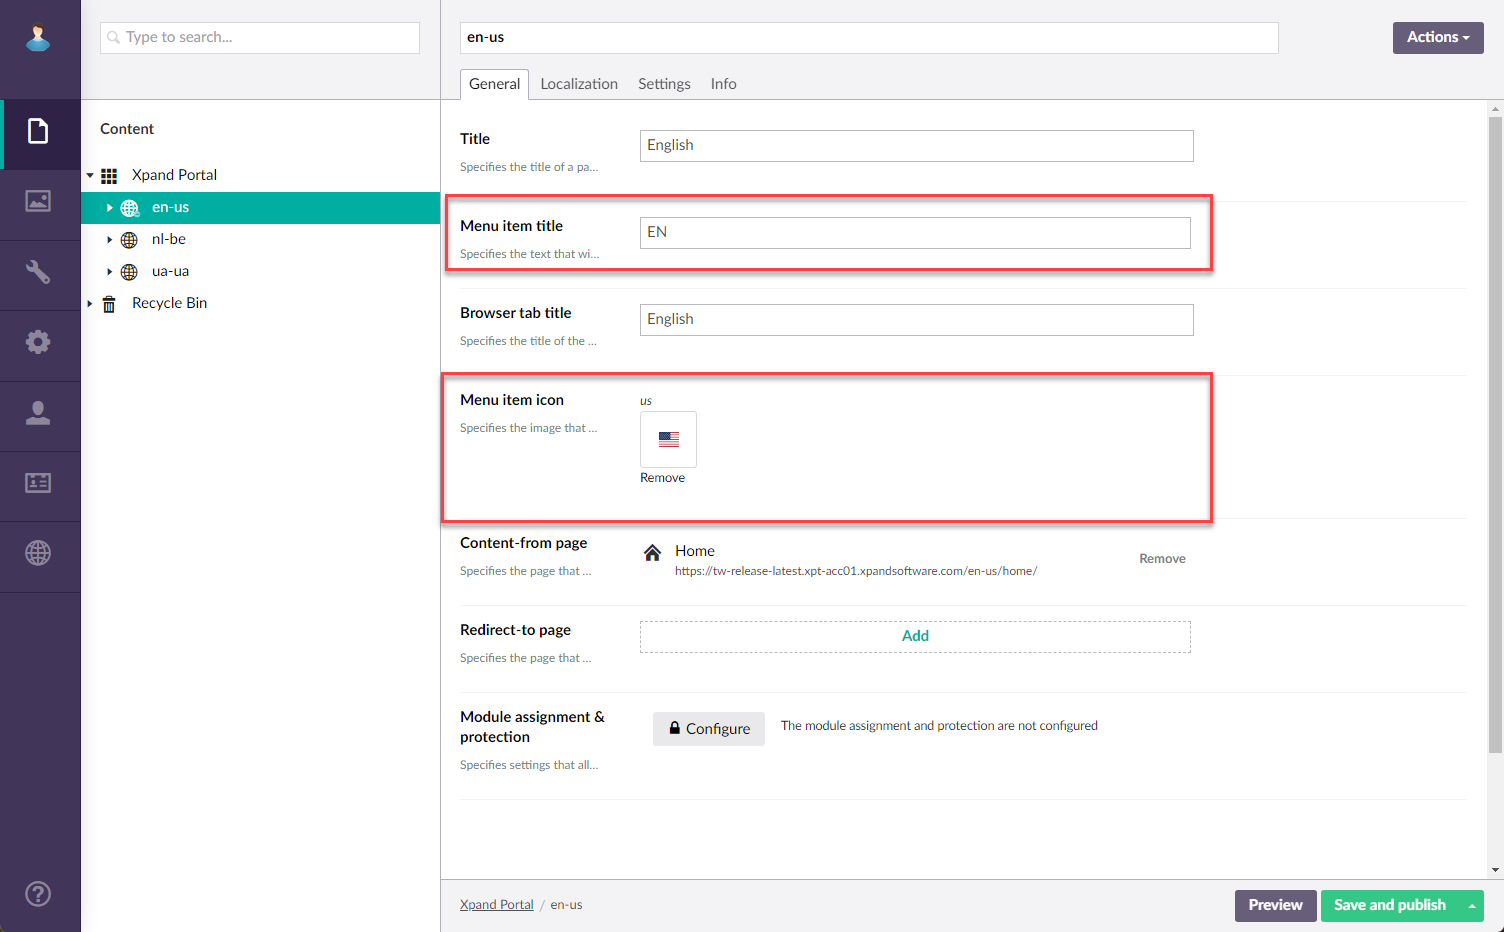
- Menu item title - Specifies the caption of the menu item that will be displayed when a portal member points to the button on the header or on the login page to change portal localization.
- Menu item icon - Specifies the icon of the menu item that will be used for the button on the header or on the login page that changes portal localization.
- Content-from page - Specifies the portal page that will be used as the home page (the first page that is opened when a portal member has signed in). Select Add and browse to an existing page. Normally, the dashboard page is used as a home page.
- Redirect-to page - Specifies the page to which the member will be redirected when trying to open the site localization page.
- Module assignment & protection - Specifies settings that allow you to assign this content element (localization, page, etc.) to an internal module as well as to protect this element from certain operations (copying, changing, deletion). Select the Configure button to configure module assignment & protection or the Change button to edit existing configuration if it has already been configured.
Localization tab
- On the Localization tab, configure the settings as described below:
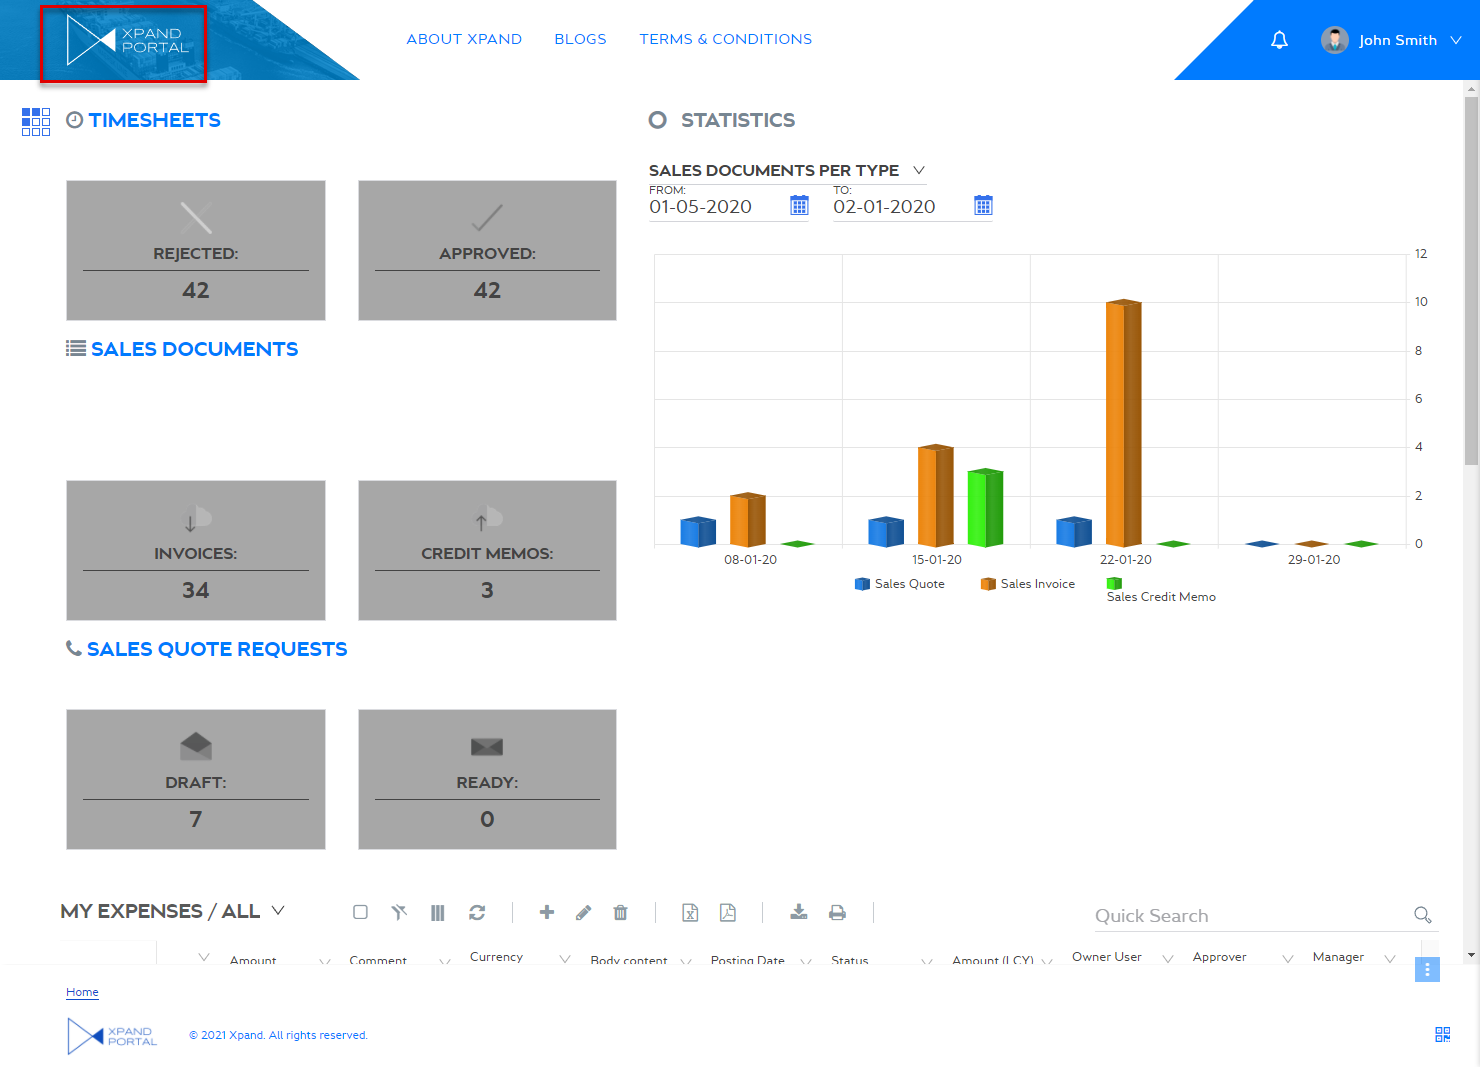
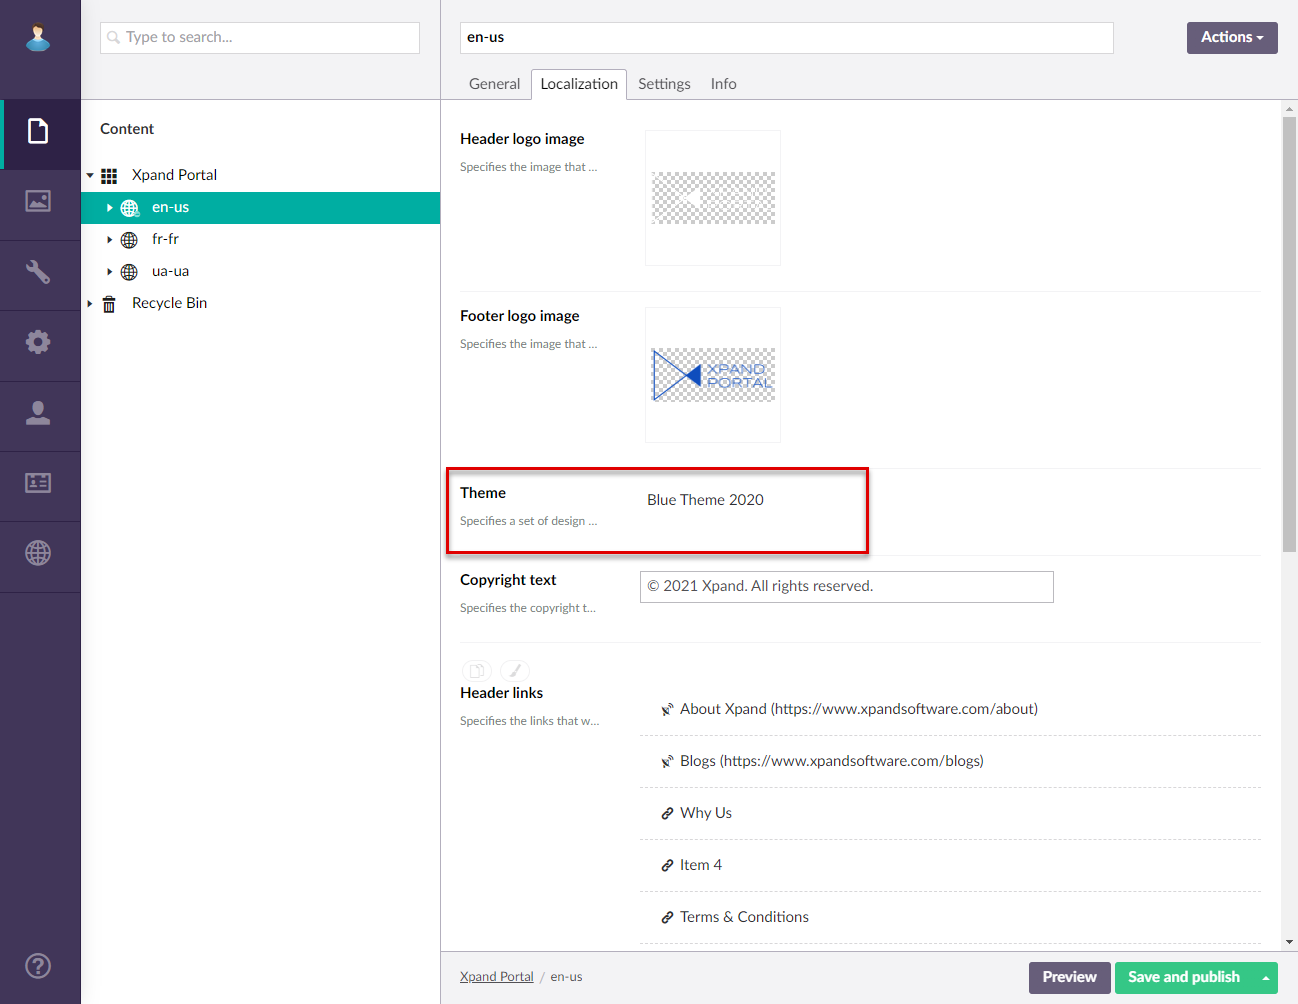
- Logo image - Specifies the logo image that will be displayed in the top left corner on all pages of the portal. You can use an existing page from the media library or upload a new one.
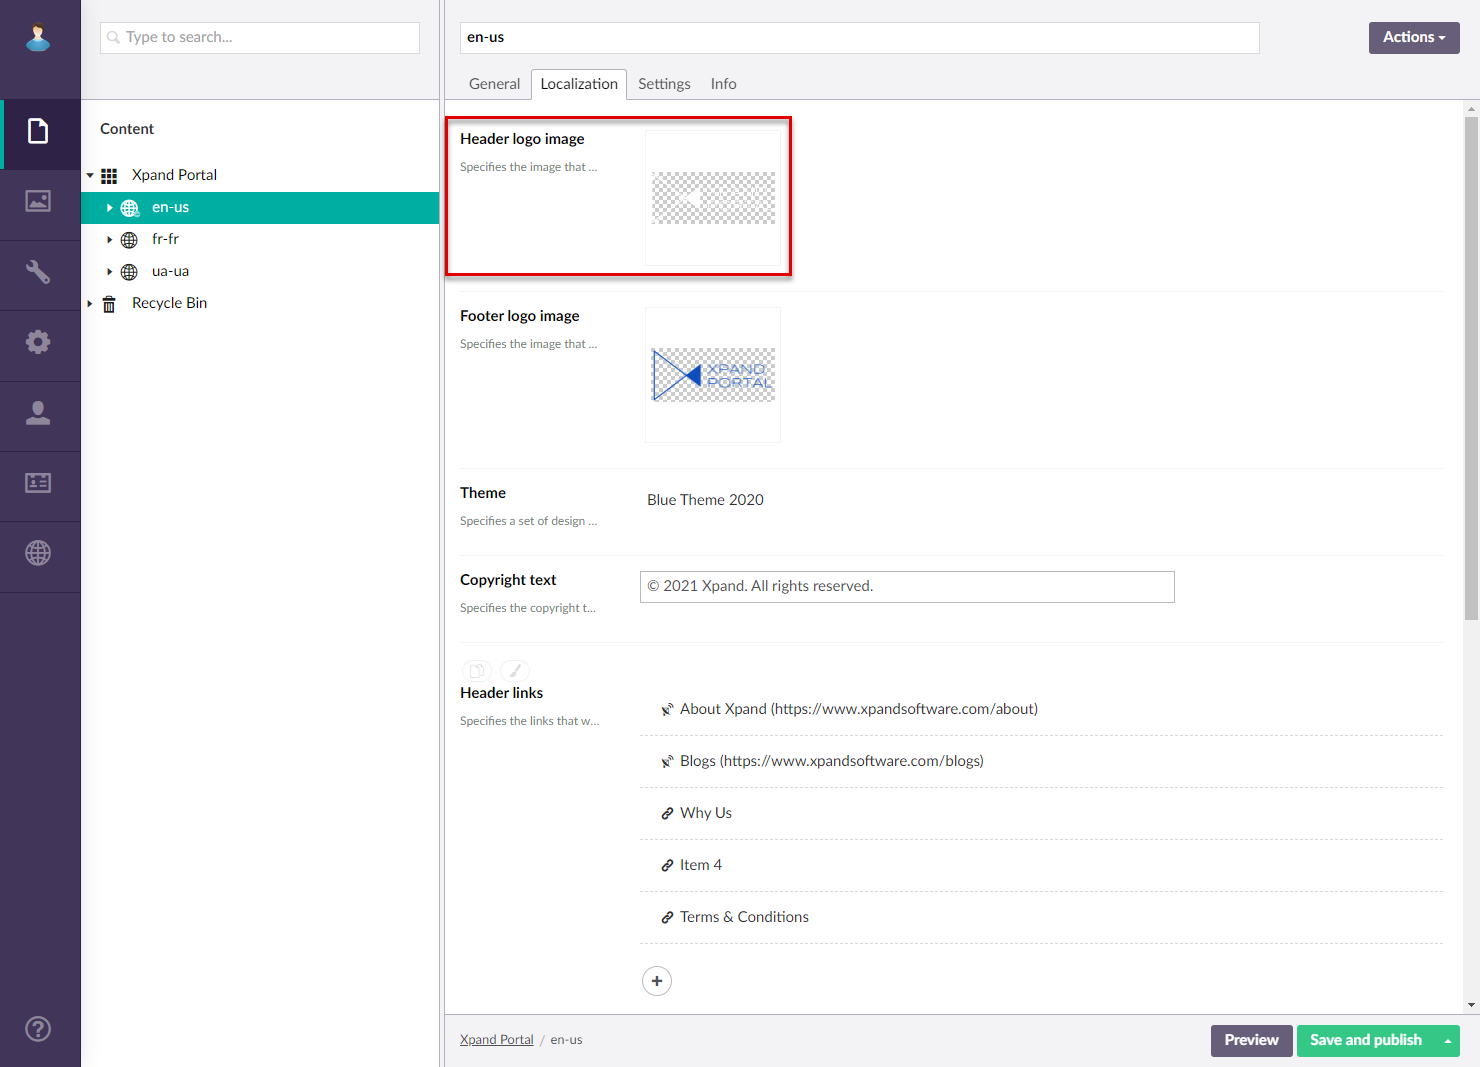
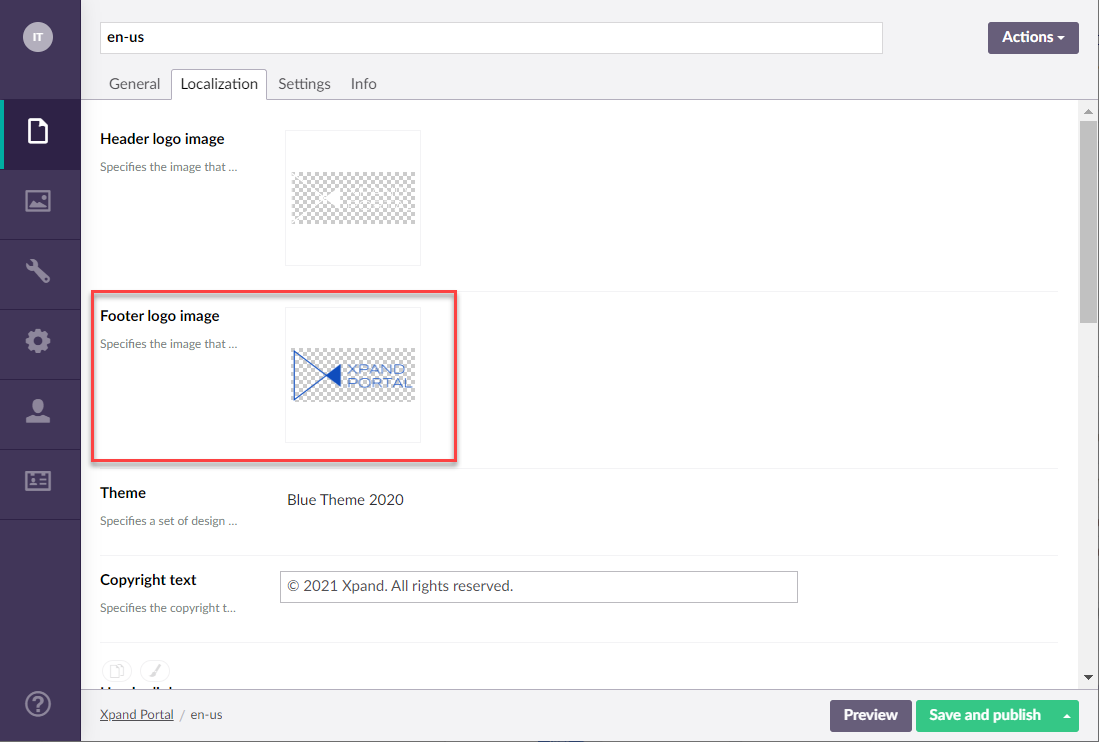
- Footer logo image - Specifies the footer logo image that will be displayed in the bottom left corner on all pages of the portal. You can use an existing page from the media library or upload a new one.
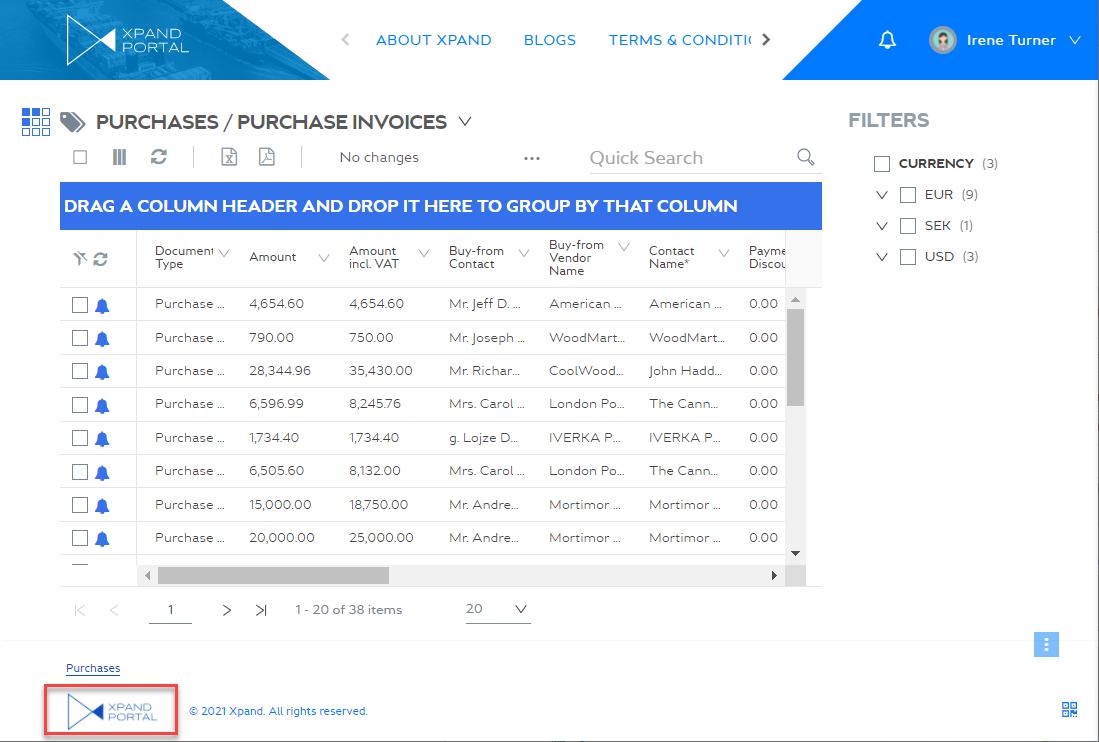
- Theme - Specifies the theme of the portal that defines the look and feel of Xpand Portal. If you leave this field empty, the default portal theme will be used. There are several predefined themes suggested (themes with new modern UI have 2020 in their name). You can create custom portal themes or customize the existing ones.
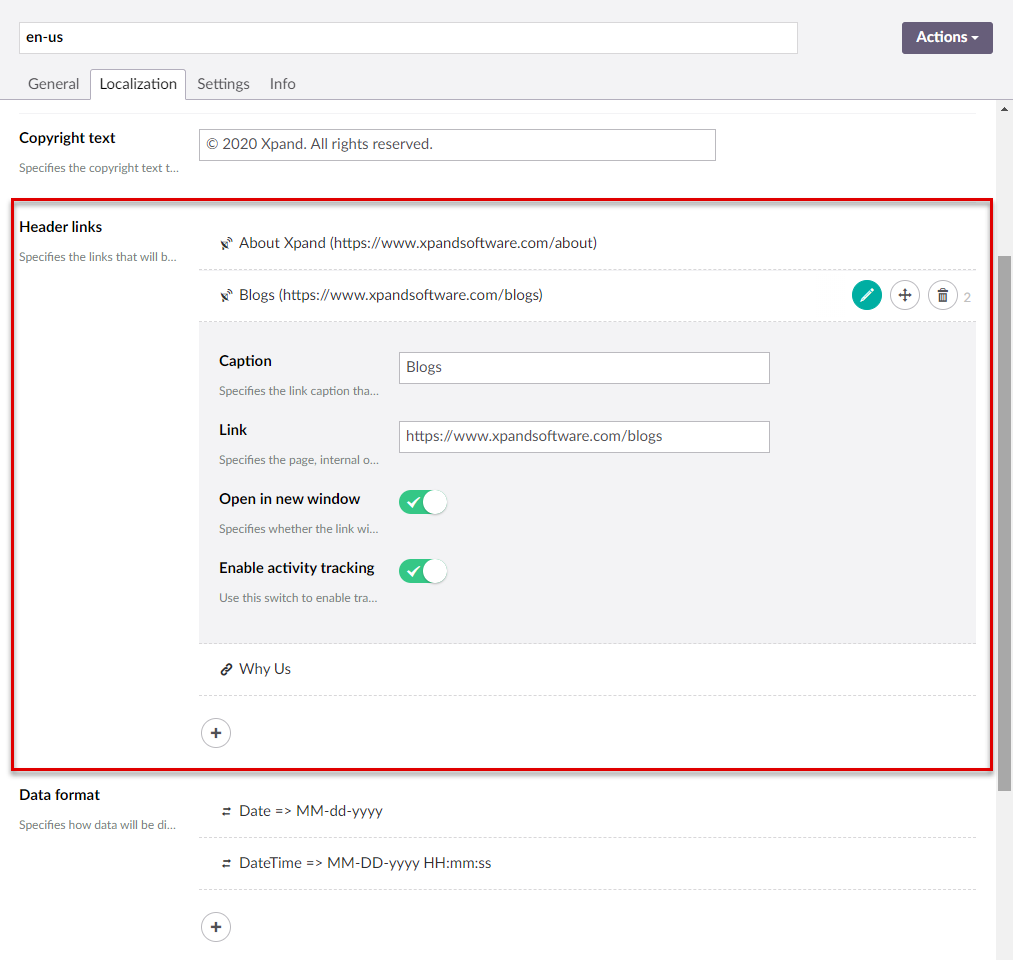
- Copyright text - Specifies the text that will be displayed at the bottom of each portal page. Normally, copyright text is specified here.
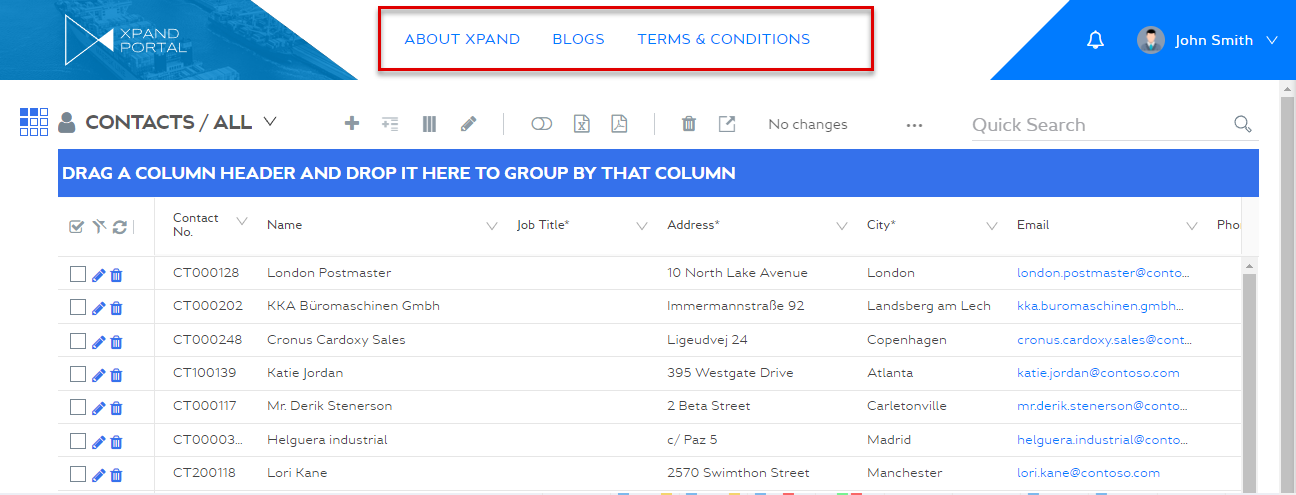
- Header links - Using this setting, you can add custom links to the header, which are displayed on every portal page unless specifically hidden by page settings. These links can open a page on the portal or any external web pages. To add a header link, select the
 icon, and then choose one of the options:
 Internal page link - Add a link to a page on the portal. With this option, configure the following link settings:
- Caption - Specifies the link caption.
- Link - Specifies a portal page that will be opened when a member follows the link. Select Add, and then navigate to a portal page.
- Enable activity tracking - Turn this switch on if you want to track this link. If enabled, when a member follows the link, this activity will be shown in the member activity log with the link click action type.
 Static external link - Add a link to any web page. With this option, configure the following link settings:
- Caption - Specifies the link caption.
- Link - Specifies the URL of a web page that will be opened when a member follows the link.
- Open in new window - Turn this switch on if you want the link to open the page in a new browser window.
- Enable activity tracking - Turn this switch on if you want to track this link. If enabled, when a member follows the link, this activity will be shown in the member activity log with the link click action type.
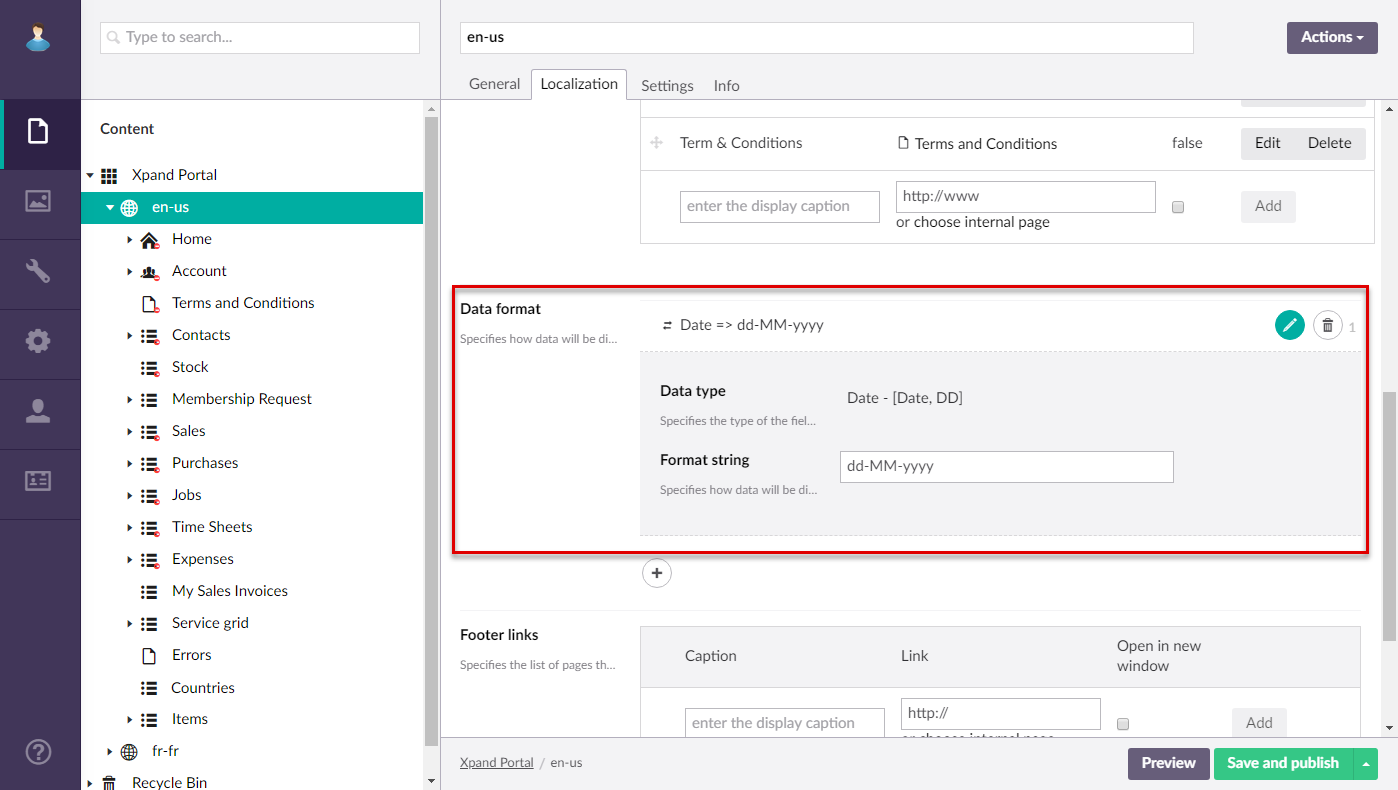
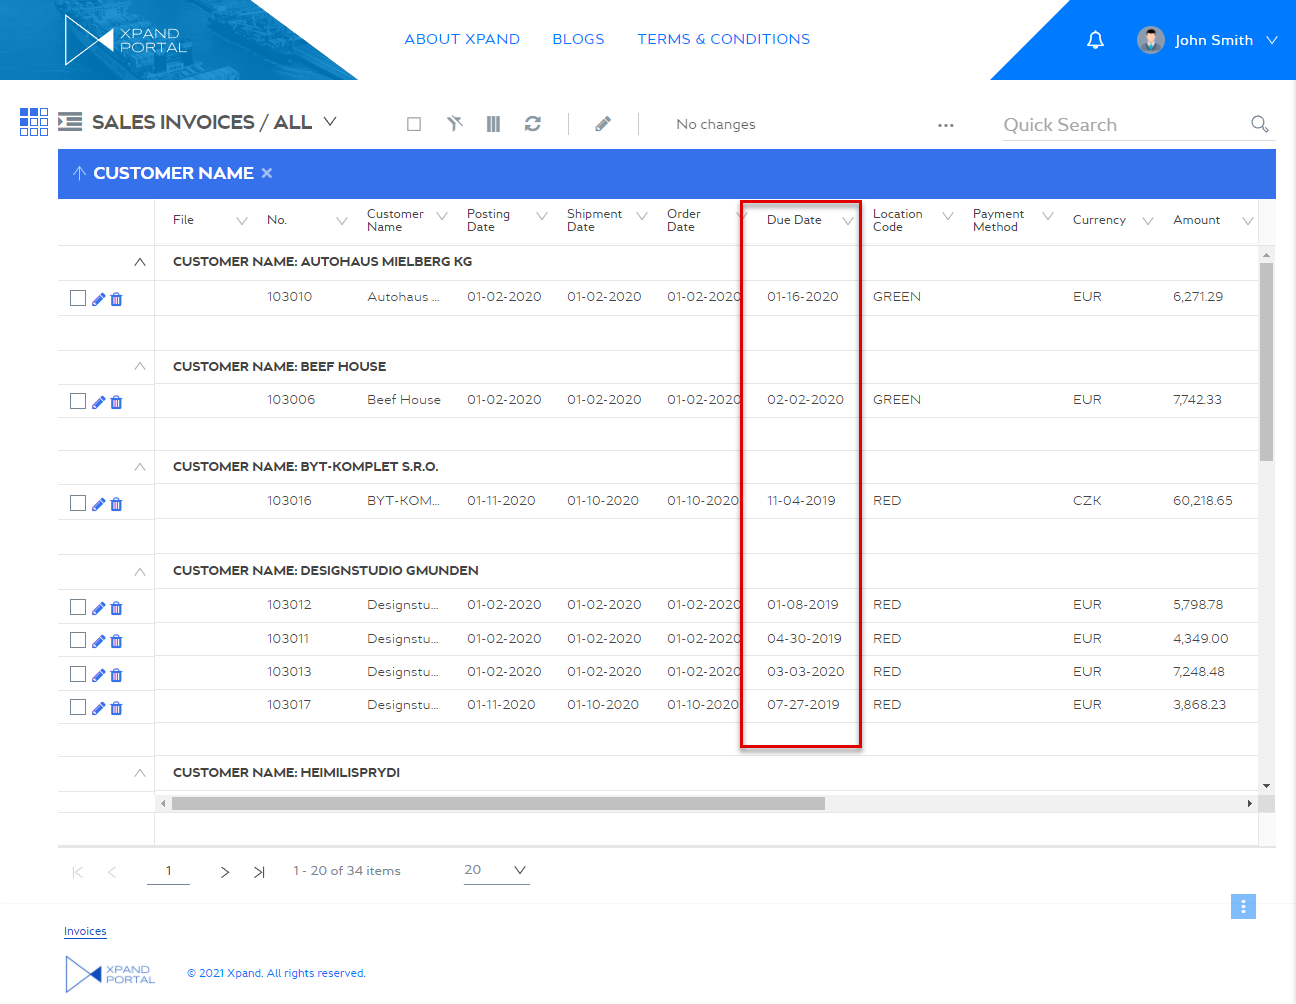
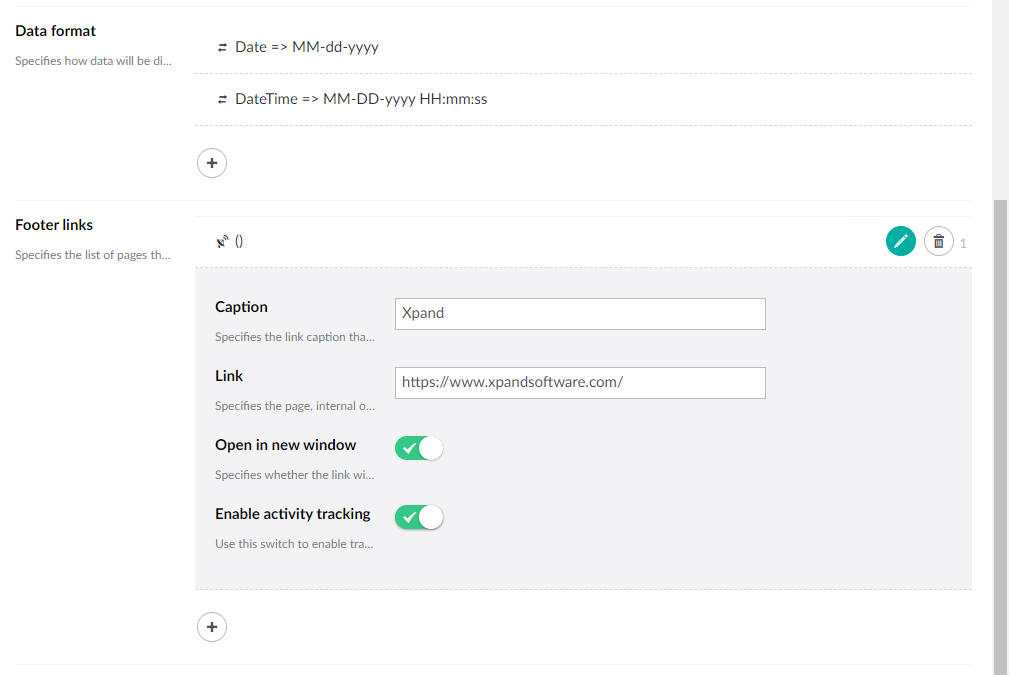
- Data format - Specifies the format in which data will be displayed in fields with various data types. Data format can be configured on three levels in Xpand Portal:
- Field level - data format in the field settings has the highest priority and will be used if it is specified for a field.
 Tip
TipYou can use the data format configurations on the field level when you need to override the data format settings for a specific field. See examples of Date and DateTime format configurations for a field using custom format string.
- Member settings - data formats configured in the Data format field on the Settings tab on the portal member settings have medium priority, and will be applied only if data format on the field level is not configured.
- Site localization settings - data formats configured in the Data format field in the site localization settings have the lowest priority, and will be applied only of the data format was not configured in the member settings or in the field settings.
 Important
When you are configuring the format string for the Date and DateTime data types, use the kendo date formatting.
- Field level - data format in the field settings has the highest priority and will be used if it is specified for a field.
- Footer links - Specifies links that will be available in the footer on all pages. To add a footer link, select the icon, and then choose one of the options:
- Internal page link - Add a link to a page on the portal. With this option, configure the following link settings:
- Caption - Specifies the link caption.
- Link - Specifies a portal page that will be opened when a member follows the link. Select Add, and then navigate to a portal page.
- Enable activity tracking - Turn this switch on if you want to track this link. If enabled, when a member follows the link, this activity will be shown in the member activity log with the link click action type.
- Static external link - Add a link to any web page. With this option, configure the following link settings:
- Caption - Specifies the link caption.
- Link - Specifies the URL of a web page that will be opened when a member follows the link.
- Open in new window - Turn this switch on if you want the link to open the page in a new browser window.
- Enable activity tracking - Turn this switch on if you want to track this link. If enabled, when a member follows the link, this activity will be shown in the member activity log with the link click action type.
- Logo image - Specifies the logo image that will be displayed in the top left corner on all pages of the portal. You can use an existing page from the media library or upload a new one.
Settings tab
- On the Settings tab, configure the settings as described below:
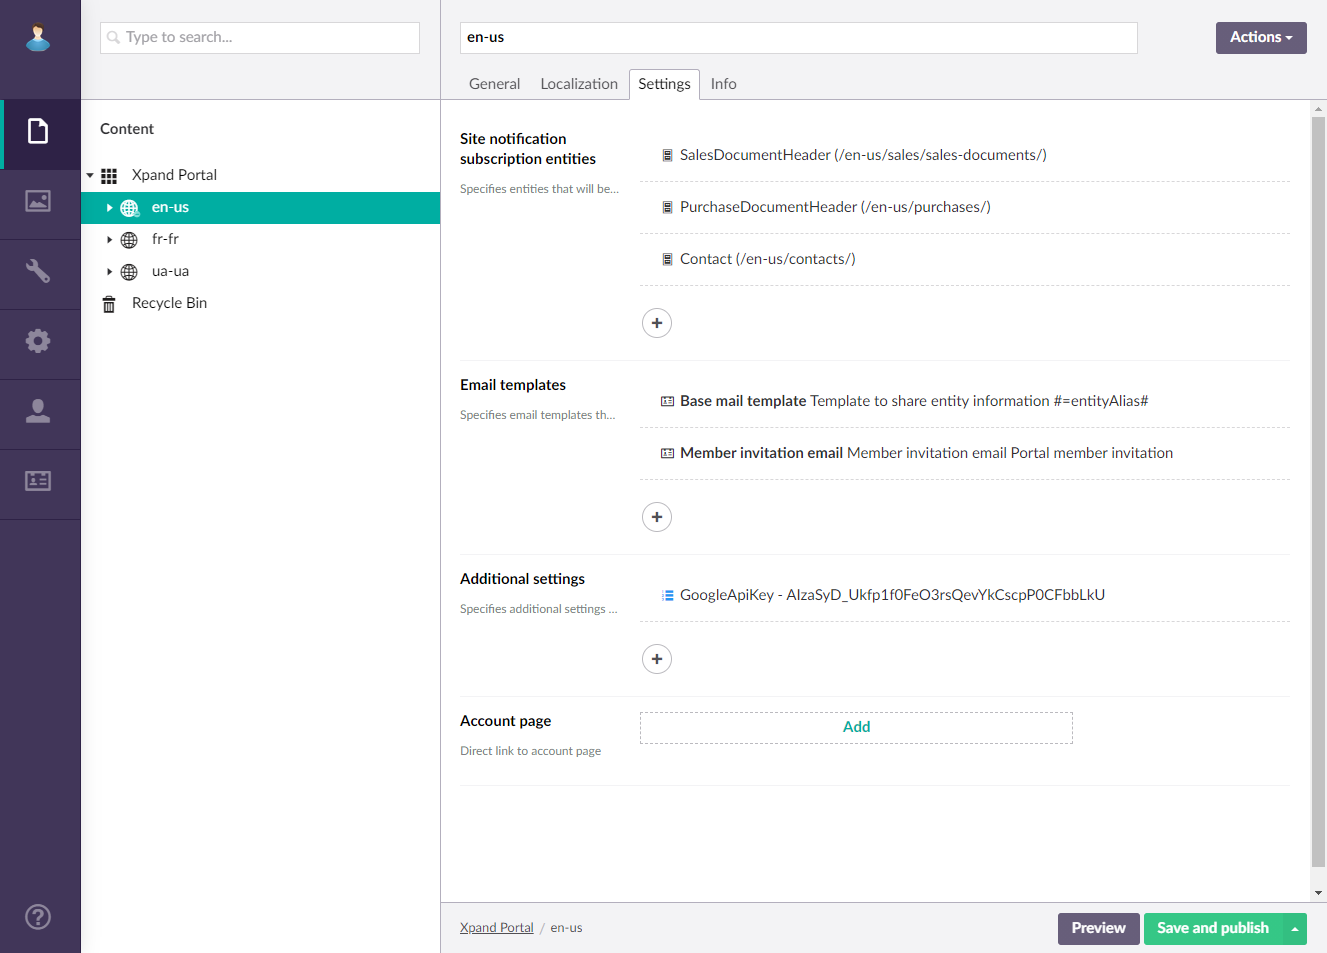
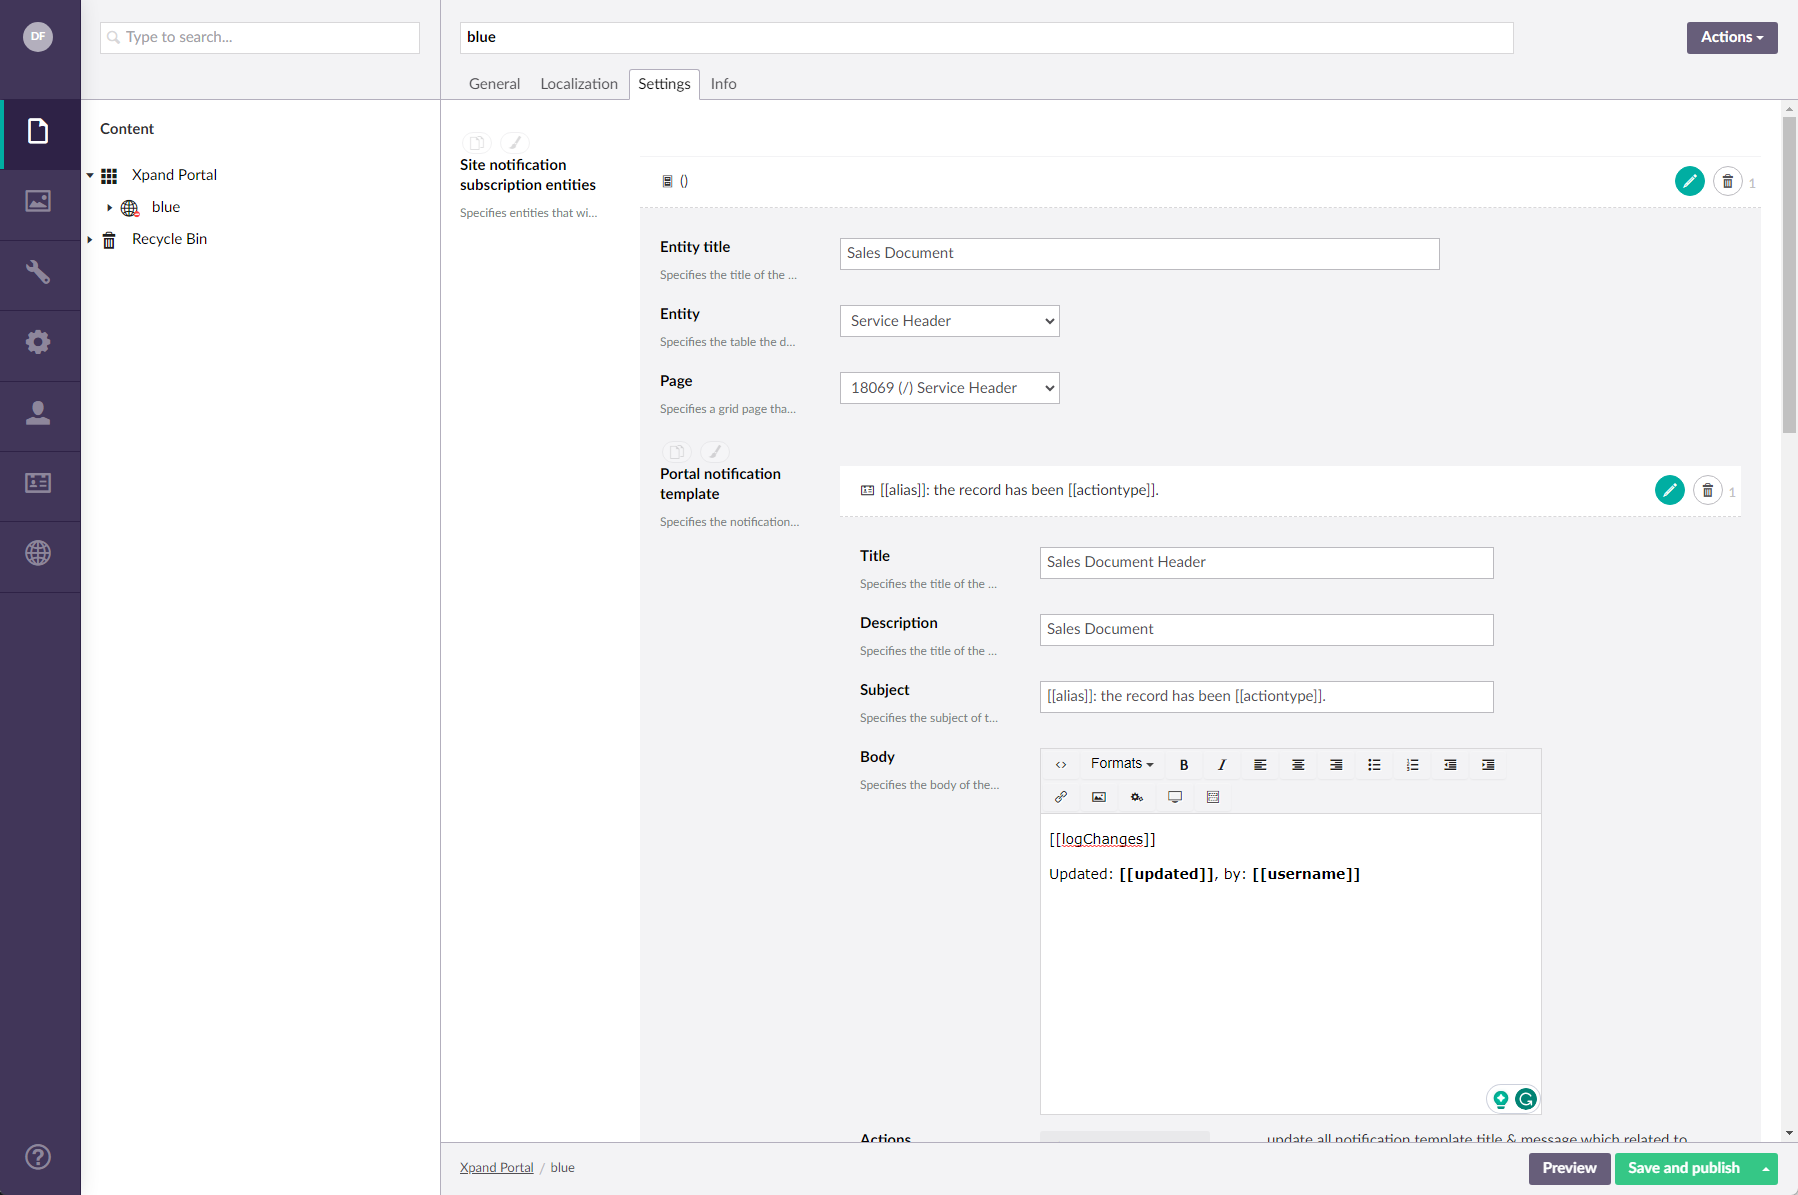
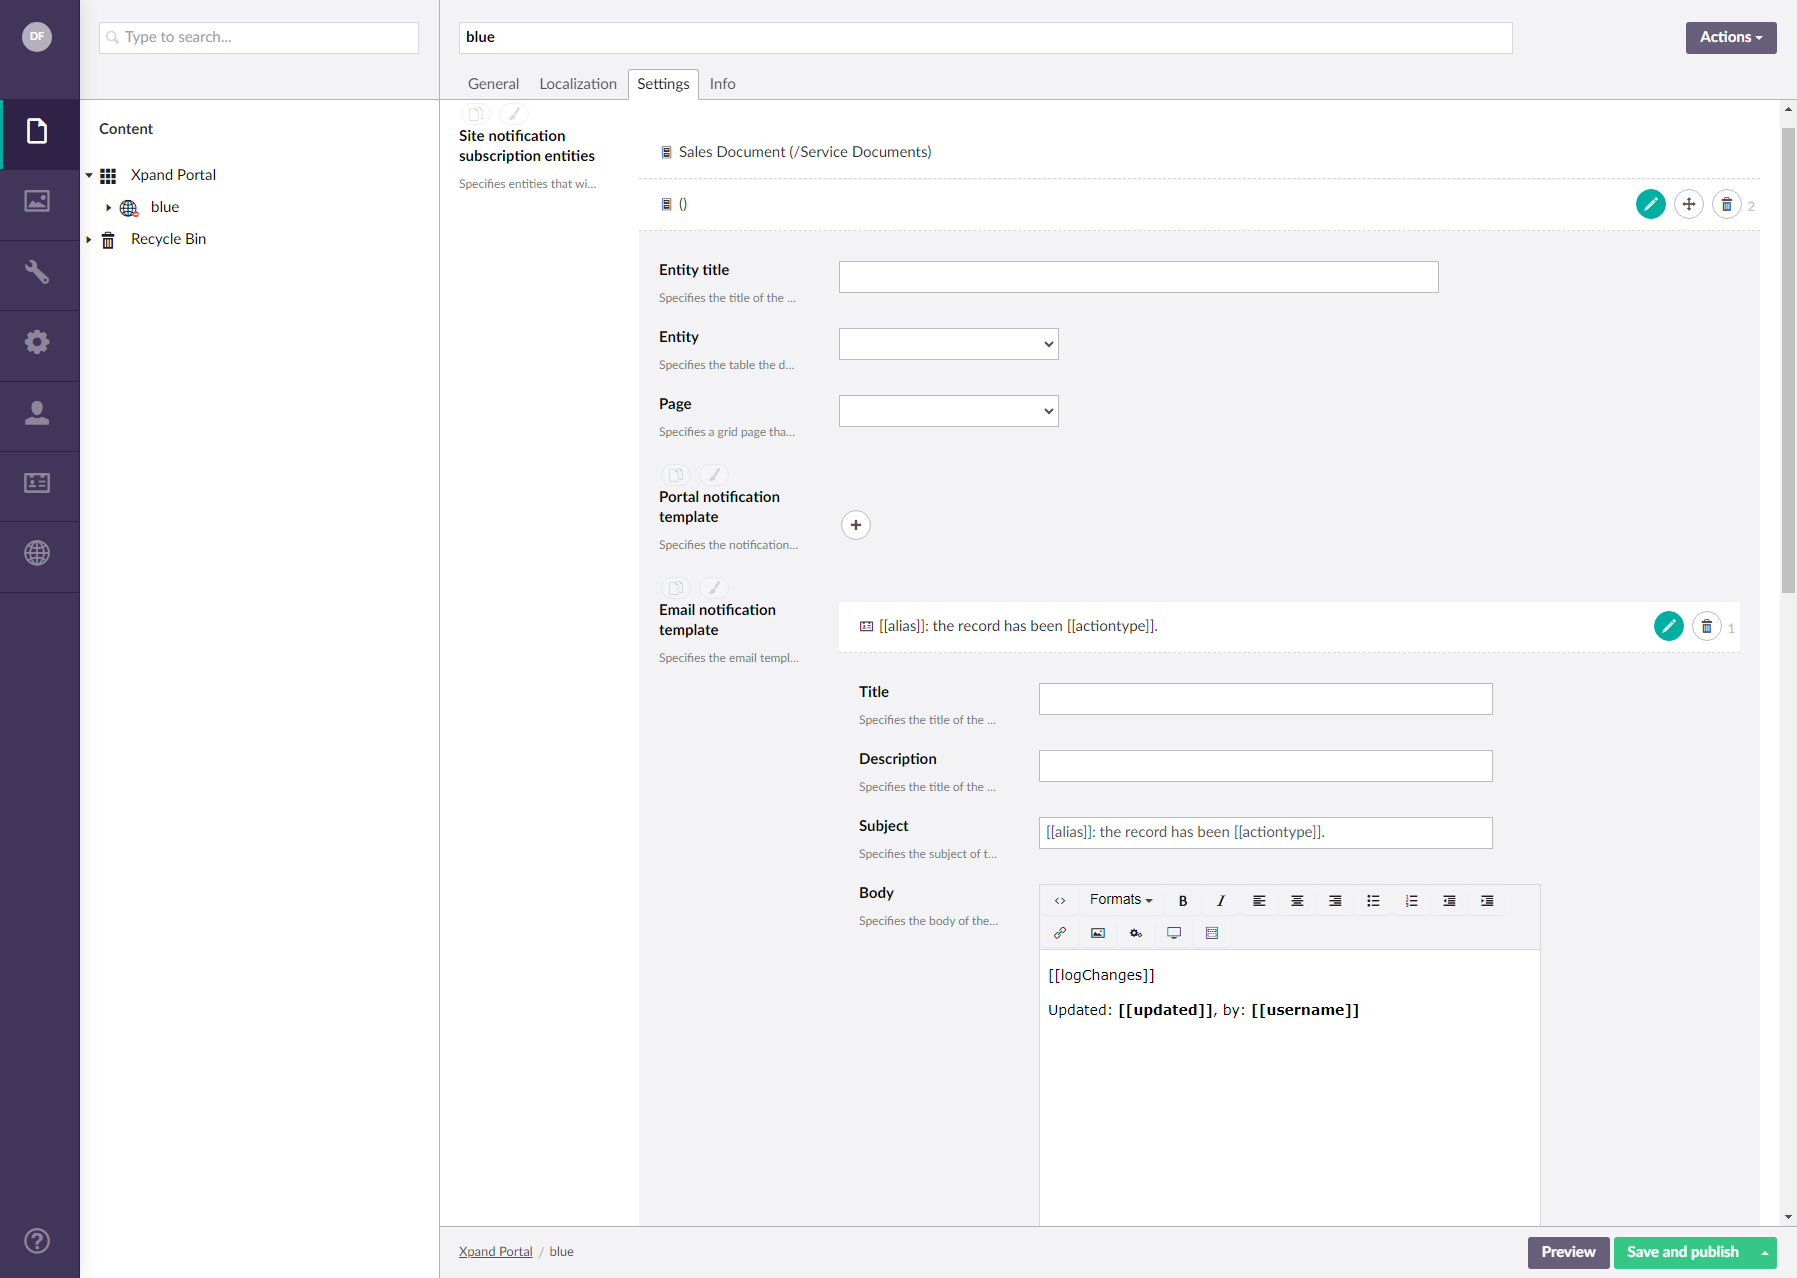
- Site notification subscription entities - Here you can link available portal grids to portal entities, which is, for example, necessary for Search pages. Also, for each entity, you can set up the default notification and email templates, which are used in the Notifications functionality. Select and then, select an entity that you want to create a notification template subscription for, and fill in the entity settings:
- Entity title - Specifies the title of the site notification subscription entity that will be displayed as an option in the Page setting on the notification setup card. If this title is not specified, the related page's title will be displayed as an option instead, and in case the related page's title is not specified, the entity's name will be used.
- Entity – Specifies the portal entity, for which are you configuring related grid, default notification subscription, and email notification templates.
- Page – Specifies the page that is used by default to retrieve data.
- Portal notification template – Specifies the notification templates that will be used by default with this entity, when you create a new subscription template for portal members for this portal entity. Select to create and link a new notification subscription template:
- Title – Specifies the title of the notification subscription template.
- Description – Specifies a description of the notification subscription template.
- Subject – Specifies the subject of the notification that will be displayed in the notification pane when clicking the notifications icon on the toolbar. You can use variables in the subject if necessary:
- [[fieldname]] - This variable where fieldname is the name of a field from the source data entity will be replaced with the field value.
- [[actiontype]] - This variable will be replaced with the type of action performed with the record.
- Body – Specifies the body of the notification that will be displayed in the notification pane when clicking the notifications icon on the toolbar. You can add plain text, apply formatting and variables of certain fields. Examples of variables:
- Basic variables for notifications:
- [[logChanges]] - This variable will be replaced with the updated value in the notification/email.
- [[fieldname]] - This variable where fieldname is the name of a field from the source data entity will be replaced with the field value.
- ##unsubscribelink## - This variable will be replaced with a link to the page where they can unsubscribe from the group notification. E.g.: <p>If you want to unsubscribe from such notifications, please follow this <a href="##unsubscribelink##">link</a> to manage your notifications</p>
- [[updated]] – This variable will be replaced with the date when the tracked record was modified.
- Variables that show information about the site:
- [[site.url]] (recommended for use)
- [[site.domain]] (recommended for use)
- [[site.path]]
- [[site.authority]]
- [[site.urlhost]]
- [[site.urlscheme]]
- etc.
- Variables that show information about the member who is the subscriber:
- [[member.xContactId]]
- [[member.xCustomerId]]
- [[member.MemberName]] (recommended for use)
- [[member.MemberUserEmail]] (recommended for use)
- [[subscriber.xContactId]]
- [[subscriber.xCustomerId]]
- [[subscriber.MemberName]]
- [[subscriber.MemberUserEmail]]
- etc.
Note
The member or subscriber entities used in these variables represent the PortalMembers entity (the entity that contains information about members), however, in this case, this is a member who is the subscriber. You can variables with other fields, not mentioned above, from the PortalMembers entity if necessary.
- Variables that show information about the member who made changes on a record:
- [[modifier.MemberName]]
- [modifier.MemberUserEmail]]
- [[modifier.MemberRoles]]
- etc.
Note
The modifier entity used in these variables represents the PortalMembers entity (the entity that contains information about members), however, in this case, this is a member who made changes on a record with active subscription. You can variables with other fields, not mentioned above, from the PortalMembers entity if necessary.
- Variables that show information about the member:
- [[PortalMembers.MemberName]]
- [[PortalMembers.MemberUserEmail]]
- etc.
-
Tip
We do not recommend adding too much text to the notification body to avoid an overcluttered notification pane. The portal member will have the ability to open the list of all notifications where you can add more details if need be.
- Basic variables for notifications:
- Actions - Specifies actions that can be performed with this template.
- Update notification - You can use this action to update all existing notification setup cards that use this template with changes if any. This may be useful if you want to update notification setup card that have already been configured; for new notification setup cards, there is no need to use this action.
-
Email notification template - Specifies the default email templates that will be available for selection when creating a notification subscription template for portal members for this portal entity. Select
to create and link email template(s):- Title – Specifies the title of the email template.
- Description – Specifies a description of the email template.
- Subject – Specifies the email subject that will be displayed in the notification email created from this template. You can use variables in the subject if necessary:
- [[fieldname]] or #=fieldname# or #:fieldname# (any of the three variants will work) - This variable where fieldname is the name of a field from the source data entity will be replaced with the field value.
- [[actiontype]] - This variable will be replaced with the type of action performed with the record.
- Body – Specifies the body of the email that will be created in the notification email created from this template. In addition to plain text, hyperlinks, images, etc., you can add the following variables to the email template body:
- Basic variables"
- <a href="#=editLink#">View record</a> - Will be replaced with a link to the related record where View record is the hyperlink text.
- [[fieldname]] or #=fieldname# or #:fieldname# (any of the three variants will work) - This variable where fieldname is the name of a field from the source data entity will be replaced with the field value.
- [[updated]] – This variable will be replaced with the date when the tracked record was modified.
- [[logChanges]] - This variable will be replaced with the updated value in the notification/email.
- ##unsubscribelink## - This variable will be replaced with a link to the page where they can unsubscribe from the group notification. E.g.: <p>If you want to unsubscribe from such emails, please follow this <a href="##unsubscribelink##">link</a> to manage your notifications</p>
- Variables that show information about the site:
- [[site.url]] (recommended for use)
- [[site.domain]] (recommended for use)
- [[site.path]]
- [[site.authority]]
- [[site.urlhost]]
- [[site.urlscheme]]
- etc.
- Variables that show information about the member:
- [[PortalMembers.MemberName]]
- [[PortalMembers.MemberUserEmail]]
- etc.
- Basic variables"
- Actions - Specifies actions that can be performed with this template.
- Update notification - You can use this action to update all existing notification setup cards that use this template with changes if any. This may be useful if you want to update notification setup card that have already been configured; for new notification setup cards, there is no need to use this action.
- Email templates - Here you create email templates that will be used for various purposes, such as when emails with record information are sent from a detail or grid page with the help of the Send Email grid or detail action, or emails for managing members (password recovery notifications or member invitations).
- Title – Specifies the title of the email template.
- Description – Specifies a description of the email template.
- Subject – Specifies the email subject that will be displayed in the email created from this template. You can use variables in the subject if necessary:
- [[fieldname]] or #=fieldname# or #:fieldname# (any of the three variants will work) - This variable where fieldname is the name of a field from the source data entity will be replaced with the field value.
- Body – Specifies the body of the email that will be created from this template. In addition to plain text, hyperlinks, images, etc., you can add the following variables to the email template body:
- [[fieldname]] or #=fieldname# or #:fieldname# (any of the three variants will work) - This variable where fieldname is the name of a field from the source data entity will be replaced with the field value.
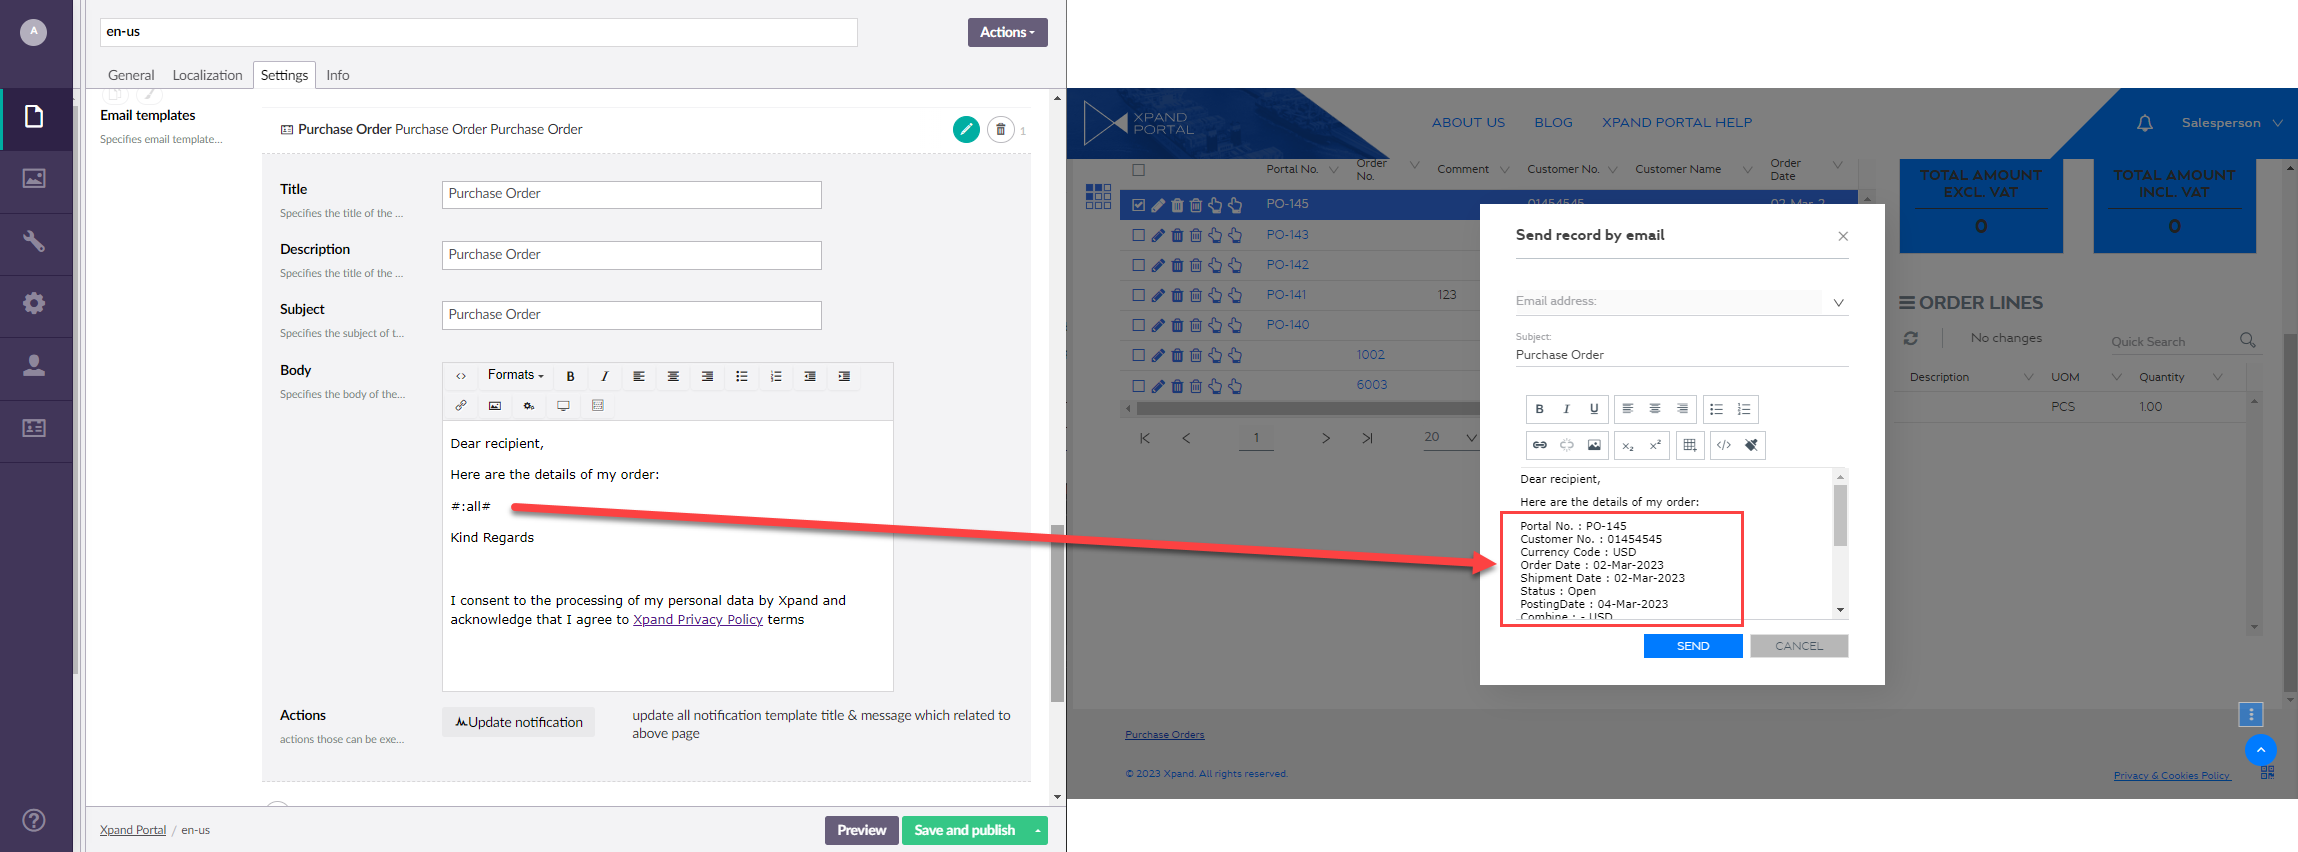
- [[all]] or #=all# or #:all# (any of the three variants will work) - This variable will be replaced with the list of all record fields (in the format Field Caption : Field Value) that are visible for the member's role according to the page permissions and have value (i.e. not empty). For example:
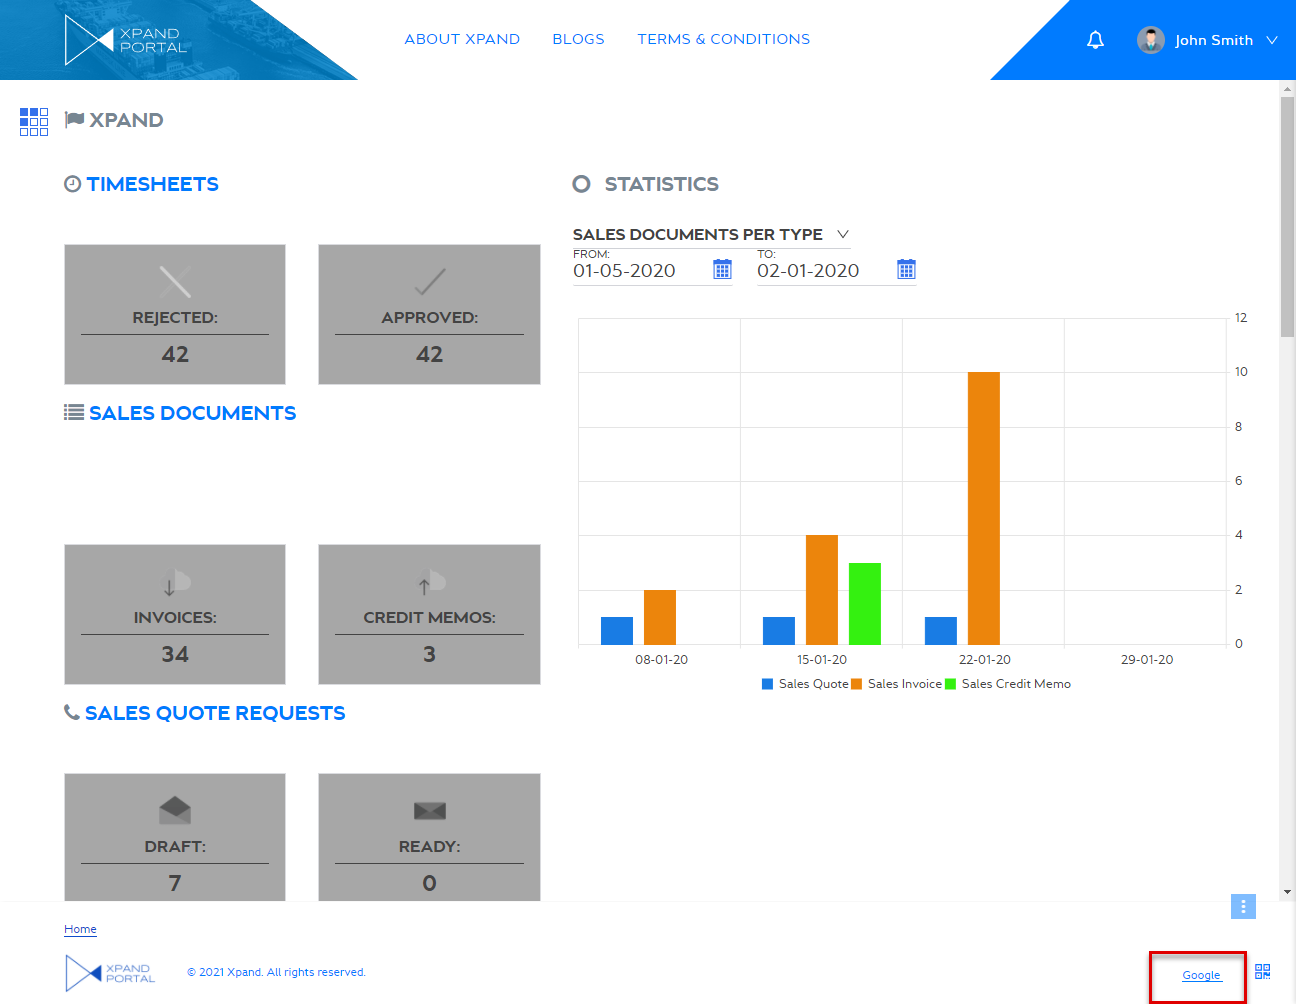
- Additional settings - Here you can configure additional settings for various features on the site. For example, you may need to specify an app ID or an app key for a feature. The availability of settings depends on the implemented features. You can configure several additional settings if necessary. Select the icon to add an additional feature setting:
- Additional setting name - Specifies the name of the additional feature setting for which you need to specify value in the Value field. Select one of the available feature settings from the list.
- Value - Specifies the value for the selected feature settings. You may need to enter, for example, the app ID, the app key, etc., depending on the additional setting type.
- Comment - Specifies a comment for the feature setting.
- Account Page - Specifies the direct link to the account page. This setting is optional.
- Site notification subscription entities - Here you can link available portal grids to portal entities, which is, for example, necessary for Search pages. Also, for each entity, you can set up the default notification and email templates, which are used in the Notifications functionality. Select
- Select Save and publish to save the changes and publish them on the front end. Optionally, if you were editing the page, you can select Save and preview to preview how the page will look like on the front end.